I also asked my students to document their experience by creating a video using the iPad’s camera. Through this process, students became more than just leaners. They were storytellers, experts and teachers. The video also allowed them to not only practice their pronunciation of some of the bones, but also provides an opportunity to verbally communicate their understanding.
Students used either iMovie or Cute Cut Pro to edit the their video. Students added titles, which served as labels. I also required them to add transitions and voice overs (when necessary) in addition to trimming their video clips.
While I have been doing video-making, storytelling, and other types of creative projects for the past three years, this was my first time using augmented reality. Here are some things I took note of after finishing the project.
- Make sure and allow enough time for students to complete the project without feeling rushed. Not surprisingly, the first group of students to finish the Skeleton 4-D assignment left out several requirements because they were trying to finish too quickly. Based on my experiences helping other teachers with video projects, students need more than two days to complete an assignment of this magnitude.
- Strongly encourage students to take advantage of all the app features at their disposal. For this particular activity, many students didn’t provide a variation of angles or zoom levels, which is one of the cool things that you can do using augmented reality. Instead students provided one view — the same angle — during the entirety of the project.
- Remind students to “keep the main thing, the main thing.” Many students want to infuse their personality and creativity into the project, which I highly encourage. But some focus all of their attention on trying to add sense of humor to their project while not addressing some the key assigned elements. For example, one group focused more on putting together their blooper reel than actually providing a thorough tour of the human skeleton.
- Ask students to constantly check, re-check and revise their work. For example, during the editing process, users are able to adjust volume levels or add audio. Several groups turned in projects where audio levels were too low, or where the speech was unclear or cut off. When students tell me they are done, I ask them to watch their video project one more time and check to see if anything is missing or needs to be fixed. After this final check, students uploaded their videos to Google Drive and share them with me.
I might make some changes next time around. Instead of using a video-making app, I’m thinking of using an app like Book Creator to accompany the augmented reality piece. I’ll have students take screenshots (using their iPads) of the various bones and then add the pictures to different pages on Book Creator. From there, students can add voice and even scribble on the pages. Once they are finished, they can convert their project into a video, or submit it as a PDF if there is no audio.
Physical human systems models can be quite expensive. Using augmented reality is a cost-effective way for students to examine body systems in the classroom. Although the video-making apps mentioned do incur a cost, the Anatomy 4-D app and the sheet of paper that brings the augmented image to life are both free and don’t require WiFi.

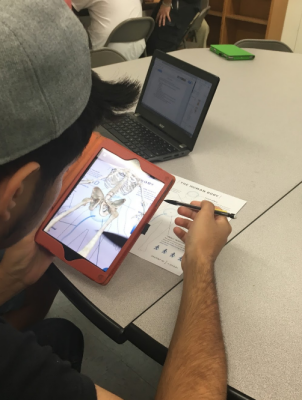 The augmented visual doesn’t move, unless you rotate the sheet of paper projecting it, so as students walked around the visual, with their iPads serving as the lens, they got to see the skeleton from different angles, which allowed them to focus on specifics bones.