All-American Dessert Recipe: Classic Apple Pie for Thanksgiving
It's not Thanksgiving without apple pie. Stephanie Rosenbaum Klassen shares step-by-step instructions for this holiday classic, better than you've ever made before.
Be gone, Mrs. Smith! A frozen pie may fill your pie-hole any other day of the year. But for Thanksgiving, on this celebratory day of gratitude, as close as we get to a ritual harvest festival, make a real pie. Yes, from scratch. Because, with our step-by-step approach, you can turn apples, sugar, flour, butter, and spices into a better pie that you or your friends have ever tasted, much less made.
So, let us begin. The first step, before you pick up a measuring cup, is to clear your mind. Are you stressed out by family demands? Worried about getting it all right? Put all this out of your head. A perfect turkey, a perfect pie, the most splendid gravy in the universe cannot ensure family harmony, just as even a sorry stuffing won't, by its underseasoned blandness or wayward lumpiness, ruin the day. (Not that you should settle for bad stuffing, not with Kim Laidlaw's fine Sage and Chestnut Stuffing recipe available here on this very blog.)
All too often, it seems, we placate our fears by obsessing over the minutia of kitchen work. Brine or dry rub? Breast up, breast down? Deep-fried or smoked? Should there been mac and cheese, and is adding brown butter and pumpkin brilliance or heresy? Here's what I can tell you, courtesy of years of writing Thanksgiving cooking advice: it is easier to worry about turkey, or cranberry sauce, or the flakiness of your pie crust than it is to be in the moment, with no distractions from the clamor of your own emotions, the ringing of your own wishful, overflowing, bruised or fearful heart.
Keep it in mind, then, as you seek to control in the kitchen what you may not be able to conquer in the dining room. More to the point, take heed of Fergus Henderson, chef and author of The Complete Nose to Tail, who advises, “Do not be afraid of cooking, as your ingredients will know, and misbehave." So, now that you're happy, and focused, and not leaning all the weight of your perfect-holiday expectations on one frangible crust, let's bake!
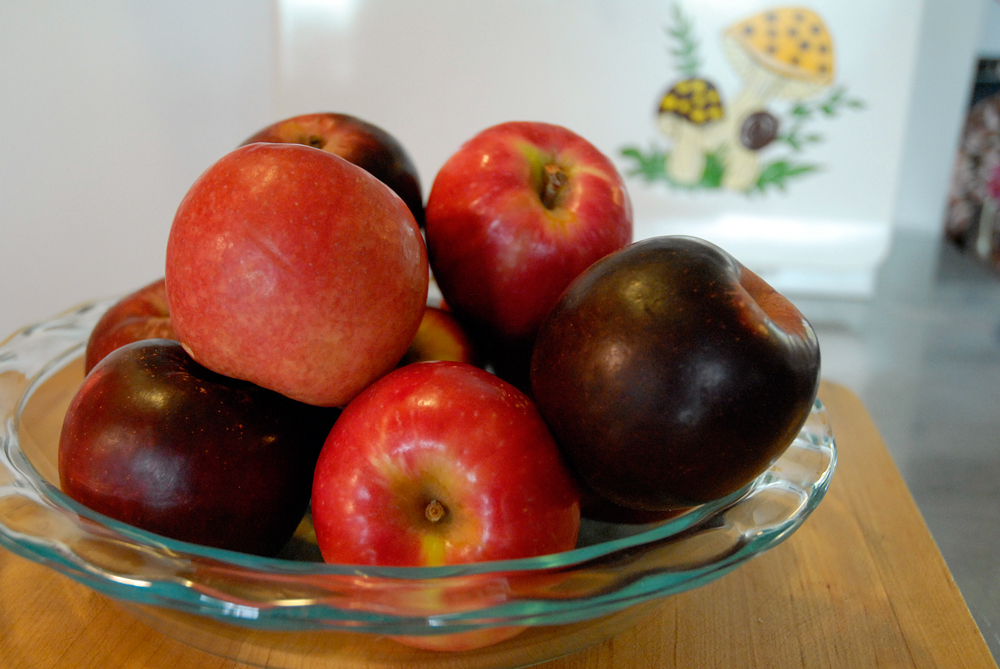
First, the apples. I like farmers' market apples, where you can be sure of getting this season's fruit, still tangy and snappy-crunchy. You want apples with some complexity and density to them. Fujis and Galas are too sweet and too full of juice--they'll make a wet pie that's closer to applesauce. Granny Smiths are the opposite: too hard, too tart. I like to use a mix of whatever looks good. This pie was made with a combination of Black Twig and Pink Ladies, but Pippins, Jonagolds, Russets, Romes, and/or Braeburns would also work well.
Apples: Black Twig and Pink Ladies. Photo: Wendy Goodfriend
The crust is easiest to handle if you let it chill before rolling, so it's wise to get your dough mixed before you start on the filling. Put your butter--preferably, a high-fat, European-style butter like Straus Family Creamery European-Style Organic Butter or Plugra--in the freezer to chill. You want it very cold and firm but not actually frozen.
Measure the full amount of cold water and vinegar into a glass (or see-through plastic) wet measuring cup. Add a handful of ice cubes. Measure your flour by dipping a dry-measure cup into the flour, then sweeping off the excess with the flat side of a knife. Don't pack it, don't shake it! Whisk the sugar and salt into the flour.
Using the coarse holes on a box grater, grate in the butter. Grating transforms the butter into thin, near-translucent curls. Once you've lightly but thoroughly mixed them into the flour, carefully breaking up any butter clumps, you're almost done. The texture will be nubbly-perfect, and you'll hardly have touched it.
Quickly pour in about half your ice water (not including the cubes). Using a wooden spoon or a large fork, gently and quickly mix the water into the flour. Drizzle in remaining water as needed over any dry patches, about a tablespoon at a time. If you are using high-fat butter, which has a lower water content, you'll probably need more water than if you're using a regular supermarket brand. Stop when a handful of dough will just hold together when squeezed. A little crumbly is fine; it will get moister as it chills.
If you have time, it's a good idea to chill your dough before you roll it out. It's not crucial; I've gone straight from mixing to rolling to baking on occasion, and it worked just fine. However, chilling lets the butter firm up again before you roll, and cold butter leads to a flakier crust. Also, cold dough is less likely to turn into a a sticky, recalcitrant dough-child that flings itself face down onto the counter and refuses to come up without tearing once you start rolling.
Divide your dough into equal parts. Scoop the dough into two resealable plastic bags. Flatten each into a round, squeezing out any remaining air from the bag, and seal. Chill the dough for an hour in the freezer or 2 hours in the refrigerator. The dough can also be refrigerated for 1-2 days ahead of baking.
Lightly sprinkle a large, clean work surface with flour. Rub a light coating of flour on your rolling pin. Take 1 bag of dough out the freezer or fridge, remove its bag, and pat the dough into a roughly symmetrical round. Roll from the middle out to the edges, using the equal amounts of pressure as you go. After every few rolls, pick the dough up from the counter and revolve it a quarter turn. This helps keep the dough from sticking to your work surface. If it seems like it's sticking, loosen with a spatula, then sprinkle a little more flour underneath. Imagine you're rolling sun rays all the way around from the center of the dough.
If the dough keeps sticking to the rolling pin and/or counter, try rolling it out between two sheets of plastic wrap, waxed paper, or parchment paper. You can also sprinkle a small amount of flour over the dough, but be stingy.
Once you’ve got a nice, more-or-less round of evenly rolled dough, lift it into your pie pan. Press it gently into the pan. You should have about an inch of dough hanging over the edge; trim off any excess. Fold the extra dough inwards (towards the middle of the pie) to make a sort of flattened mesa or bulwark. Wrap the whole crust loosely in plastic wrap or waxed paper and return it to the fridge to chill while you make the filling.
Peel, core, and slice your apples. Toss with sugar, salt, and spices. Let stand for about 10 minutes, until there is a puddle of liquid at the bottom of the bowl. Pour the liquid into a small pan and boil, watching carefully, until it has cooked down to the consistency of maple syrup. Pour back into the bowl of apples. Sprinkle with flour and mix thoroughly.
Preheat the oven to 400ºF. Take the second bag out of the fridge, remove and roll like you did the first crust. When your large round of top crust is ready, take the bottom-crust-lined pie pan out of the fridge. Scoop your filling into the bottom crust. Drape the top crust over the filling, and trim off any extra so you have about 1/2 inch hanging over the edges. Tuck the excess crust under, pressing to join it to the bottom crust, making a thicker mesa/ridge this time.
You're almost done, but not yet. Crimping--making a decorative edge around the crust--is the artistic part of pie-shaping, and there are many, many ways to do this. I like to gently pinch the edge between the thumb and forefinger of each hand. You move up with the left hand, down with the right, going neatly all the way around the pie until the whole thing has been crimped. The main thing is do something, even if it’s just a plain or rolled ridge of dough along the edge. A good crimp will both keep any excess filling from spilling out and to make the pie look nice and finished. Too many pies just sort of peter out at the edges, with no definition--no, no, no. Define your boundaries, even if you're just flattening the two layers of dough together with fork tines.
To make the pastry leaves shown here, gather together your extra pastry scraps and roll out. Using a small, sharp knife, cut 4 or 5 leaf-shaped ovals. To make the leaf "veins," use the knife to mark a line down the center of each oval, then mark matching diagonal lines on either side. Be careful not to cut all the way through the pastry. Arrange the pastry leaves on the center of the top crust. You can also add "berries" by rolling a few small balls of dough and adding them where the leaves come together at the center. Using a sharp knife, slash top crust in several places to let steam escape.
If you want a little shine on your crust, brush with milk or half-and-half. Use a clean pastry brush if you have one (i.e., not the one you use to baste the turkey, which will be all clotted and stuck together with grease). If you're light-handed and very quick, you can dip your fingertips in the cream and brush it like that. You don't need to get into every crimp; just concentrate on the top dome.
Place your pie on a baking sheet. Bake for 45 to 60 minutes. Cover the edges with foil or a pie shield if they seem to getting too brown. The filling should be bubbling gently; sticky pie juices may drip out (hence the baking sheet). The apples within should be tender but not cooked to mush, and most importantly, the crust must be brown--distinctly golden on top, toasty around the edges. Having recently been a judge at CUESA's Pie Contest, sharing the duties at my table with professional bakers from Knead Patisserie and 3 Babes Bakeshop, we saw, with disappointment, so many sadly underbaked crusts. If you're using a clear Pyrex pan, look at that bottom crust, and look for gold, not platinum. A pallid crust is a soft, dull crust. Don't be nervous.
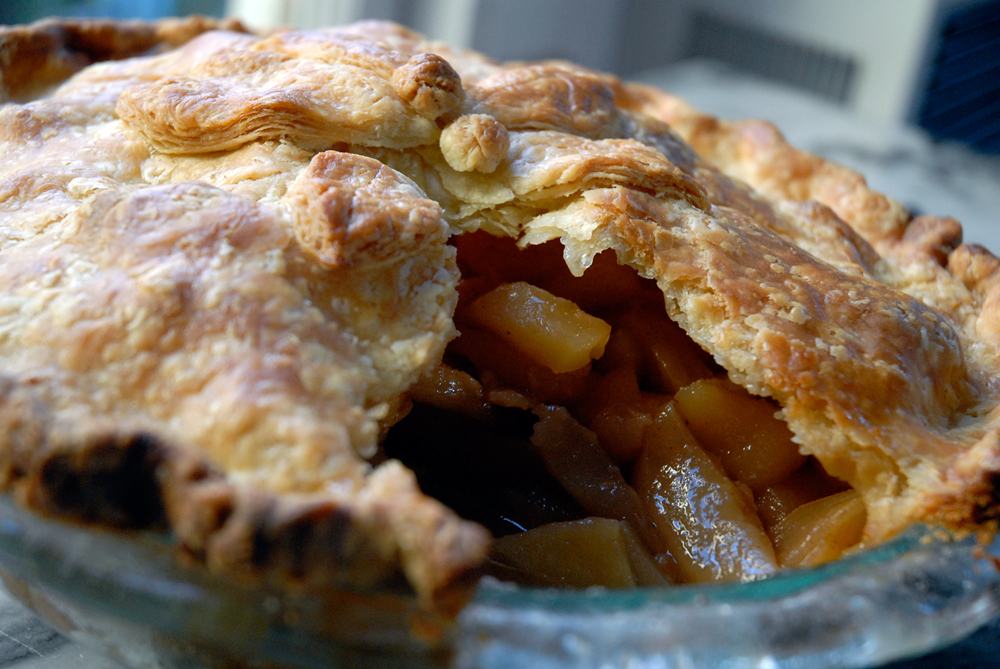
Take it out, put it on a cooling rack, and walk away. It may seem lovely to launch right into your hot-from-the-oven pie, but like turkey, pie needs time to collect itself. A hot pie is a runny, runny pie. You will cut the first piece and wonder how you went so wrong as all the juices in the pie gush to fill the slice-shaped hole. But, let the pie sit for a couple of hours, til it's on the room temperature side of warm, and your patience will be rewarded: crisp, almost-shattering crust, melting apples, just enough cinnamon-fragrant juice to prove that no gelatinous glop went into the making of your perfect pie.
An interior view of the Classic Apple Pie. Photo: Wendy Goodfriend
Recipe: Classic Apple Pie
Personally, I love an apple pie with raisins in it, but I know this is a minority view. You could add dried cranberries, though, or even a handful of fresh ones, in which case you may want to bump up the sugar a little, since fresh cranberries are quite sour.
Makes 1 pie
Ingredients:
Crust:
2 1/2 cups all-purpose flour
1 1/2 tablespoons sugar
1/2 teaspoon salt
8 oz (16 tablespoons/2 sticks) butter, preferably a high-fat, European style butter, chilled until very cold
6-8 tablespoons ice water
2 tsp apple cider vinegar
Filling:
3 lbs apples, 8-10 apples, depending on size
1/2 cup granulated sugar
1 tsp cinnamon
1/4 tsp freshly grated nutmeg
generous pinch of allspice
1/4 tsp salt
1 1/2 tablespoons flour
For Shine on Crust:
1 tbsp milk or half-or-half, optional
Instructions:
1. To make the pie crust, pour water and vinegar into a glass measuring cup. Add a handful of ice cubes, and set aside.
2. Mix flour, sugar, and salt in a large bowl. Using the large holes on a box grater, grate the butter into the flour. Toss lightly to coat butter curls with flour.
3. Pour half the water (not the cubes) into flour mixture. Stir gently with a wooden spoon to moisten the flour. Drizzle in remaining water (you may not need all of it) a tablespoon at a time, stirring gently, until you can just squeeze together a handful of dough. Stop adding water while dough is still slightly crumbly.
4. Flatten dough into two rounds and seal in a resealable plastic bag. Chill in freezer for 1 hour or in the refrigerator for 2 hours.
5. Sprinkle a work surface with flour. Using a lightly floured rolling pin, roll out the first dough round, moving from the center to the edges. After every 2-3 rolls, pick up the dough and rotate it a quarter turn to keep it from sticking to the counter.
6. Once dough is rolled evenly into a round about 2″ bigger than your pie plate, lift it up and drape it over the pie plate. Press gently into the pan.
7. Fold excess dough inwards to make an even ridge. Wrap loosely in plastic wrap and chill until needed.
8. To make the filling, peel, core, and slice the apples. Toss with sugar, spices, and salt. Let sit for 10 minutes.
9. Pour accumulated liquid from apples into a small saucepan. Bring to a boil and cook, watching carefully, until liquid has reduced down to the consistency of maple syrup. Remove from heat and pour over apples. Sprinkle on flour and mix thoroughly.
10. Preheat oven to 400ºF. Remove second dough round from the fridge and roll out as above. Remove crust-lined pan from the fridge. Scoop filling into pan. Drape top crust over filling. Fold extra dough under to form a ridge around the edge of the pan. Crimp edges together. Brush lightly with milk or half-and-half, if desired. Using a sharp knife, slash top crust in several places to let steam escape.
11. Place pie on a baking sheet and bake for 45-60 minutes, covering edges with foil if they brown too fast.
12. When pie is done, remove from oven and let cool on a rack for at least 2 hours before cutting.
lower waypointnext waypoint
Player sponsored by
window.__IS_SSR__=true
window.__INITIAL_STATE__={
"attachmentsReducer": {
"audio_0": {
"type": "attachments",
"id": "audio_0",
"imgSizes": {
"kqedFullSize": {
"file": "https://ww2.kqed.org/news/wp-content/themes/KQED-unified/img/audio_bgs/background0.jpg"
}
}
},
"audio_1": {
"type": "attachments",
"id": "audio_1",
"imgSizes": {
"kqedFullSize": {
"file": "https://ww2.kqed.org/news/wp-content/themes/KQED-unified/img/audio_bgs/background1.jpg"
}
}
},
"audio_2": {
"type": "attachments",
"id": "audio_2",
"imgSizes": {
"kqedFullSize": {
"file": "https://ww2.kqed.org/news/wp-content/themes/KQED-unified/img/audio_bgs/background2.jpg"
}
}
},
"audio_3": {
"type": "attachments",
"id": "audio_3",
"imgSizes": {
"kqedFullSize": {
"file": "https://ww2.kqed.org/news/wp-content/themes/KQED-unified/img/audio_bgs/background3.jpg"
}
}
},
"audio_4": {
"type": "attachments",
"id": "audio_4",
"imgSizes": {
"kqedFullSize": {
"file": "https://ww2.kqed.org/news/wp-content/themes/KQED-unified/img/audio_bgs/background4.jpg"
}
}
},
"placeholder": {
"type": "attachments",
"id": "placeholder",
"imgSizes": {
"thumbnail": {
"file": "https://cdn.kqed.org/wp-content/uploads/2024/12/KQED-Default-Image-816638274-2000x1333-1-160x107.jpg",
"width": 160,
"height": 107,
"mimeType": "image/jpeg"
},
"medium": {
"file": "https://cdn.kqed.org/wp-content/uploads/2024/12/KQED-Default-Image-816638274-2000x1333-1-800x533.jpg",
"width": 800,
"height": 533,
"mimeType": "image/jpeg"
},
"medium_large": {
"file": "https://cdn.kqed.org/wp-content/uploads/2024/12/KQED-Default-Image-816638274-2000x1333-1-768x512.jpg",
"width": 768,
"height": 512,
"mimeType": "image/jpeg"
},
"large": {
"file": "https://cdn.kqed.org/wp-content/uploads/2024/12/KQED-Default-Image-816638274-2000x1333-1-1020x680.jpg",
"width": 1020,
"height": 680,
"mimeType": "image/jpeg"
},
"1536x1536": {
"file": "https://cdn.kqed.org/wp-content/uploads/2024/12/KQED-Default-Image-816638274-2000x1333-1-1536x1024.jpg",
"width": 1536,
"height": 1024,
"mimeType": "image/jpeg"
},
"fd-lrg": {
"file": "https://cdn.kqed.org/wp-content/uploads/2024/12/KQED-Default-Image-816638274-2000x1333-1-1536x1024.jpg",
"width": 1536,
"height": 1024,
"mimeType": "image/jpeg"
},
"fd-med": {
"file": "https://cdn.kqed.org/wp-content/uploads/2024/12/KQED-Default-Image-816638274-2000x1333-1-1020x680.jpg",
"width": 1020,
"height": 680,
"mimeType": "image/jpeg"
},
"fd-sm": {
"file": "https://cdn.kqed.org/wp-content/uploads/2024/12/KQED-Default-Image-816638274-2000x1333-1-800x533.jpg",
"width": 800,
"height": 533,
"mimeType": "image/jpeg"
},
"post-thumbnail": {
"file": "https://cdn.kqed.org/wp-content/uploads/2024/12/KQED-Default-Image-816638274-2000x1333-1-672x372.jpg",
"width": 672,
"height": 372,
"mimeType": "image/jpeg"
},
"twentyfourteen-full-width": {
"file": "https://cdn.kqed.org/wp-content/uploads/2024/12/KQED-Default-Image-816638274-2000x1333-1-1038x576.jpg",
"width": 1038,
"height": 576,
"mimeType": "image/jpeg"
},
"xxsmall": {
"file": "https://cdn.kqed.org/wp-content/uploads/2024/12/KQED-Default-Image-816638274-2000x1333-1-160x107.jpg",
"width": 160,
"height": 107,
"mimeType": "image/jpeg"
},
"xsmall": {
"file": "https://cdn.kqed.org/wp-content/uploads/2024/12/KQED-Default-Image-816638274-2000x1333-1-672x372.jpg",
"width": 672,
"height": 372,
"mimeType": "image/jpeg"
},
"small": {
"file": "https://cdn.kqed.org/wp-content/uploads/2024/12/KQED-Default-Image-816638274-2000x1333-1-672x372.jpg",
"width": 672,
"height": 372,
"mimeType": "image/jpeg"
},
"xlarge": {
"file": "https://cdn.kqed.org/wp-content/uploads/2024/12/KQED-Default-Image-816638274-2000x1333-1-1020x680.jpg",
"width": 1020,
"height": 680,
"mimeType": "image/jpeg"
},
"full-width": {
"file": "https://cdn.kqed.org/wp-content/uploads/2024/12/KQED-Default-Image-816638274-2000x1333-1-1920x1280.jpg",
"width": 1920,
"height": 1280,
"mimeType": "image/jpeg"
},
"guest-author-32": {
"file": "https://cdn.kqed.org/wp-content/uploads/2025/01/KQED-Default-Image-816638274-1333x1333-1-160x160.jpg",
"width": 32,
"height": 32,
"mimeType": "image/jpeg"
},
"guest-author-50": {
"file": "https://cdn.kqed.org/wp-content/uploads/2025/01/KQED-Default-Image-816638274-1333x1333-1-160x160.jpg",
"width": 50,
"height": 50,
"mimeType": "image/jpeg"
},
"guest-author-64": {
"file": "https://cdn.kqed.org/wp-content/uploads/2025/01/KQED-Default-Image-816638274-1333x1333-1-160x160.jpg",
"width": 64,
"height": 64,
"mimeType": "image/jpeg"
},
"guest-author-96": {
"file": "https://cdn.kqed.org/wp-content/uploads/2025/01/KQED-Default-Image-816638274-1333x1333-1-160x160.jpg",
"width": 96,
"height": 96,
"mimeType": "image/jpeg"
},
"guest-author-128": {
"file": "https://cdn.kqed.org/wp-content/uploads/2025/01/KQED-Default-Image-816638274-1333x1333-1-160x160.jpg",
"width": 128,
"height": 128,
"mimeType": "image/jpeg"
},
"detail": {
"file": "https://cdn.kqed.org/wp-content/uploads/2025/01/KQED-Default-Image-816638274-1333x1333-1-160x160.jpg",
"width": 160,
"height": 160,
"mimeType": "image/jpeg"
},
"kqedFullSize": {
"file": "https://cdn.kqed.org/wp-content/uploads/2024/12/KQED-Default-Image-816638274-2000x1333-1.jpg",
"width": 2000,
"height": 1333
}
}
},
"bayareabites_74614": {
"type": "attachments",
"id": "bayareabites_74614",
"meta": {
"index": "attachments_1716263798",
"site": "bayareabites",
"id": "74614",
"found": true
},
"parent": 74069,
"imgSizes": {
"kqedFullSize": {
"file": "https://ww2.kqed.org/app/uploads/sites/24/2013/11/apple-final1000640x360.jpg",
"width": 640,
"height": 360
}
},
"publishDate": 1385523794,
"modified": 1385523794,
"caption": null,
"description": null,
"title": "apple-final1000640x360",
"credit": null,
"status": "inherit",
"isLoading": false,
"fetchFailed": false
}
},
"audioPlayerReducer": {
"postId": "stream_live",
"isPaused": true,
"isPlaying": false,
"pfsActive": false,
"pledgeModalIsOpen": true,
"playerDrawerIsOpen": false,
"liveAudioPlayStartedAt": 0,
"liveAudioPlayContext": ""
},
"authorsReducer": {
"wendy-goodfriend": {
"type": "authors",
"id": "5014",
"meta": {
"index": "authors_1716337520",
"id": "5014",
"found": true
},
"name": "Wendy Goodfriend",
"firstName": "Wendy",
"lastName": "Goodfriend",
"slug": "wendy-goodfriend",
"email": "wendy@wendygoodfriend.com",
"display_author_email": false,
"staff_mastheads": [],
"title": "KQED Contributor",
"bio": "I was the Senior Digital Producer for KQED Food up until July, 2018. Since 2001, I designed, produced, managed and contributed to mostly food-related websites and blogs for KQED including: KQED.org; KQED Food; Bay Area Bites; Check, Please! Bay Area; Taste This; Celebrity Chefs; seven of Jacques Pepin's TV series websites; and Joanne Weir's Cooking in the City. I initiated the majority of KQED Food's social media feeds and maintained them up until 2017. As far as content creation, photography is my passion and I also shoot video and write stories. My photos have been used in articles for KQED Food, News, Arts, and Science as well as for promotional purposes in print and online. Professional education and training includes: clinical psychology, photography, commercial cooking, web design, information architecture and UX.",
"avatar": "https://secure.gravatar.com/avatar/dfba64372339cc34cf17e446e6f18fa8?s=600&d=blank&r=g",
"twitter": null,
"facebook": "bayareabites",
"instagram": null,
"linkedin": "wendygoodfriend",
"sites": [
{
"site": "jpepinheart",
"roles": []
},
{
"site": "about",
"roles": [
"editor"
]
},
{
"site": "bayareabites",
"roles": [
"subscriber"
]
},
{
"site": "science",
"roles": [
"administrator"
]
},
{
"site": "checkplease",
"roles": [
"subscriber"
]
},
{
"site": "food",
"roles": [
"author"
]
},
{
"site": "essentialpepin",
"roles": [
"administrator"
]
}
],
"headData": {
"title": "Wendy Goodfriend | KQED",
"description": "KQED Contributor",
"ogImgSrc": "https://secure.gravatar.com/avatar/dfba64372339cc34cf17e446e6f18fa8?s=600&d=blank&r=g",
"twImgSrc": "https://secure.gravatar.com/avatar/dfba64372339cc34cf17e446e6f18fa8?s=600&d=blank&r=g"
},
"isLoading": false,
"link": "/author/wendy-goodfriend"
},
"stephanie-rosenbaum": {
"type": "authors",
"id": "5038",
"meta": {
"index": "authors_1716337520",
"id": "5038",
"found": true
},
"name": "Stephanie Rosenbaum Klassen",
"firstName": "Stephanie",
"lastName": "Rosenbaum Klassen",
"slug": "stephanie-rosenbaum",
"email": "dixieday@aol.com",
"display_author_email": false,
"staff_mastheads": [],
"title": null,
"bio": "Stephanie Rosenbaum Klassen is a longtime local food writer, author, and cook. Her books include The Art of Vintage Cocktails (Egg & Dart Press), World of Doughnuts (Egg & Dart Press); Kids in the Kitchen: Fun Food (Williams Sonoma); Honey from Flower to Table (Chronicle Books) and The Astrology Cookbook: A Cosmic Guide to Feasts of Love (Manic D Press). She has studied organic farming at UCSC and holds a certificate in Ecological Horticulture from the Center for Agroecology and Sustainable Food Systems. She does frequent cooking demonstrations at local farmers’ markets and has taught food writing at Media Alliance in San Francisco and the Continuing Education program at Stanford University. She has been the lead restaurant critic for the San Francisco Bay Guardian as well as for San Francisco magazine. She has been an assistant chef at the Headlands Center for the Arts, an artists' residency program located in the Marin Headlands, and a production cook at the Marin Sun Farms Cafe in Pt Reyes Station. After some 20 years in San Francisco interspersed with stints in Oakland, Santa Cruz, Brooklyn, and Manhattan, she recently moved to Sonoma county but still writes in San Francisco several days a week.",
"avatar": "https://secure.gravatar.com/avatar/46bf004da7b42de11bfd2b1614ecadcf?s=600&d=blank&r=g",
"twitter": "sjrosenbaum",
"facebook": null,
"instagram": null,
"linkedin": null,
"sites": [
{
"site": "bayareabites",
"roles": [
"author"
]
},
{
"site": "food",
"roles": [
"contributor"
]
}
],
"headData": {
"title": "Stephanie Rosenbaum Klassen | KQED",
"description": null,
"ogImgSrc": "https://secure.gravatar.com/avatar/46bf004da7b42de11bfd2b1614ecadcf?s=600&d=blank&r=g",
"twImgSrc": "https://secure.gravatar.com/avatar/46bf004da7b42de11bfd2b1614ecadcf?s=600&d=blank&r=g"
},
"isLoading": false,
"link": "/author/stephanie-rosenbaum"
}
},
"pagesReducer": {},
"pfsSessionReducer": {},
"postsReducer": {
"stream_live": {
"type": "live",
"id": "stream_live",
"audioUrl": "https://streams.kqed.org/kqedradio",
"title": "Live Stream",
"excerpt": "Live Stream information currently unavailable.",
"link": "/radio",
"featImg": "",
"label": {
"name": "KQED Live",
"link": "/"
}
},
"stream_kqedNewscast": {
"type": "posts",
"id": "stream_kqedNewscast",
"audioUrl": "https://www.kqed.org/.stream/anon/radio/RDnews/newscast.mp3?_=1",
"title": "KQED Newscast",
"featImg": "",
"label": {
"name": "88.5 FM",
"link": "/"
}
},
"bayareabites_74069": {
"type": "posts",
"id": "bayareabites_74069",
"meta": {
"index": "posts_1716263798",
"site": "bayareabites",
"id": "74069",
"found": true
},
"articlePosition": 0,
"parent": 0,
"labelTerm": {
"site": "bayareabites",
"term": 15012
},
"blocks": [],
"publishDate": 1385587408,
"format": "aside",
"disqusTitle": "All-American Dessert Recipe: Classic Apple Pie for Thanksgiving",
"title": "All-American Dessert Recipe: Classic Apple Pie for Thanksgiving",
"headTitle": "Thanksgiving Recipes | Bay Area Bites | KQED Food",
"content": "\u003cfigure id=\"attachment_74575\" class=\"wp-caption aligncenter\" style=\"max-width: 1000px\">\u003ca href=\"http://ww2.kqed.org/bayareabites/wp-content/uploads/sites/24/2013/11/apple-final1000a.jpg\">\u003cimg class=\"size-full wp-image-74575\" src=\"http://ww2.kqed.org/bayareabites/wp-content/uploads/sites/24/2013/11/apple-final1000a.jpg\" alt=\"Classic Apple Pie. Photo: Wendy Goodfriend\" width=\"1000\" height=\"669\">\u003c/a>\u003cfigcaption class=\"wp-caption-text\">Classic Apple Pie. Photo: Wendy Goodfriend\u003c/figcaption>\u003c/figure>\n\u003cp>All Photos: \u003ca href=\"http://ww2.kqed.org/bayareabites/author/wendy-goodfriend/\">Wendy Goodfriend\u003c/a>\u003c/p>\n\u003cp>Be gone, Mrs. Smith! A frozen pie may fill your pie-hole any other day of the year. But for Thanksgiving, on this celebratory day of gratitude, as close as we get to a ritual harvest festival, make a real pie. Yes, from scratch. Because, with our step-by-step approach, you can turn apples, sugar, flour, butter, and spices into a better pie that you or your friends have ever tasted, much less made.\u003c/p>\n\u003cp>So, let us begin. The first step, before you pick up a measuring cup, is to clear your mind. Are you stressed out by family demands? Worried about getting it all right? Put all this out of your head. A perfect turkey, a perfect pie, the most splendid gravy in the universe cannot ensure family harmony, just as even a sorry stuffing won't, by its underseasoned blandness or wayward lumpiness, ruin the day. (Not that you should settle for bad stuffing, not with Kim Laidlaw's fine \u003ca href=\"http://ww2.kqed.org/bayareabites/2013/11/23/thanksgiving-recipe-an-elevated-version-of-classic-sage-and-chestnut-stuffing/\">Sage and Chestnut Stuffing\u003c/a> recipe available here on this very blog.)\u003c/p>\n\u003cp>All too often, it seems, we placate our fears by obsessing over the minutia of kitchen work. Brine or dry rub? Breast up, breast down? Deep-fried or smoked? Should there been mac and cheese, and is adding \u003ca href=\"http://brokeassgourmet.com/articles/brown-butter-pumpkin-mac-and-cheese\">brown butter and pumpkin\u003c/a> brilliance or heresy? Here's what I can tell you, courtesy of years of writing Thanksgiving cooking advice: it is easier to worry about turkey, or cranberry sauce, or the flakiness of your pie crust than it is to be in the moment, with no distractions from the clamor of your own emotions, the ringing of your own wishful, overflowing, bruised or fearful heart.\u003c/p>\n\u003cp>Keep it in mind, then, as you seek to control in the kitchen what you may not be able to conquer in the dining room. More to the point, take heed of Fergus Henderson, chef and author of \u003ca href=\"http://www.amazon.com/exec/obidos/ASIN/0062282611/kqedorg-20\">The Complete Nose to Tail\u003c/a>, who advises, “Do not be afraid of cooking, as your ingredients will know, and misbehave.\" So, now that you're happy, and focused, and not leaning all the weight of your perfect-holiday expectations on one frangible crust, let's bake!\u003c/p>\n\u003cp>[ad fullwidth]\u003c/p>\n\u003cp>First, the apples. I like farmers' market apples, where you can be sure of getting this season's fruit, still tangy and snappy-crunchy. You want apples with some complexity and density to them. Fujis and Galas are too sweet and too full of juice--they'll make a wet pie that's closer to applesauce. Granny Smiths are the opposite: too hard, too tart. I like to use a mix of whatever looks good. This pie was made with a combination of Black Twig and Pink Ladies, but Pippins, Jonagolds, Russets, Romes, and/or Braeburns would also work well.\u003c/p>\n\u003cfigure id=\"attachment_74580\" class=\"wp-caption aligncenter\" style=\"max-width: 1000px\">\u003ca href=\"http://ww2.kqed.org/bayareabites/wp-content/uploads/sites/24/2013/11/apple-pie-apples1000.jpg\">\u003cimg class=\"size-full wp-image-74580\" src=\"http://ww2.kqed.org/bayareabites/wp-content/uploads/sites/24/2013/11/apple-pie-apples1000.jpg\" alt=\"Apples: Black Twig and Pink Ladies. Photo: Wendy Goodfriend\" width=\"1000\" height=\"669\">\u003c/a>\u003cfigcaption class=\"wp-caption-text\">Apples: Black Twig and Pink Ladies. Photo: Wendy Goodfriend\u003c/figcaption>\u003c/figure>\n\u003cp>The crust is easiest to handle if you let it chill before rolling, so it's wise to get your dough mixed before you start on the filling. Put your butter--preferably, a high-fat, European-style butter like \u003ca href=\"http://strausfamilycreamery.com/products/item/organic-sweet-butter\">Straus Family Creamery European-Style Organic Butter\u003c/a> or Plugra--in the freezer to chill. You want it very cold and firm but not actually frozen.\u003c/p>\n\u003cp>Measure the full amount of cold water and vinegar into a glass (or see-through plastic) wet measuring cup. Add a handful of ice cubes. Measure your flour by dipping a dry-measure cup into the flour, then sweeping off the excess with the flat side of a knife. Don't pack it, don't shake it! Whisk the sugar and salt into the flour.\u003c/p>\n\u003cp>Using the coarse holes on a box grater, grate in the butter. Grating transforms the butter into thin, near-translucent curls. Once you've lightly but thoroughly mixed them into the flour, carefully breaking up any butter clumps, you're almost done. The texture will be nubbly-perfect, and you'll hardly have touched it.\u003c/p>\n\u003cp>Quickly pour in about half your ice water (not including the cubes). Using a wooden spoon or a large fork, gently and quickly mix the water into the flour. Drizzle in remaining water as needed over any dry patches, about a tablespoon at a time. If you are using high-fat butter, which has a lower water content, you'll probably need more water than if you're using a regular supermarket brand. Stop when a handful of dough will just hold together when squeezed. A little crumbly is fine; it will get moister as it chills.\u003c/p>\n\u003cp>If you have time, it's a good idea to chill your dough before you roll it out. It's not crucial; I've gone straight from mixing to rolling to baking on occasion, and it worked just fine. However, chilling lets the butter firm up again before you roll, and cold butter leads to a flakier crust. Also, cold dough is less likely to turn into a a sticky, recalcitrant dough-child that flings itself face down onto the counter and refuses to come up without tearing once you start rolling.\u003c/p>\n\u003cp>Divide your dough into equal parts. Scoop the dough into two resealable plastic bags. Flatten each into a round, squeezing out any remaining air from the bag, and seal. Chill the dough for an hour in the freezer or 2 hours in the refrigerator. The dough can also be refrigerated for 1-2 days ahead of baking.\u003c/p>\n\u003cp>[gallery type=\"slideshow\" link=\"file\" ids=\"74348,74346,74345,74342,74343,74338,74339,74337,74336,74334,74603,74605,74608,74599,74597,74606,74594,74578,74582,74583,74592\"]\u003c/p>\n\u003cp>Lightly sprinkle a large, clean work surface with flour. Rub a light coating of flour on your rolling pin. Take 1 bag of dough out the freezer or fridge, remove its bag, and pat the dough into a roughly symmetrical round. Roll from the middle out to the edges, using the equal amounts of pressure as you go. After every few rolls, pick the dough up from the counter and revolve it a quarter turn. This helps keep the dough from sticking to your work surface. If it seems like it's sticking, loosen with a spatula, then sprinkle a little more flour underneath. Imagine you're rolling sun rays all the way around from the center of the dough.\u003c/p>\n\u003cp>If the dough keeps sticking to the rolling pin and/or counter, try rolling it out between two sheets of plastic wrap, waxed paper, or parchment paper. You can also sprinkle a small amount of flour over the dough, but be stingy.\u003c/p>\n\u003cp>Once you’ve got a nice, more-or-less round of evenly rolled dough, lift it into your pie pan. Press it gently into the pan. You should have about an inch of dough hanging over the edge; trim off any excess. Fold the extra dough inwards (towards the middle of the pie) to make a sort of flattened mesa or bulwark. Wrap the whole crust loosely in plastic wrap or waxed paper and return it to the fridge to chill while you make the filling.\u003c/p>\n\u003cp>Peel, core, and slice your apples. Toss with sugar, salt, and spices. Let stand for about 10 minutes, until there is a puddle of liquid at the bottom of the bowl. Pour the liquid into a small pan and boil, watching carefully, until it has cooked down to the consistency of maple syrup. Pour back into the bowl of apples. Sprinkle with flour and mix thoroughly.\u003c/p>\n\u003cp>Preheat the oven to 400ºF. Take the second bag out of the fridge, remove and roll like you did the first crust. When your large round of top crust is ready, take the bottom-crust-lined pie pan out of the fridge. Scoop your filling into the bottom crust. Drape the top crust over the filling, and trim off any extra so you have about 1/2 inch hanging over the edges. Tuck the excess crust under, pressing to join it to the bottom crust, making a thicker mesa/ridge this time.\u003c/p>\n\u003cp>[gallery type=\"slideshow\" link=\"file\" ids=\"74598,74607,74609,74587,74586,74602\"]\u003c/p>\n\u003cp>You're almost done, but not yet. Crimping--making a decorative edge around the crust--is the artistic part of pie-shaping, and there are many, many ways to do this. I like to gently pinch the edge between the thumb and forefinger of each hand. You move up with the left hand, down with the right, going neatly all the way around the pie until the whole thing has been crimped. The main thing is do something, even if it’s just a plain or rolled ridge of dough along the edge. A good crimp will both keep any excess filling from spilling out and to make the pie look nice and finished. Too many pies just sort of peter out at the edges, with no definition--no, no, no. Define your boundaries, even if you're just flattening the two layers of dough together with fork tines.\u003c/p>\n\u003cp>[gallery type=\"slideshow\" link=\"file\" ids=\"74589,74588,74610,74601,74595,74613\"]\u003c/p>\n\u003cp>To make the pastry leaves shown here, gather together your extra pastry scraps and roll out. Using a small, sharp knife, cut 4 or 5 leaf-shaped ovals. To make the leaf \"veins,\" use the knife to mark a line down the center of each oval, then mark matching diagonal lines on either side. Be careful not to cut all the way through the pastry. Arrange the pastry leaves on the center of the top crust. You can also add \"berries\" by rolling a few small balls of dough and adding them where the leaves come together at the center. Using a sharp knife, slash top crust in several places to let steam escape.\u003c/p>\n\u003cp>If you want a little shine on your crust, brush with milk or half-and-half. Use a clean pastry brush if you have one (i.e., not the one you use to baste the turkey, which will be all clotted and stuck together with grease). If you're light-handed and very quick, you can dip your fingertips in the cream and brush it like that. You don't need to get into every crimp; just concentrate on the top dome.\u003c/p>\n\u003cp>Place your pie on a baking sheet. Bake for 45 to 60 minutes. Cover the edges with foil or a pie shield if they seem to getting too brown. The filling should be bubbling gently; sticky pie juices may drip out (hence the baking sheet). The apples within should be tender but not cooked to mush, and most importantly, the crust must be brown--distinctly golden on top, toasty around the edges. Having recently been a judge at \u003ca href=\"http://www.cuesa.org/article/congratulations-pie-contest-winners\">CUESA's Pie Contest\u003c/a>, sharing the duties at my table with professional bakers from \u003ca href=\"http://www.kneadpatisserie.com/\">Knead Patisserie\u003c/a> and \u003ca href=\"http://threebabesbakeshop.com/\">3 Babes Bakeshop\u003c/a>, we saw, with disappointment, so many sadly underbaked crusts. If you're using a clear Pyrex pan, look at that bottom crust, and look for gold, not platinum. A pallid crust is a soft, dull crust. Don't be nervous.\u003c/p>\n\u003cp>Take it out, put it on a cooling rack, and walk away. It may seem lovely to launch right into your hot-from-the-oven pie, but like turkey, pie needs time to collect itself. A hot pie is a runny, runny pie. You will cut the first piece and wonder how you went so wrong as all the juices in the pie gush to fill the slice-shaped hole. But, let the pie sit for a couple of hours, til it's on the room temperature side of warm, and your patience will be rewarded: crisp, almost-shattering crust, melting apples, just enough cinnamon-fragrant juice to prove that no gelatinous glop went into the making of your perfect pie.\u003c/p>\n\u003cfigure id=\"attachment_74611\" class=\"wp-caption aligncenter\" style=\"max-width: 1000px\">\u003ca href=\"http://ww2.kqed.org/bayareabites/wp-content/uploads/sites/24/2013/11/apple1000-open.jpg\">\u003cimg class=\"size-full wp-image-74611\" src=\"http://ww2.kqed.org/bayareabites/wp-content/uploads/sites/24/2013/11/apple1000-open.jpg\" alt=\"An interior view of the Classic Apple Pie. Photo: Wendy Goodfriend\" width=\"1000\" height=\"669\">\u003c/a>\u003cfigcaption class=\"wp-caption-text\">An interior view of the Classic Apple Pie. Photo: Wendy Goodfriend\u003c/figcaption>\u003c/figure>\n\u003ch3>Recipe: Classic Apple Pie\u003c/h3>\n\u003cp>Personally, I love an apple pie with raisins in it, but I know this is a minority view. You could add dried cranberries, though, or even a handful of fresh ones, in which case you may want to bump up the sugar a little, since fresh cranberries are quite sour.\u003c/p>\n\u003cp>\u003cem>Makes 1 pie\u003c/em>\u003c/p>\n\u003cp>\u003cstrong>Ingredients:\u003c/strong>\u003c/p>\n\u003cp>\u003cstrong>Crust:\u003c/strong>\u003c/p>\n\u003cul>\n\u003cli>2 1/2 cups all-purpose flour\u003c/li>\n\u003cli>1 1/2 tablespoons sugar\u003c/li>\n\u003cli>1/2 teaspoon salt\u003c/li>\n\u003cli>8 oz (16 tablespoons/2 sticks) butter, preferably a high-fat, European style butter, chilled until very cold\u003c/li>\n\u003cli>6-8 tablespoons ice water\u003c/li>\n\u003cli>2 tsp apple cider vinegar\u003c/li>\n\u003c/ul>\n\u003cp>\u003cstrong>Filling:\u003c/strong>\u003c/p>\n\u003cul>\n\u003cli>3 lbs apples, 8-10 apples, depending on size\u003c/li>\n\u003cli>1/2 cup granulated sugar\u003c/li>\n\u003cli>1 tsp cinnamon\u003c/li>\n\u003cli>1/4 tsp freshly grated nutmeg\u003c/li>\n\u003cli>generous pinch of allspice\u003c/li>\n\u003cli>1/4 tsp salt\u003c/li>\n\u003cli>1 1/2 tablespoons flour\u003c/li>\n\u003c/ul>\n\u003cp>\u003cstrong>For Shine on Crust:\u003c/strong>\u003c/p>\n\u003cul>\n\u003cli>1 tbsp milk or half-or-half, optional\u003c/li>\n\u003c/ul>\n\u003cp>\u003cstrong>Instructions:\u003c/strong>\u003cbr>\n1. To make the pie crust, pour water and vinegar into a glass measuring cup. Add a handful of ice cubes, and set aside.\u003c/p>\n\u003cp>2. Mix flour, sugar, and salt in a large bowl. Using the large holes on a box grater, grate the butter into the flour. Toss lightly to coat butter curls with flour.\u003c/p>\n\u003cp>3. Pour half the water (not the cubes) into flour mixture. Stir gently with a wooden spoon to moisten the flour. Drizzle in remaining water (you may not need all of it) a tablespoon at a time, stirring gently, until you can just squeeze together a handful of dough. Stop adding water while dough is still slightly crumbly.\u003c/p>\n\u003cp>4. Flatten dough into two rounds and seal in a resealable plastic bag. Chill in freezer for 1 hour or in the refrigerator for 2 hours.\u003c/p>\n\u003cp>5. Sprinkle a work surface with flour. Using a lightly floured rolling pin, roll out the first dough round, moving from the center to the edges. After every 2-3 rolls, pick up the dough and rotate it a quarter turn to keep it from sticking to the counter.\u003c/p>\n\u003cp>6. Once dough is rolled evenly into a round about 2″ bigger than your pie plate, lift it up and drape it over the pie plate. Press gently into the pan.\u003c/p>\n\u003cp>7. Fold excess dough inwards to make an even ridge. Wrap loosely in plastic wrap and chill until needed.\u003c/p>\n\u003cp>8. To make the filling, peel, core, and slice the apples. Toss with sugar, spices, and salt. Let sit for 10 minutes.\u003c/p>\n\u003cp>9. Pour accumulated liquid from apples into a small saucepan. Bring to a boil and cook, watching carefully, until liquid has reduced down to the consistency of maple syrup. Remove from heat and pour over apples. Sprinkle on flour and mix thoroughly.\u003c/p>\n\u003cp>10. Preheat oven to 400ºF. Remove second dough round from the fridge and roll out as above. Remove crust-lined pan from the fridge. Scoop filling into pan. Drape top crust over filling. Fold extra dough under to form a ridge around the edge of the pan. Crimp edges together. Brush lightly with milk or half-and-half, if desired. Using a sharp knife, slash top crust in several places to let steam escape.\u003c/p>\n\u003cp>11. Place pie on a baking sheet and bake for 45-60 minutes, covering edges with foil if they brown too fast.\u003c/p>\n\u003cp>[ad floatright]\u003c/p>\n\u003cp>12. When pie is done, remove from oven and let cool on a rack for at least 2 hours before cutting.\u003c/p>\n\n",
"disqusIdentifier": "74069 http://blogs.kqed.org/bayareabites/?p=74069",
"disqusUrl": "https://ww2.kqed.org/bayareabites/2013/11/27/all-american-dessert-recipe-classic-apple-pie-for-thanksgiving/",
"stats": {
"hasVideo": false,
"hasChartOrMap": false,
"hasAudio": false,
"hasPolis": false,
"wordCount": 2570,
"hasGoogleForm": false,
"hasGallery": true,
"hasHearkenModule": false,
"iframeSrcs": [],
"paragraphCount": 45
},
"modified": 1571963362,
"excerpt": "It's not Thanksgiving without apple pie. Stephanie Rosenbaum Klassen shares step-by-step instructions for this holiday classic, better than you've ever made before. ",
"headData": {
"twImgId": "",
"twTitle": "",
"ogTitle": "",
"ogImgId": "",
"twDescription": "",
"description": "It's not Thanksgiving without apple pie. Stephanie Rosenbaum Klassen shares step-by-step instructions for this holiday classic, better than you've ever made before. ",
"title": "All-American Dessert Recipe: Classic Apple Pie for Thanksgiving | KQED",
"ogDescription": "",
"schema": {
"@context": "https://schema.org",
"@type": "Article",
"headline": "All-American Dessert Recipe: Classic Apple Pie for Thanksgiving",
"datePublished": "2013-11-27T13:23:28-08:00",
"dateModified": "2019-10-24T17:29:22-07:00",
"image": "https://cdn.kqed.org/wp-content/uploads/2020/02/KQED-OG-Image@1x.png",
"author": {
"@type": "Person",
"name": "Wendy Goodfriend",
"jobTitle": "KQED Contributor",
"url": "https://www.kqed.org/author/wendy-goodfriend"
}
},
"authorsData": [],
"tagData": []
},
"guestAuthors": [],
"slug": "all-american-dessert-recipe-classic-apple-pie-for-thanksgiving",
"status": "publish",
"path": "/bayareabites/74069/all-american-dessert-recipe-classic-apple-pie-for-thanksgiving",
"audioTrackLength": null,
"parsedContent": [
{
"type": "contentString",
"content": "\u003cdiv class=\"post-body\">\u003cp>\u003cfigure id=\"attachment_74575\" class=\"wp-caption aligncenter\" style=\"max-width: 1000px\">\u003ca href=\"http://ww2.kqed.org/bayareabites/wp-content/uploads/sites/24/2013/11/apple-final1000a.jpg\">\u003cimg class=\"size-full wp-image-74575\" src=\"http://ww2.kqed.org/bayareabites/wp-content/uploads/sites/24/2013/11/apple-final1000a.jpg\" alt=\"Classic Apple Pie. Photo: Wendy Goodfriend\" width=\"1000\" height=\"669\">\u003c/a>\u003cfigcaption class=\"wp-caption-text\">Classic Apple Pie. Photo: Wendy Goodfriend\u003c/figcaption>\u003c/figure>\n\u003cp>All Photos: \u003ca href=\"http://ww2.kqed.org/bayareabites/author/wendy-goodfriend/\">Wendy Goodfriend\u003c/a>\u003c/p>\n\u003cp>Be gone, Mrs. Smith! A frozen pie may fill your pie-hole any other day of the year. But for Thanksgiving, on this celebratory day of gratitude, as close as we get to a ritual harvest festival, make a real pie. Yes, from scratch. Because, with our step-by-step approach, you can turn apples, sugar, flour, butter, and spices into a better pie that you or your friends have ever tasted, much less made.\u003c/p>\n\u003cp>So, let us begin. The first step, before you pick up a measuring cup, is to clear your mind. Are you stressed out by family demands? Worried about getting it all right? Put all this out of your head. A perfect turkey, a perfect pie, the most splendid gravy in the universe cannot ensure family harmony, just as even a sorry stuffing won't, by its underseasoned blandness or wayward lumpiness, ruin the day. (Not that you should settle for bad stuffing, not with Kim Laidlaw's fine \u003ca href=\"http://ww2.kqed.org/bayareabites/2013/11/23/thanksgiving-recipe-an-elevated-version-of-classic-sage-and-chestnut-stuffing/\">Sage and Chestnut Stuffing\u003c/a> recipe available here on this very blog.)\u003c/p>\n\u003cp>All too often, it seems, we placate our fears by obsessing over the minutia of kitchen work. Brine or dry rub? Breast up, breast down? Deep-fried or smoked? Should there been mac and cheese, and is adding \u003ca href=\"http://brokeassgourmet.com/articles/brown-butter-pumpkin-mac-and-cheese\">brown butter and pumpkin\u003c/a> brilliance or heresy? Here's what I can tell you, courtesy of years of writing Thanksgiving cooking advice: it is easier to worry about turkey, or cranberry sauce, or the flakiness of your pie crust than it is to be in the moment, with no distractions from the clamor of your own emotions, the ringing of your own wishful, overflowing, bruised or fearful heart.\u003c/p>\n\u003cp>Keep it in mind, then, as you seek to control in the kitchen what you may not be able to conquer in the dining room. More to the point, take heed of Fergus Henderson, chef and author of \u003ca href=\"http://www.amazon.com/exec/obidos/ASIN/0062282611/kqedorg-20\">The Complete Nose to Tail\u003c/a>, who advises, “Do not be afraid of cooking, as your ingredients will know, and misbehave.\" So, now that you're happy, and focused, and not leaning all the weight of your perfect-holiday expectations on one frangible crust, let's bake!\u003c/p>\n\u003cp>\u003c/p>\u003c/div>",
"attributes": {
"named": {},
"numeric": []
}
},
{
"type": "component",
"content": "",
"name": "ad",
"attributes": {
"named": {
"label": "fullwidth"
},
"numeric": [
"fullwidth"
]
}
},
{
"type": "contentString",
"content": "\u003cdiv class=\"post-body\">\u003cp>\u003c/p>\n\u003cp>First, the apples. I like farmers' market apples, where you can be sure of getting this season's fruit, still tangy and snappy-crunchy. You want apples with some complexity and density to them. Fujis and Galas are too sweet and too full of juice--they'll make a wet pie that's closer to applesauce. Granny Smiths are the opposite: too hard, too tart. I like to use a mix of whatever looks good. This pie was made with a combination of Black Twig and Pink Ladies, but Pippins, Jonagolds, Russets, Romes, and/or Braeburns would also work well.\u003c/p>\n\u003cfigure id=\"attachment_74580\" class=\"wp-caption aligncenter\" style=\"max-width: 1000px\">\u003ca href=\"http://ww2.kqed.org/bayareabites/wp-content/uploads/sites/24/2013/11/apple-pie-apples1000.jpg\">\u003cimg class=\"size-full wp-image-74580\" src=\"http://ww2.kqed.org/bayareabites/wp-content/uploads/sites/24/2013/11/apple-pie-apples1000.jpg\" alt=\"Apples: Black Twig and Pink Ladies. Photo: Wendy Goodfriend\" width=\"1000\" height=\"669\">\u003c/a>\u003cfigcaption class=\"wp-caption-text\">Apples: Black Twig and Pink Ladies. Photo: Wendy Goodfriend\u003c/figcaption>\u003c/figure>\n\u003cp>The crust is easiest to handle if you let it chill before rolling, so it's wise to get your dough mixed before you start on the filling. Put your butter--preferably, a high-fat, European-style butter like \u003ca href=\"http://strausfamilycreamery.com/products/item/organic-sweet-butter\">Straus Family Creamery European-Style Organic Butter\u003c/a> or Plugra--in the freezer to chill. You want it very cold and firm but not actually frozen.\u003c/p>\n\u003cp>Measure the full amount of cold water and vinegar into a glass (or see-through plastic) wet measuring cup. Add a handful of ice cubes. Measure your flour by dipping a dry-measure cup into the flour, then sweeping off the excess with the flat side of a knife. Don't pack it, don't shake it! Whisk the sugar and salt into the flour.\u003c/p>\n\u003cp>Using the coarse holes on a box grater, grate in the butter. Grating transforms the butter into thin, near-translucent curls. Once you've lightly but thoroughly mixed them into the flour, carefully breaking up any butter clumps, you're almost done. The texture will be nubbly-perfect, and you'll hardly have touched it.\u003c/p>\n\u003cp>Quickly pour in about half your ice water (not including the cubes). Using a wooden spoon or a large fork, gently and quickly mix the water into the flour. Drizzle in remaining water as needed over any dry patches, about a tablespoon at a time. If you are using high-fat butter, which has a lower water content, you'll probably need more water than if you're using a regular supermarket brand. Stop when a handful of dough will just hold together when squeezed. A little crumbly is fine; it will get moister as it chills.\u003c/p>\n\u003cp>If you have time, it's a good idea to chill your dough before you roll it out. It's not crucial; I've gone straight from mixing to rolling to baking on occasion, and it worked just fine. However, chilling lets the butter firm up again before you roll, and cold butter leads to a flakier crust. Also, cold dough is less likely to turn into a a sticky, recalcitrant dough-child that flings itself face down onto the counter and refuses to come up without tearing once you start rolling.\u003c/p>\n\u003cp>Divide your dough into equal parts. Scoop the dough into two resealable plastic bags. Flatten each into a round, squeezing out any remaining air from the bag, and seal. Chill the dough for an hour in the freezer or 2 hours in the refrigerator. The dough can also be refrigerated for 1-2 days ahead of baking.\u003c/p>\n\u003cp>\u003c/p>\u003c/div>",
"attributes": {
"named": {},
"numeric": []
}
},
{
"type": "component",
"content": "",
"name": "gallery",
"attributes": {
"named": {
"type": "slideshow",
"link": "file",
"ids": "74348,74346,74345,74342,74343,74338,74339,74337,74336,74334,74603,74605,74608,74599,74597,74606,74594,74578,74582,74583,74592",
"label": ""
},
"numeric": []
}
},
{
"type": "contentString",
"content": "\u003cdiv class=\"post-body\">\u003cp>\u003c/p>\n\u003cp>Lightly sprinkle a large, clean work surface with flour. Rub a light coating of flour on your rolling pin. Take 1 bag of dough out the freezer or fridge, remove its bag, and pat the dough into a roughly symmetrical round. Roll from the middle out to the edges, using the equal amounts of pressure as you go. After every few rolls, pick the dough up from the counter and revolve it a quarter turn. This helps keep the dough from sticking to your work surface. If it seems like it's sticking, loosen with a spatula, then sprinkle a little more flour underneath. Imagine you're rolling sun rays all the way around from the center of the dough.\u003c/p>\n\u003cp>If the dough keeps sticking to the rolling pin and/or counter, try rolling it out between two sheets of plastic wrap, waxed paper, or parchment paper. You can also sprinkle a small amount of flour over the dough, but be stingy.\u003c/p>\n\u003cp>Once you’ve got a nice, more-or-less round of evenly rolled dough, lift it into your pie pan. Press it gently into the pan. You should have about an inch of dough hanging over the edge; trim off any excess. Fold the extra dough inwards (towards the middle of the pie) to make a sort of flattened mesa or bulwark. Wrap the whole crust loosely in plastic wrap or waxed paper and return it to the fridge to chill while you make the filling.\u003c/p>\n\u003cp>Peel, core, and slice your apples. Toss with sugar, salt, and spices. Let stand for about 10 minutes, until there is a puddle of liquid at the bottom of the bowl. Pour the liquid into a small pan and boil, watching carefully, until it has cooked down to the consistency of maple syrup. Pour back into the bowl of apples. Sprinkle with flour and mix thoroughly.\u003c/p>\n\u003cp>Preheat the oven to 400ºF. Take the second bag out of the fridge, remove and roll like you did the first crust. When your large round of top crust is ready, take the bottom-crust-lined pie pan out of the fridge. Scoop your filling into the bottom crust. Drape the top crust over the filling, and trim off any extra so you have about 1/2 inch hanging over the edges. Tuck the excess crust under, pressing to join it to the bottom crust, making a thicker mesa/ridge this time.\u003c/p>\n\u003cp>\u003c/p>\u003c/div>",
"attributes": {
"named": {},
"numeric": []
}
},
{
"type": "component",
"content": "",
"name": "gallery",
"attributes": {
"named": {
"type": "slideshow",
"link": "file",
"ids": "74598,74607,74609,74587,74586,74602",
"label": ""
},
"numeric": []
}
},
{
"type": "contentString",
"content": "\u003cdiv class=\"post-body\">\u003cp>\u003c/p>\n\u003cp>You're almost done, but not yet. Crimping--making a decorative edge around the crust--is the artistic part of pie-shaping, and there are many, many ways to do this. I like to gently pinch the edge between the thumb and forefinger of each hand. You move up with the left hand, down with the right, going neatly all the way around the pie until the whole thing has been crimped. The main thing is do something, even if it’s just a plain or rolled ridge of dough along the edge. A good crimp will both keep any excess filling from spilling out and to make the pie look nice and finished. Too many pies just sort of peter out at the edges, with no definition--no, no, no. Define your boundaries, even if you're just flattening the two layers of dough together with fork tines.\u003c/p>\n\u003cp>\u003c/p>\u003c/div>",
"attributes": {
"named": {},
"numeric": []
}
},
{
"type": "component",
"content": "",
"name": "gallery",
"attributes": {
"named": {
"type": "slideshow",
"link": "file",
"ids": "74589,74588,74610,74601,74595,74613",
"label": ""
},
"numeric": []
}
},
{
"type": "contentString",
"content": "\u003cdiv class=\"post-body\">\u003cp>\u003c/p>\n\u003cp>To make the pastry leaves shown here, gather together your extra pastry scraps and roll out. Using a small, sharp knife, cut 4 or 5 leaf-shaped ovals. To make the leaf \"veins,\" use the knife to mark a line down the center of each oval, then mark matching diagonal lines on either side. Be careful not to cut all the way through the pastry. Arrange the pastry leaves on the center of the top crust. You can also add \"berries\" by rolling a few small balls of dough and adding them where the leaves come together at the center. Using a sharp knife, slash top crust in several places to let steam escape.\u003c/p>\n\u003cp>If you want a little shine on your crust, brush with milk or half-and-half. Use a clean pastry brush if you have one (i.e., not the one you use to baste the turkey, which will be all clotted and stuck together with grease). If you're light-handed and very quick, you can dip your fingertips in the cream and brush it like that. You don't need to get into every crimp; just concentrate on the top dome.\u003c/p>\n\u003cp>Place your pie on a baking sheet. Bake for 45 to 60 minutes. Cover the edges with foil or a pie shield if they seem to getting too brown. The filling should be bubbling gently; sticky pie juices may drip out (hence the baking sheet). The apples within should be tender but not cooked to mush, and most importantly, the crust must be brown--distinctly golden on top, toasty around the edges. Having recently been a judge at \u003ca href=\"http://www.cuesa.org/article/congratulations-pie-contest-winners\">CUESA's Pie Contest\u003c/a>, sharing the duties at my table with professional bakers from \u003ca href=\"http://www.kneadpatisserie.com/\">Knead Patisserie\u003c/a> and \u003ca href=\"http://threebabesbakeshop.com/\">3 Babes Bakeshop\u003c/a>, we saw, with disappointment, so many sadly underbaked crusts. If you're using a clear Pyrex pan, look at that bottom crust, and look for gold, not platinum. A pallid crust is a soft, dull crust. Don't be nervous.\u003c/p>\n\u003cp>Take it out, put it on a cooling rack, and walk away. It may seem lovely to launch right into your hot-from-the-oven pie, but like turkey, pie needs time to collect itself. A hot pie is a runny, runny pie. You will cut the first piece and wonder how you went so wrong as all the juices in the pie gush to fill the slice-shaped hole. But, let the pie sit for a couple of hours, til it's on the room temperature side of warm, and your patience will be rewarded: crisp, almost-shattering crust, melting apples, just enough cinnamon-fragrant juice to prove that no gelatinous glop went into the making of your perfect pie.\u003c/p>\n\u003cfigure id=\"attachment_74611\" class=\"wp-caption aligncenter\" style=\"max-width: 1000px\">\u003ca href=\"http://ww2.kqed.org/bayareabites/wp-content/uploads/sites/24/2013/11/apple1000-open.jpg\">\u003cimg class=\"size-full wp-image-74611\" src=\"http://ww2.kqed.org/bayareabites/wp-content/uploads/sites/24/2013/11/apple1000-open.jpg\" alt=\"An interior view of the Classic Apple Pie. Photo: Wendy Goodfriend\" width=\"1000\" height=\"669\">\u003c/a>\u003cfigcaption class=\"wp-caption-text\">An interior view of the Classic Apple Pie. Photo: Wendy Goodfriend\u003c/figcaption>\u003c/figure>\n\u003ch3>Recipe: Classic Apple Pie\u003c/h3>\n\u003cp>Personally, I love an apple pie with raisins in it, but I know this is a minority view. You could add dried cranberries, though, or even a handful of fresh ones, in which case you may want to bump up the sugar a little, since fresh cranberries are quite sour.\u003c/p>\n\u003cp>\u003cem>Makes 1 pie\u003c/em>\u003c/p>\n\u003cp>\u003cstrong>Ingredients:\u003c/strong>\u003c/p>\n\u003cp>\u003cstrong>Crust:\u003c/strong>\u003c/p>\n\u003cul>\n\u003cli>2 1/2 cups all-purpose flour\u003c/li>\n\u003cli>1 1/2 tablespoons sugar\u003c/li>\n\u003cli>1/2 teaspoon salt\u003c/li>\n\u003cli>8 oz (16 tablespoons/2 sticks) butter, preferably a high-fat, European style butter, chilled until very cold\u003c/li>\n\u003cli>6-8 tablespoons ice water\u003c/li>\n\u003cli>2 tsp apple cider vinegar\u003c/li>\n\u003c/ul>\n\u003cp>\u003cstrong>Filling:\u003c/strong>\u003c/p>\n\u003cul>\n\u003cli>3 lbs apples, 8-10 apples, depending on size\u003c/li>\n\u003cli>1/2 cup granulated sugar\u003c/li>\n\u003cli>1 tsp cinnamon\u003c/li>\n\u003cli>1/4 tsp freshly grated nutmeg\u003c/li>\n\u003cli>generous pinch of allspice\u003c/li>\n\u003cli>1/4 tsp salt\u003c/li>\n\u003cli>1 1/2 tablespoons flour\u003c/li>\n\u003c/ul>\n\u003cp>\u003cstrong>For Shine on Crust:\u003c/strong>\u003c/p>\n\u003cul>\n\u003cli>1 tbsp milk or half-or-half, optional\u003c/li>\n\u003c/ul>\n\u003cp>\u003cstrong>Instructions:\u003c/strong>\u003cbr>\n1. To make the pie crust, pour water and vinegar into a glass measuring cup. Add a handful of ice cubes, and set aside.\u003c/p>\n\u003cp>2. Mix flour, sugar, and salt in a large bowl. Using the large holes on a box grater, grate the butter into the flour. Toss lightly to coat butter curls with flour.\u003c/p>\n\u003cp>3. Pour half the water (not the cubes) into flour mixture. Stir gently with a wooden spoon to moisten the flour. Drizzle in remaining water (you may not need all of it) a tablespoon at a time, stirring gently, until you can just squeeze together a handful of dough. Stop adding water while dough is still slightly crumbly.\u003c/p>\n\u003cp>4. Flatten dough into two rounds and seal in a resealable plastic bag. Chill in freezer for 1 hour or in the refrigerator for 2 hours.\u003c/p>\n\u003cp>5. Sprinkle a work surface with flour. Using a lightly floured rolling pin, roll out the first dough round, moving from the center to the edges. After every 2-3 rolls, pick up the dough and rotate it a quarter turn to keep it from sticking to the counter.\u003c/p>\n\u003cp>6. Once dough is rolled evenly into a round about 2″ bigger than your pie plate, lift it up and drape it over the pie plate. Press gently into the pan.\u003c/p>\n\u003cp>7. Fold excess dough inwards to make an even ridge. Wrap loosely in plastic wrap and chill until needed.\u003c/p>\n\u003cp>8. To make the filling, peel, core, and slice the apples. Toss with sugar, spices, and salt. Let sit for 10 minutes.\u003c/p>\n\u003cp>9. Pour accumulated liquid from apples into a small saucepan. Bring to a boil and cook, watching carefully, until liquid has reduced down to the consistency of maple syrup. Remove from heat and pour over apples. Sprinkle on flour and mix thoroughly.\u003c/p>\n\u003cp>10. Preheat oven to 400ºF. Remove second dough round from the fridge and roll out as above. Remove crust-lined pan from the fridge. Scoop filling into pan. Drape top crust over filling. Fold extra dough under to form a ridge around the edge of the pan. Crimp edges together. Brush lightly with milk or half-and-half, if desired. Using a sharp knife, slash top crust in several places to let steam escape.\u003c/p>\n\u003cp>11. Place pie on a baking sheet and bake for 45-60 minutes, covering edges with foil if they brown too fast.\u003c/p>\n\u003cp>\u003c/p>\u003c/div>",
"attributes": {
"named": {},
"numeric": []
}
},
{
"type": "component",
"content": "",
"name": "ad",
"attributes": {
"named": {
"label": "floatright"
},
"numeric": [
"floatright"
]
}
},
{
"type": "contentString",
"content": "\u003cdiv class=\"post-body\">\u003cp>\u003c/p>\n\u003cp>12. When pie is done, remove from oven and let cool on a rack for at least 2 hours before cutting.\u003c/p>\n\n\u003c/div>\u003c/p>",
"attributes": {
"named": {},
"numeric": []
}
}
],
"link": "/bayareabites/74069/all-american-dessert-recipe-classic-apple-pie-for-thanksgiving",
"authors": [
"5038",
"5014"
],
"series": [
"bayareabites_15012"
],
"categories": [
"bayareabites_1516",
"bayareabites_752",
"bayareabites_2695",
"bayareabites_1653",
"bayareabites_1874",
"bayareabites_95",
"bayareabites_12550",
"bayareabites_1763"
],
"tags": [
"bayareabites_8405",
"bayareabites_469",
"bayareabites_228",
"bayareabites_2594",
"bayareabites_530",
"bayareabites_2962"
],
"featImg": "bayareabites_74614",
"label": "bayareabites_15012",
"isLoading": false,
"hasAllInfo": true
}
},
"podcastsReducer": {
"isFetching": false,
"fetchFailed": false,
"hasFetched": false,
"podcasts": {}
},
"radioProgramsReducer": {
"isFetching": false,
"fetchFailed": false,
"hasFetched": false,
"radioPrograms": {}
},
"programsReducer": {
"all-things-considered": {
"id": "all-things-considered",
"title": "All Things Considered",
"info": "Every weekday, \u003cem>All Things Considered\u003c/em> hosts Robert Siegel, Audie Cornish, Ari Shapiro, and Kelly McEvers present the program's trademark mix of news, interviews, commentaries, reviews, and offbeat features. Michel Martin hosts on the weekends.",
"airtime": "MON-FRI 1pm-2pm, 4:30pm-6:30pm\u003cbr />SAT-SUN 5pm-6pm",
"imageSrc": "https://cdn.kqed.org/wp-content/uploads/2024/04/All-Things-Considered-Podcast-Tile-360x360-1.jpg",
"officialWebsiteLink": "https://www.npr.org/programs/all-things-considered/",
"meta": {
"site": "news",
"source": "npr"
},
"link": "/radio/program/all-things-considered"
},
"american-suburb-podcast": {
"id": "american-suburb-podcast",
"title": "American Suburb: The Podcast",
"tagline": "The flip side of gentrification, told through one town",
"info": "Gentrification is changing cities across America, forcing people from neighborhoods they have long called home. Call them the displaced. Now those priced out of the Bay Area are looking for a better life in an unlikely place. American Suburb follows this migration to one California town along the Delta, 45 miles from San Francisco. But is this once sleepy suburb ready for them?",
"imageSrc": "https://cdn.kqed.org/wp-content/uploads/2024/04/American-Suburb-Podcast-Tile-703x703-1.jpg",
"officialWebsiteLink": "/news/series/american-suburb-podcast",
"meta": {
"site": "news",
"source": "kqed",
"order": 19
},
"link": "/news/series/american-suburb-podcast/",
"subscribe": {
"npr": "https://rpb3r.app.goo.gl/RBrW",
"apple": "https://itunes.apple.com/WebObjects/MZStore.woa/wa/viewPodcast?mt=2&id=1287748328",
"tuneIn": "https://tunein.com/radio/American-Suburb-p1086805/",
"rss": "https://ww2.kqed.org/news/series/american-suburb-podcast/feed/podcast",
"google": "https://podcasts.google.com/feed/aHR0cHM6Ly9mZWVkcy5tZWdhcGhvbmUuZm0vS1FJTkMzMDExODgxNjA5"
}
},
"baycurious": {
"id": "baycurious",
"title": "Bay Curious",
"tagline": "Exploring the Bay Area, one question at a time",
"info": "KQED’s new podcast, Bay Curious, gets to the bottom of the mysteries — both profound and peculiar — that give the Bay Area its unique identity. And we’ll do it with your help! You ask the questions. You decide what Bay Curious investigates. And you join us on the journey to find the answers.",
"imageSrc": "https://cdn.kqed.org/wp-content/uploads/2024/04/Bay-Curious-Podcast-Tile-703x703-1.jpg",
"imageAlt": "KQED Bay Curious",
"officialWebsiteLink": "/news/series/baycurious",
"meta": {
"site": "news",
"source": "kqed",
"order": 3
},
"link": "/podcasts/baycurious",
"subscribe": {
"apple": "https://podcasts.apple.com/us/podcast/bay-curious/id1172473406",
"npr": "https://www.npr.org/podcasts/500557090/bay-curious",
"rss": "https://ww2.kqed.org/news/category/bay-curious-podcast/feed/podcast",
"amazon": "https://music.amazon.com/podcasts/9a90d476-aa04-455d-9a4c-0871ed6216d4/bay-curious",
"stitcher": "https://www.stitcher.com/podcast/kqed/bay-curious",
"spotify": "https://open.spotify.com/show/6O76IdmhixfijmhTZLIJ8k"
}
},
"bbc-world-service": {
"id": "bbc-world-service",
"title": "BBC World Service",
"info": "The day's top stories from BBC News compiled twice daily in the week, once at weekends.",
"airtime": "MON-FRI 9pm-10pm, TUE-FRI 1am-2am",
"imageSrc": "https://cdn.kqed.org/wp-content/uploads/2024/04/BBC-World-Service-Podcast-Tile-360x360-1.jpg",
"officialWebsiteLink": "https://www.bbc.co.uk/sounds/play/live:bbc_world_service",
"meta": {
"site": "news",
"source": "BBC World Service"
},
"link": "/radio/program/bbc-world-service",
"subscribe": {
"apple": "https://itunes.apple.com/us/podcast/global-news-podcast/id135067274?mt=2",
"tuneIn": "https://tunein.com/radio/BBC-World-Service-p455581/",
"rss": "https://podcasts.files.bbci.co.uk/p02nq0gn.rss"
}
},
"californiareport": {
"id": "californiareport",
"title": "The California Report",
"tagline": "California, day by day",
"info": "KQED’s statewide radio news program providing daily coverage of issues, trends and public policy decisions.",
"imageSrc": "https://cdn.kqed.org/wp-content/uploads/2024/04/The-California-Report-Podcast-Tile-703x703-1.jpg",
"imageAlt": "KQED The California Report",
"officialWebsiteLink": "/californiareport",
"meta": {
"site": "news",
"source": "kqed",
"order": 8
},
"link": "/californiareport",
"subscribe": {
"apple": "https://podcasts.apple.com/us/podcast/kqeds-the-california-report/id79681292",
"amazon": "https://music.amazon.com/podcasts/26099305-72af-4542-9dde-ac1807fe36d5/kqed-s-the-california-report",
"npr": "https://www.npr.org/podcasts/432285393/the-california-report",
"stitcher": "https://www.stitcher.com/podcast/kqedfm-kqeds-the-california-report-podcast-8838",
"rss": "https://ww2.kqed.org/news/tag/tcram/feed/podcast"
}
},
"californiareportmagazine": {
"id": "californiareportmagazine",
"title": "The California Report Magazine",
"tagline": "Your state, your stories",
"info": "Every week, The California Report Magazine takes you on a road trip for the ears: to visit the places and meet the people who make California unique. The in-depth storytelling podcast from the California Report.",
"airtime": "FRI 4:30pm-5pm, 6:30pm-7pm, 11pm-11:30pm",
"imageSrc": "https://cdn.kqed.org/wp-content/uploads/2024/04/The-California-Report-Magazine-Podcast-Tile-703x703-1.jpg",
"imageAlt": "KQED The California Report Magazine",
"officialWebsiteLink": "/californiareportmagazine",
"meta": {
"site": "news",
"source": "kqed",
"order": 10
},
"link": "/californiareportmagazine",
"subscribe": {
"apple": "https://podcasts.apple.com/us/podcast/the-california-report-magazine/id1314750545",
"google": "https://podcasts.google.com/feed/aHR0cHM6Ly9mZWVkcy5tZWdhcGhvbmUuZm0vS1FJTkM3NjkwNjk1OTAz",
"npr": "https://www.npr.org/podcasts/564733126/the-california-report-magazine",
"stitcher": "https://www.stitcher.com/podcast/kqed/the-california-report-magazine",
"rss": "https://ww2.kqed.org/news/tag/tcrmag/feed/podcast"
}
},
"city-arts": {
"id": "city-arts",
"title": "City Arts & Lectures",
"info": "A one-hour radio program to hear celebrated writers, artists and thinkers address contemporary ideas and values, often discussing the creative process. Please note: tapes or transcripts are not available",
"imageSrc": "https://ww2.kqed.org/radio/wp-content/uploads/sites/50/2018/05/cityartsandlecture-300x300.jpg",
"officialWebsiteLink": "https://www.cityarts.net/",
"airtime": "SUN 1pm-2pm, TUE 10pm, WED 1am",
"meta": {
"site": "news",
"source": "City Arts & Lectures"
},
"link": "https://www.cityarts.net",
"subscribe": {
"tuneIn": "https://tunein.com/radio/City-Arts-and-Lectures-p692/",
"rss": "https://www.cityarts.net/feed/"
}
},
"closealltabs": {
"id": "closealltabs",
"title": "Close All Tabs",
"tagline": "Your irreverent guide to the trends redefining our world",
"info": "Close All Tabs breaks down how digital culture shapes our world through thoughtful insights and irreverent humor.",
"imageSrc": "https://cdn.kqed.org/wp-content/uploads/2025/02/CAT_2_Tile-scaled.jpg",
"imageAlt": "KQED Close All Tabs",
"officialWebsiteLink": "/podcasts/closealltabs",
"meta": {
"site": "news",
"source": "kqed",
"order": 1
},
"link": "/podcasts/closealltabs",
"subscribe": {
"apple": "https://podcasts.apple.com/us/podcast/close-all-tabs/id214663465",
"rss": "https://feeds.megaphone.fm/KQINC6993880386",
"amazon": "https://music.amazon.com/podcasts/92d9d4ac-67a3-4eed-b10a-fb45d45b1ef2/close-all-tabs",
"spotify": "https://open.spotify.com/show/6LAJFHnGK1pYXYzv6SIol6?si=deb0cae19813417c"
}
},
"code-switch-life-kit": {
"id": "code-switch-life-kit",
"title": "Code Switch / Life Kit",
"info": "\u003cem>Code Switch\u003c/em>, which listeners will hear in the first part of the hour, has fearless and much-needed conversations about race. Hosted by journalists of color, the show tackles the subject of race head-on, exploring how it impacts every part of society — from politics and pop culture to history, sports and more.\u003cbr />\u003cbr />\u003cem>Life Kit\u003c/em>, which will be in the second part of the hour, guides you through spaces and feelings no one prepares you for — from finances to mental health, from workplace microaggressions to imposter syndrome, from relationships to parenting. The show features experts with real world experience and shares their knowledge. Because everyone needs a little help being human.\u003cbr />\u003cbr />\u003ca href=\"https://www.npr.org/podcasts/510312/codeswitch\">\u003cem>Code Switch\u003c/em> offical site and podcast\u003c/a>\u003cbr />\u003ca href=\"https://www.npr.org/lifekit\">\u003cem>Life Kit\u003c/em> offical site and podcast\u003c/a>\u003cbr />",
"airtime": "SUN 9pm-10pm",
"imageSrc": "https://cdn.kqed.org/wp-content/uploads/2024/04/Code-Switch-Life-Kit-Podcast-Tile-360x360-1.jpg",
"meta": {
"site": "radio",
"source": "npr"
},
"link": "/radio/program/code-switch-life-kit",
"subscribe": {
"apple": "https://podcasts.apple.com/podcast/1112190608?mt=2&at=11l79Y&ct=nprdirectory",
"google": "https://podcasts.google.com/feed/aHR0cHM6Ly93d3cubnByLm9yZy9yc3MvcG9kY2FzdC5waHA_aWQ9NTEwMzEy",
"spotify": "https://open.spotify.com/show/3bExJ9JQpkwNhoHvaIIuyV",
"rss": "https://feeds.npr.org/510312/podcast.xml"
}
},
"commonwealth-club": {
"id": "commonwealth-club",
"title": "Commonwealth Club of California Podcast",
"info": "The Commonwealth Club of California is the nation's oldest and largest public affairs forum. As a non-partisan forum, The Club brings to the public airwaves diverse viewpoints on important topics. The Club's weekly radio broadcast - the oldest in the U.S., dating back to 1924 - is carried across the nation on public radio stations and is now podcasting. Our website archive features audio of our recent programs, as well as selected speeches from our long and distinguished history. This podcast feed is usually updated twice a week and is always un-edited.",
"airtime": "THU 10pm, FRI 1am",
"imageSrc": "https://cdn.kqed.org/wp-content/uploads/2024/04/Commonwealth-Club-Podcast-Tile-360x360-1.jpg",
"officialWebsiteLink": "https://www.commonwealthclub.org/podcasts",
"meta": {
"site": "news",
"source": "Commonwealth Club of California"
},
"link": "/radio/program/commonwealth-club",
"subscribe": {
"apple": "https://itunes.apple.com/us/podcast/commonwealth-club-of-california-podcast/id976334034?mt=2",
"google": "https://podcasts.google.com/feed/aHR0cDovL3d3dy5jb21tb253ZWFsdGhjbHViLm9yZy9hdWRpby9wb2RjYXN0L3dlZWtseS54bWw",
"tuneIn": "https://tunein.com/radio/Commonwealth-Club-of-California-p1060/"
}
},
"forum": {
"id": "forum",
"title": "Forum",
"tagline": "The conversation starts here",
"info": "KQED’s live call-in program discussing local, state, national and international issues, as well as in-depth interviews.",
"airtime": "MON-FRI 9am-11am, 10pm-11pm",
"imageSrc": "https://cdn.kqed.org/wp-content/uploads/2024/04/Forum-Podcast-Tile-703x703-1.jpg",
"imageAlt": "KQED Forum with Mina Kim and Alexis Madrigal",
"officialWebsiteLink": "/forum",
"meta": {
"site": "news",
"source": "kqed",
"order": 9
},
"link": "/forum",
"subscribe": {
"apple": "https://podcasts.apple.com/us/podcast/kqeds-forum/id73329719",
"google": "https://podcasts.google.com/feed/aHR0cHM6Ly9mZWVkcy5tZWdhcGhvbmUuZm0vS1FJTkM5NTU3MzgxNjMz",
"npr": "https://www.npr.org/podcasts/432307980/forum",
"stitcher": "https://www.stitcher.com/podcast/kqedfm-kqeds-forum-podcast",
"rss": "https://feeds.megaphone.fm/KQINC9557381633"
}
},
"freakonomics-radio": {
"id": "freakonomics-radio",
"title": "Freakonomics Radio",
"info": "Freakonomics Radio is a one-hour award-winning podcast and public-radio project hosted by Stephen Dubner, with co-author Steve Levitt as a regular guest. It is produced in partnership with WNYC.",
"imageSrc": "https://ww2.kqed.org/news/wp-content/uploads/sites/10/2018/05/freakonomicsRadio.png",
"officialWebsiteLink": "http://freakonomics.com/",
"airtime": "SUN 1am-2am, SAT 3pm-4pm",
"meta": {
"site": "radio",
"source": "WNYC"
},
"link": "/radio/program/freakonomics-radio",
"subscribe": {
"npr": "https://rpb3r.app.goo.gl/4s8b",
"apple": "https://itunes.apple.com/us/podcast/freakonomics-radio/id354668519",
"tuneIn": "https://tunein.com/podcasts/WNYC-Podcasts/Freakonomics-Radio-p272293/",
"rss": "https://feeds.feedburner.com/freakonomicsradio"
}
},
"fresh-air": {
"id": "fresh-air",
"title": "Fresh Air",
"info": "Hosted by Terry Gross, \u003cem>Fresh Air from WHYY\u003c/em> is the Peabody Award-winning weekday magazine of contemporary arts and issues. One of public radio's most popular programs, Fresh Air features intimate conversations with today's biggest luminaries.",
"airtime": "MON-FRI 7pm-8pm",
"imageSrc": "https://cdn.kqed.org/wp-content/uploads/2024/04/Fresh-Air-Podcast-Tile-360x360-1.jpg",
"officialWebsiteLink": "https://www.npr.org/programs/fresh-air/",
"meta": {
"site": "radio",
"source": "npr"
},
"link": "/radio/program/fresh-air",
"subscribe": {
"npr": "https://rpb3r.app.goo.gl/4s8b",
"apple": "https://itunes.apple.com/WebObjects/MZStore.woa/wa/viewPodcast?s=143441&mt=2&id=214089682&at=11l79Y&ct=nprdirectory",
"tuneIn": "https://tunein.com/radio/Fresh-Air-p17/",
"rss": "https://feeds.npr.org/381444908/podcast.xml"
}
},
"here-and-now": {
"id": "here-and-now",
"title": "Here & Now",
"info": "A live production of NPR and WBUR Boston, in collaboration with stations across the country, Here & Now reflects the fluid world of news as it's happening in the middle of the day, with timely, in-depth news, interviews and conversation. Hosted by Robin Young, Jeremy Hobson and Tonya Mosley.",
"airtime": "MON-THU 11am-12pm",
"imageSrc": "https://cdn.kqed.org/wp-content/uploads/2024/04/Here-And-Now-Podcast-Tile-360x360-1.jpg",
"officialWebsiteLink": "http://www.wbur.org/hereandnow",
"meta": {
"site": "news",
"source": "npr"
},
"link": "/radio/program/here-and-now",
"subsdcribe": {
"apple": "https://itunes.apple.com/WebObjects/MZStore.woa/wa/viewPodcast?mt=2&id=426698661",
"tuneIn": "https://tunein.com/radio/Here--Now-p211/",
"rss": "https://feeds.npr.org/510051/podcast.xml"
}
},
"hidden-brain": {
"id": "hidden-brain",
"title": "Hidden Brain",
"info": "Shankar Vedantam uses science and storytelling to reveal the unconscious patterns that drive human behavior, shape our choices and direct our relationships.",
"imageSrc": "https://ww2.kqed.org/radio/wp-content/uploads/sites/50/2018/05/hiddenbrain.jpg",
"officialWebsiteLink": "https://www.npr.org/series/423302056/hidden-brain",
"airtime": "SUN 7pm-8pm",
"meta": {
"site": "news",
"source": "NPR"
},
"link": "/radio/program/hidden-brain",
"subscribe": {
"apple": "https://itunes.apple.com/us/podcast/hidden-brain/id1028908750?mt=2",
"tuneIn": "https://tunein.com/podcasts/Science-Podcasts/Hidden-Brain-p787503/",
"rss": "https://feeds.npr.org/510308/podcast.xml"
}
},
"how-i-built-this": {
"id": "how-i-built-this",
"title": "How I Built This with Guy Raz",
"info": "Guy Raz dives into the stories behind some of the world's best known companies. How I Built This weaves a narrative journey about innovators, entrepreneurs and idealists—and the movements they built.",
"imageSrc": "https://ww2.kqed.org/news/wp-content/uploads/sites/10/2018/05/howIBuiltThis.png",
"officialWebsiteLink": "https://www.npr.org/podcasts/510313/how-i-built-this",
"airtime": "SUN 7:30pm-8pm",
"meta": {
"site": "news",
"source": "npr"
},
"link": "/radio/program/how-i-built-this",
"subscribe": {
"npr": "https://rpb3r.app.goo.gl/3zxy",
"apple": "https://itunes.apple.com/us/podcast/how-i-built-this-with-guy-raz/id1150510297?mt=2",
"tuneIn": "https://tunein.com/podcasts/Arts--Culture-Podcasts/How-I-Built-This-p910896/",
"rss": "https://feeds.npr.org/510313/podcast.xml"
}
},
"hyphenacion": {
"id": "hyphenacion",
"title": "Hyphenación",
"tagline": "Where conversation and cultura meet",
"info": "What kind of no sabo word is Hyphenación? For us, it’s about living within a hyphenation. Like being a third-gen Mexican-American from the Texas border now living that Bay Area Chicano life. Like Xorje! Each week we bring together a couple of hyphenated Latinos to talk all about personal life choices: family, careers, relationships, belonging … everything is on the table. ",
"imageSrc": "https://cdn.kqed.org/wp-content/uploads/2025/03/Hyphenacion_FinalAssets_PodcastTile.png",
"imageAlt": "KQED Hyphenación",
"officialWebsiteLink": "/podcasts/hyphenacion",
"meta": {
"site": "news",
"source": "kqed",
"order": 15
},
"link": "/podcasts/hyphenacion",
"subscribe": {
"apple": "https://podcasts.apple.com/us/podcast/hyphenaci%C3%B3n/id1191591838",
"spotify": "https://open.spotify.com/show/2p3Fifq96nw9BPcmFdIq0o?si=39209f7b25774f38",
"youtube": "https://www.youtube.com/c/kqedarts",
"amazon": "https://music.amazon.com/podcasts/6c3dd23c-93fb-4aab-97ba-1725fa6315f1/hyphenaci%C3%B3n",
"rss": "https://feeds.megaphone.fm/KQINC2275451163"
}
},
"jerrybrown": {
"id": "jerrybrown",
"title": "The Political Mind of Jerry Brown",
"tagline": "Lessons from a lifetime in politics",
"info": "The Political Mind of Jerry Brown brings listeners the wisdom of the former Governor, Mayor, and presidential candidate. Scott Shafer interviewed Brown for more than 40 hours, covering the former governor's life and half-century in the political game – and Brown has some lessons he'd like to share. ",
"imageSrc": "https://cdn.kqed.org/wp-content/uploads/2024/04/The-Political-Mind-of-Jerry-Brown-Podcast-Tile-703x703-1.jpg",
"imageAlt": "KQED The Political Mind of Jerry Brown",
"officialWebsiteLink": "/podcasts/jerrybrown",
"meta": {
"site": "news",
"source": "kqed",
"order": 18
},
"link": "/podcasts/jerrybrown",
"subscribe": {
"npr": "https://www.npr.org/podcasts/790253322/the-political-mind-of-jerry-brown",
"apple": "https://itunes.apple.com/us/podcast/id1492194549",
"rss": "https://ww2.kqed.org/news/series/jerrybrown/feed/podcast/",
"tuneIn": "http://tun.in/pjGcK",
"stitcher": "https://www.stitcher.com/podcast/kqed/the-political-mind-of-jerry-brown",
"spotify": "https://open.spotify.com/show/54C1dmuyFyKMFttY6X2j6r?si=K8SgRCoISNK6ZbjpXrX5-w",
"amazon": "https://music.amazon.com/podcasts/44420f75-3b0e-4301-ab3b-16da6b09e543/the-political-mind-of-jerry-brown"
}
},
"latino-usa": {
"id": "latino-usa",
"title": "Latino USA",
"airtime": "MON 1am-2am, SUN 6pm-7pm",
"info": "Latino USA, the radio journal of news and culture, is the only national, English-language radio program produced from a Latino perspective.",
"imageSrc": "https://ww2.kqed.org/radio/wp-content/uploads/sites/50/2018/04/latinoUsa.jpg",
"officialWebsiteLink": "http://latinousa.org/",
"meta": {
"site": "news",
"source": "npr"
},
"link": "/radio/program/latino-usa",
"subscribe": {
"npr": "https://rpb3r.app.goo.gl/xtTd",
"apple": "https://itunes.apple.com/WebObjects/MZStore.woa/wa/viewPodcast?s=143441&mt=2&id=79681317&at=11l79Y&ct=nprdirectory",
"tuneIn": "https://tunein.com/radio/Latino-USA-p621/",
"rss": "https://feeds.npr.org/510016/podcast.xml"
}
},
"marketplace": {
"id": "marketplace",
"title": "Marketplace",
"info": "Our flagship program, helmed by Kai Ryssdal, examines what the day in money delivered, through stories, conversations, newsworthy numbers and more. Updated Monday through Friday at about 3:30 p.m. PT.",
"airtime": "MON-FRI 4pm-4:30pm, MON-WED 6:30pm-7pm",
"imageSrc": "https://cdn.kqed.org/wp-content/uploads/2024/04/Marketplace-Podcast-Tile-360x360-1.jpg",
"officialWebsiteLink": "https://www.marketplace.org/",
"meta": {
"site": "news",
"source": "American Public Media"
},
"link": "/radio/program/marketplace",
"subscribe": {
"apple": "https://itunes.apple.com/WebObjects/MZStore.woa/wa/viewPodcast?s=143441&mt=2&id=201853034&at=11l79Y&ct=nprdirectory",
"tuneIn": "https://tunein.com/radio/APM-Marketplace-p88/",
"rss": "https://feeds.publicradio.org/public_feeds/marketplace-pm/rss/rss"
}
},
"masters-of-scale": {
"id": "masters-of-scale",
"title": "Masters of Scale",
"info": "Masters of Scale is an original podcast in which LinkedIn co-founder and Greylock Partner Reid Hoffman sets out to describe and prove theories that explain how great entrepreneurs take their companies from zero to a gazillion in ingenious fashion.",
"airtime": "Every other Wednesday June 12 through October 16 at 8pm (repeats Thursdays at 2am)",
"imageSrc": "https://cdn.kqed.org/wp-content/uploads/2024/04/Masters-of-Scale-Podcast-Tile-360x360-1.jpg",
"officialWebsiteLink": "https://mastersofscale.com/",
"meta": {
"site": "radio",
"source": "WaitWhat"
},
"link": "/radio/program/masters-of-scale",
"subscribe": {
"apple": "http://mastersofscale.app.link/",
"rss": "https://rss.art19.com/masters-of-scale"
}
},
"mindshift": {
"id": "mindshift",
"title": "MindShift",
"tagline": "A podcast about the future of learning and how we raise our kids",
"info": "The MindShift podcast explores the innovations in education that are shaping how kids learn. Hosts Ki Sung and Katrina Schwartz introduce listeners to educators, researchers, parents and students who are developing effective ways to improve how kids learn. We cover topics like how fed-up administrators are developing surprising tactics to deal with classroom disruptions; how listening to podcasts are helping kids develop reading skills; the consequences of overparenting; and why interdisciplinary learning can engage students on all ends of the traditional achievement spectrum. This podcast is part of the MindShift education site, a division of KQED News. KQED is an NPR/PBS member station based in San Francisco. You can also visit the MindShift website for episodes and supplemental blog posts or tweet us \u003ca href=\"https://twitter.com/MindShiftKQED\">@MindShiftKQED\u003c/a> or visit us at \u003ca href=\"/mindshift\">MindShift.KQED.org\u003c/a>",
"imageSrc": "https://cdn.kqed.org/wp-content/uploads/2024/04/Mindshift-Podcast-Tile-703x703-1.jpg",
"imageAlt": "KQED MindShift: How We Will Learn",
"officialWebsiteLink": "/mindshift/",
"meta": {
"site": "news",
"source": "kqed",
"order": 12
},
"link": "/podcasts/mindshift",
"subscribe": {
"apple": "https://podcasts.apple.com/us/podcast/mindshift-podcast/id1078765985",
"google": "https://podcasts.google.com/feed/aHR0cHM6Ly9mZWVkcy5tZWdhcGhvbmUuZm0vS1FJTkM1NzY0NjAwNDI5",
"npr": "https://www.npr.org/podcasts/464615685/mind-shift-podcast",
"stitcher": "https://www.stitcher.com/podcast/kqed/stories-teachers-share",
"spotify": "https://open.spotify.com/show/0MxSpNYZKNprFLCl7eEtyx"
}
},
"morning-edition": {
"id": "morning-edition",
"title": "Morning Edition",
"info": "\u003cem>Morning Edition\u003c/em> takes listeners around the country and the world with multi-faceted stories and commentaries every weekday. Hosts Steve Inskeep, David Greene and Rachel Martin bring you the latest breaking news and features to prepare you for the day.",
"airtime": "MON-FRI 3am-9am",
"imageSrc": "https://cdn.kqed.org/wp-content/uploads/2024/04/Morning-Edition-Podcast-Tile-360x360-1.jpg",
"officialWebsiteLink": "https://www.npr.org/programs/morning-edition/",
"meta": {
"site": "news",
"source": "npr"
},
"link": "/radio/program/morning-edition"
},
"onourwatch": {
"id": "onourwatch",
"title": "On Our Watch",
"tagline": "Deeply-reported investigative journalism",
"info": "For decades, the process for how police police themselves has been inconsistent – if not opaque. In some states, like California, these proceedings were completely hidden. After a new police transparency law unsealed scores of internal affairs files, our reporters set out to examine these cases and the shadow world of police discipline. On Our Watch brings listeners into the rooms where officers are questioned and witnesses are interrogated to find out who this system is really protecting. Is it the officers, or the public they've sworn to serve?",
"imageSrc": "https://cdn.kqed.org/wp-content/uploads/2024/04/On-Our-Watch-Podcast-Tile-703x703-1.jpg",
"imageAlt": "On Our Watch from NPR and KQED",
"officialWebsiteLink": "/podcasts/onourwatch",
"meta": {
"site": "news",
"source": "kqed",
"order": 11
},
"link": "/podcasts/onourwatch",
"subscribe": {
"apple": "https://podcasts.apple.com/podcast/id1567098962",
"google": "https://podcasts.google.com/feed/aHR0cHM6Ly9mZWVkcy5ucHIub3JnLzUxMDM2MC9wb2RjYXN0LnhtbD9zYz1nb29nbGVwb2RjYXN0cw",
"npr": "https://rpb3r.app.goo.gl/onourwatch",
"spotify": "https://open.spotify.com/show/0OLWoyizopu6tY1XiuX70x",
"tuneIn": "https://tunein.com/radio/On-Our-Watch-p1436229/",
"stitcher": "https://www.stitcher.com/show/on-our-watch",
"rss": "https://feeds.npr.org/510360/podcast.xml"
}
},
"on-the-media": {
"id": "on-the-media",
"title": "On The Media",
"info": "Our weekly podcast explores how the media 'sausage' is made, casts an incisive eye on fluctuations in the marketplace of ideas, and examines threats to the freedom of information and expression in America and abroad. For one hour a week, the show tries to lift the veil from the process of \"making media,\" especially news media, because it's through that lens that we see the world and the world sees us",
"airtime": "SUN 2pm-3pm, MON 12am-1am",
"imageSrc": "https://ww2.kqed.org/radio/wp-content/uploads/sites/50/2018/04/onTheMedia.png",
"officialWebsiteLink": "https://www.wnycstudios.org/shows/otm",
"meta": {
"site": "news",
"source": "wnyc"
},
"link": "/radio/program/on-the-media",
"subscribe": {
"apple": "https://itunes.apple.com/us/podcast/on-the-media/id73330715?mt=2",
"tuneIn": "https://tunein.com/radio/On-the-Media-p69/",
"rss": "http://feeds.wnyc.org/onthemedia"
}
},
"pbs-newshour": {
"id": "pbs-newshour",
"title": "PBS NewsHour",
"info": "Analysis, background reports and updates from the PBS NewsHour putting today's news in context.",
"airtime": "MON-FRI 3pm-4pm",
"imageSrc": "https://cdn.kqed.org/wp-content/uploads/2024/04/PBS-News-Hour-Podcast-Tile-360x360-1.jpg",
"officialWebsiteLink": "https://www.pbs.org/newshour/",
"meta": {
"site": "news",
"source": "pbs"
},
"link": "/radio/program/pbs-newshour",
"subscribe": {
"apple": "https://itunes.apple.com/us/podcast/pbs-newshour-full-show/id394432287?mt=2",
"tuneIn": "https://tunein.com/radio/PBS-NewsHour---Full-Show-p425698/",
"rss": "https://www.pbs.org/newshour/feeds/rss/podcasts/show"
}
},
"perspectives": {
"id": "perspectives",
"title": "Perspectives",
"tagline": "KQED's series of daily listener commentaries since 1991",
"info": "KQED's series of daily listener commentaries since 1991.",
"imageSrc": "https://cdn.kqed.org/wp-content/uploads/2025/01/Perspectives_Tile_Final.jpg",
"imageAlt": "KQED Perspectives",
"officialWebsiteLink": "/perspectives/",
"meta": {
"site": "radio",
"source": "kqed",
"order": 14
},
"link": "/perspectives",
"subscribe": {
"apple": "https://podcasts.apple.com/us/podcast/id73801135",
"npr": "https://www.npr.org/podcasts/432309616/perspectives",
"rss": "https://ww2.kqed.org/perspectives/category/perspectives/feed/",
"google": "https://podcasts.google.com/feed/aHR0cHM6Ly93dzIua3FlZC5vcmcvcGVyc3BlY3RpdmVzL2NhdGVnb3J5L3BlcnNwZWN0aXZlcy9mZWVkLw"
}
},
"planet-money": {
"id": "planet-money",
"title": "Planet Money",
"info": "The economy explained. Imagine you could call up a friend and say, Meet me at the bar and tell me what's going on with the economy. Now imagine that's actually a fun evening.",
"airtime": "SUN 3pm-4pm",
"imageSrc": "https://ww2.kqed.org/radio/wp-content/uploads/sites/50/2018/04/planetmoney.jpg",
"officialWebsiteLink": "https://www.npr.org/sections/money/",
"meta": {
"site": "news",
"source": "npr"
},
"link": "/radio/program/planet-money",
"subscribe": {
"npr": "https://rpb3r.app.goo.gl/M4f5",
"apple": "https://itunes.apple.com/us/podcast/planet-money/id290783428?mt=2",
"tuneIn": "https://tunein.com/podcasts/Business--Economics-Podcasts/Planet-Money-p164680/",
"rss": "https://feeds.npr.org/510289/podcast.xml"
}
},
"politicalbreakdown": {
"id": "politicalbreakdown",
"title": "Political Breakdown",
"tagline": "Politics from a personal perspective",
"info": "Political Breakdown is a new series that explores the political intersection of California and the nation. Each week hosts Scott Shafer and Marisa Lagos are joined with a new special guest to unpack politics -- with personality — and offer an insider’s glimpse at how politics happens.",
"airtime": "THU 6:30pm-7pm",
"imageSrc": "https://cdn.kqed.org/wp-content/uploads/2024/04/Political-Breakdown-2024-Podcast-Tile-703x703-1.jpg",
"imageAlt": "KQED Political Breakdown",
"officialWebsiteLink": "/podcasts/politicalbreakdown",
"meta": {
"site": "radio",
"source": "kqed",
"order": 5
},
"link": "/podcasts/politicalbreakdown",
"subscribe": {
"apple": "https://podcasts.apple.com/us/podcast/political-breakdown/id1327641087",
"amazon": "https://music.amazon.com/podcasts/e0c2d153-ad36-4c8d-901d-f1da6a724824/political-breakdown",
"npr": "https://www.npr.org/podcasts/572155894/political-breakdown",
"stitcher": "https://www.stitcher.com/podcast/kqed/political-breakdown",
"spotify": "https://open.spotify.com/show/07RVyIjIdk2WDuVehvBMoN",
"rss": "https://ww2.kqed.org/news/tag/political-breakdown/feed/podcast"
}
},
"possible": {
"id": "possible",
"title": "Possible",
"info": "Possible is hosted by entrepreneur Reid Hoffman and writer Aria Finger. Together in Possible, Hoffman and Finger lead enlightening discussions about building a brighter collective future. The show features interviews with visionary guests like Trevor Noah, Sam Altman and Janette Sadik-Khan. Possible paints an optimistic portrait of the world we can create through science, policy, business, art and our shared humanity. It asks: What if everything goes right for once? How can we get there? Each episode also includes a short fiction story generated by advanced AI GPT-4, serving as a thought-provoking springboard to speculate how humanity could leverage technology for good.",
"airtime": "SUN 2pm",
"imageSrc": "https://cdn.kqed.org/wp-content/uploads/2024/04/Possible-Podcast-Tile-360x360-1.jpg",
"officialWebsiteLink": "https://www.possible.fm/",
"meta": {
"site": "news",
"source": "Possible"
},
"link": "/radio/program/possible",
"subscribe": {
"apple": "https://podcasts.apple.com/us/podcast/possible/id1677184070",
"spotify": "https://open.spotify.com/show/730YpdUSNlMyPQwNnyjp4k"
}
},
"pri-the-world": {
"id": "pri-the-world",
"title": "PRI's The World: Latest Edition",
"info": "Each weekday, host Marco Werman and his team of producers bring you the world's most interesting stories in an hour of radio that reminds us just how small our planet really is.",
"airtime": "MON-FRI 2pm-3pm",
"imageSrc": "https://cdn.kqed.org/wp-content/uploads/2024/04/The-World-Podcast-Tile-360x360-1.jpg",
"officialWebsiteLink": "https://www.pri.org/programs/the-world",
"meta": {
"site": "news",
"source": "PRI"
},
"link": "/radio/program/pri-the-world",
"subscribe": {
"apple": "https://itunes.apple.com/us/podcast/pris-the-world-latest-edition/id278196007?mt=2",
"tuneIn": "https://tunein.com/podcasts/News--Politics-Podcasts/PRIs-The-World-p24/",
"rss": "http://feeds.feedburner.com/pri/theworld"
}
},
"radiolab": {
"id": "radiolab",
"title": "Radiolab",
"info": "A two-time Peabody Award-winner, Radiolab is an investigation told through sounds and stories, and centered around one big idea. In the Radiolab world, information sounds like music and science and culture collide. Hosted by Jad Abumrad and Robert Krulwich, the show is designed for listeners who demand skepticism, but appreciate wonder. WNYC Studios is the producer of other leading podcasts including Freakonomics Radio, Death, Sex & Money, On the Media and many more.",
"airtime": "SUN 12am-1am, SAT 2pm-3pm",
"imageSrc": "https://ww2.kqed.org/radio/wp-content/uploads/sites/50/2018/04/radiolab1400.png",
"officialWebsiteLink": "https://www.wnycstudios.org/shows/radiolab/",
"meta": {
"site": "science",
"source": "WNYC"
},
"link": "/radio/program/radiolab",
"subscribe": {
"apple": "https://itunes.apple.com/us/podcast/radiolab/id152249110?mt=2",
"tuneIn": "https://tunein.com/radio/RadioLab-p68032/",
"rss": "https://feeds.wnyc.org/radiolab"
}
},
"reveal": {
"id": "reveal",
"title": "Reveal",
"info": "Created by The Center for Investigative Reporting and PRX, Reveal is public radios first one-hour weekly radio show and podcast dedicated to investigative reporting. Credible, fact based and without a partisan agenda, Reveal combines the power and artistry of driveway moment storytelling with data-rich reporting on critically important issues. The result is stories that inform and inspire, arming our listeners with information to right injustices, hold the powerful accountable and improve lives.Reveal is hosted by Al Letson and showcases the award-winning work of CIR and newsrooms large and small across the nation. In a radio and podcast market crowded with choices, Reveal focuses on important and often surprising stories that illuminate the world for our listeners.",
"airtime": "SAT 4pm-5pm",
"imageSrc": "https://ww2.kqed.org/radio/wp-content/uploads/sites/50/2018/04/reveal300px.png",
"officialWebsiteLink": "https://www.revealnews.org/episodes/",
"meta": {
"site": "news",
"source": "npr"
},
"link": "/radio/program/reveal",
"subscribe": {
"apple": "https://itunes.apple.com/us/podcast/reveal/id886009669",
"tuneIn": "https://tunein.com/radio/Reveal-p679597/",
"rss": "http://feeds.revealradio.org/revealpodcast"
}
},
"rightnowish": {
"id": "rightnowish",
"title": "Rightnowish",
"tagline": "Art is where you find it",
"info": "Rightnowish digs into life in the Bay Area right now… ish. Journalist Pendarvis Harshaw takes us to galleries painted on the sides of liquor stores in West Oakland. We'll dance in warehouses in the Bayview, make smoothies with kids in South Berkeley, and listen to classical music in a 1984 Cutlass Supreme in Richmond. Every week, Pen talks to movers and shakers about how the Bay Area shapes what they create, and how they shape the place we call home.",
"imageSrc": "https://cdn.kqed.org/wp-content/uploads/2024/04/Rightnowish-Podcast-Tile-500x500-1.jpg",
"imageAlt": "KQED Rightnowish with Pendarvis Harshaw",
"officialWebsiteLink": "/podcasts/rightnowish",
"meta": {
"site": "arts",
"source": "kqed",
"order": 16
},
"link": "/podcasts/rightnowish",
"subscribe": {
"npr": "https://www.npr.org/podcasts/721590300/rightnowish",
"rss": "https://ww2.kqed.org/arts/programs/rightnowish/feed/podcast",
"apple": "https://podcasts.apple.com/us/podcast/rightnowish/id1482187648",
"stitcher": "https://www.stitcher.com/podcast/kqed/rightnowish",
"google": "https://podcasts.google.com/feed/aHR0cHM6Ly9mZWVkcy5tZWdhcGhvbmUuZm0vS1FJTkMxMjU5MTY3NDc4",
"spotify": "https://open.spotify.com/show/7kEJuafTzTVan7B78ttz1I"
}
},
"science-friday": {
"id": "science-friday",
"title": "Science Friday",
"info": "Science Friday is a weekly science talk show, broadcast live over public radio stations nationwide. Each week, the show focuses on science topics that are in the news and tries to bring an educated, balanced discussion to bear on the scientific issues at hand. Panels of expert guests join host Ira Flatow, a veteran science journalist, to discuss science and to take questions from listeners during the call-in portion of the program.",
"airtime": "FRI 11am-1pm",
"imageSrc": "https://cdn.kqed.org/wp-content/uploads/2024/04/Science-Friday-Podcast-Tile-360x360-1.jpg",
"officialWebsiteLink": "https://www.wnycstudios.org/shows/science-friday",
"meta": {
"site": "news",
"source": "npr"
},
"link": "/radio/program/science-friday",
"subscribe": {
"apple": "https://itunes.apple.com/WebObjects/MZStore.woa/wa/viewPodcast?s=143441&mt=2&id=73329284&at=11l79Y&ct=nprdirectory",
"tuneIn": "https://tunein.com/radio/Science-Friday-p394/",
"rss": "http://feeds.wnyc.org/science-friday"
}
},
"snap-judgment": {
"id": "snap-judgment",
"title": "Snap Judgment",
"tagline": "Real stories with killer beats",
"info": "The Snap Judgment radio show and podcast mixes real stories with killer beats to produce cinematic, dramatic radio. Snap's musical brand of storytelling dares listeners to see the world through the eyes of another. This is storytelling... with a BEAT!! Snap first aired on public radio stations nationwide in July 2010. Today, Snap Judgment airs on over 450 public radio stations and is brought to the airwaves by KQED & PRX.",
"airtime": "SAT 1pm-2pm, 9pm-10pm",
"imageSrc": "https://cdn.kqed.org/wp-content/uploads/2024/05/Snap-Judgment-Podcast-Tile-703x703-1.jpg",
"imageAlt": "KQED Snap Judgment",
"officialWebsiteLink": "https://snapjudgment.org",
"meta": {
"site": "arts",
"source": "kqed",
"order": 4
},
"link": "https://snapjudgment.org",
"subscribe": {
"apple": "https://podcasts.apple.com/us/podcast/snap-judgment/id283657561",
"npr": "https://www.npr.org/podcasts/449018144/snap-judgment",
"stitcher": "https://www.pandora.com/podcast/snap-judgment/PC:241?source=stitcher-sunset",
"spotify": "https://open.spotify.com/show/3Cct7ZWmxHNAtLgBTqjC5v",
"rss": "https://snap.feed.snapjudgment.org/"
}
},
"soldout": {
"id": "soldout",
"title": "SOLD OUT: Rethinking Housing in America",
"tagline": "A new future for housing",
"info": "Sold Out: Rethinking Housing in America",
"imageSrc": "https://cdn.kqed.org/wp-content/uploads/2024/04/Sold-Out-Podcast-Tile-703x703-1.jpg",
"imageAlt": "KQED Sold Out: Rethinking Housing in America",
"officialWebsiteLink": "/podcasts/soldout",
"meta": {
"site": "news",
"source": "kqed",
"order": 13
},
"link": "/podcasts/soldout",
"subscribe": {
"npr": "https://www.npr.org/podcasts/911586047/s-o-l-d-o-u-t-a-new-future-for-housing",
"apple": "https://podcasts.apple.com/us/podcast/introducing-sold-out-rethinking-housing-in-america/id1531354937",
"rss": "https://feeds.megaphone.fm/soldout",
"spotify": "https://open.spotify.com/show/38dTBSk2ISFoPiyYNoKn1X",
"stitcher": "https://www.stitcher.com/podcast/kqed/sold-out-rethinking-housing-in-america",
"tunein": "https://tunein.com/radio/SOLD-OUT-Rethinking-Housing-in-America-p1365871/"
}
},
"spooked": {
"id": "spooked",
"title": "Spooked",
"tagline": "True-life supernatural stories",
"info": "",
"imageSrc": "https://cdn.kqed.org/wp-content/uploads/2024/10/Spooked-Podcast-Tile-703x703-1.jpg",
"imageAlt": "KQED Spooked",
"officialWebsiteLink": "https://spookedpodcast.org/",
"meta": {
"site": "news",
"source": "kqed",
"order": 7
},
"link": "https://spookedpodcast.org/",
"subscribe": {
"apple": "https://podcasts.apple.com/us/podcast/spooked/id1279361017",
"npr": "https://www.npr.org/podcasts/549547848/snap-judgment-presents-spooked",
"spotify": "https://open.spotify.com/show/76571Rfl3m7PLJQZKQIGCT",
"rss": "https://feeds.simplecast.com/TBotaapn"
}
},
"tech-nation": {
"id": "tech-nation",
"title": "Tech Nation Radio Podcast",
"info": "Tech Nation is a weekly public radio program, hosted by Dr. Moira Gunn. Founded in 1993, it has grown from a simple interview show to a multi-faceted production, featuring conversations with noted technology and science leaders, and a weekly science and technology-related commentary.",
"airtime": "FRI 10pm",
"imageSrc": "https://cdn.kqed.org/wp-content/uploads/2024/04/Tech-Nation-Radio-Podcast-Tile-360x360-1.jpg",
"officialWebsiteLink": "http://technation.podomatic.com/",
"meta": {
"site": "science",
"source": "Tech Nation Media"
},
"link": "/radio/program/tech-nation",
"subscribe": {
"rss": "https://technation.podomatic.com/rss2.xml"
}
},
"ted-radio-hour": {
"id": "ted-radio-hour",
"title": "TED Radio Hour",
"info": "The TED Radio Hour is a journey through fascinating ideas, astonishing inventions, fresh approaches to old problems, and new ways to think and create.",
"airtime": "SUN 3pm-4pm, SAT 10pm-11pm",
"imageSrc": "https://ww2.kqed.org/radio/wp-content/uploads/sites/50/2018/04/tedRadioHour.jpg",
"officialWebsiteLink": "https://www.npr.org/programs/ted-radio-hour/?showDate=2018-06-22",
"meta": {
"site": "news",
"source": "npr"
},
"link": "/radio/program/ted-radio-hour",
"subscribe": {
"npr": "https://rpb3r.app.goo.gl/8vsS",
"apple": "https://itunes.apple.com/WebObjects/MZStore.woa/wa/viewPodcast?s=143441&mt=2&id=523121474&at=11l79Y&ct=nprdirectory",
"tuneIn": "https://tunein.com/radio/TED-Radio-Hour-p418021/",
"rss": "https://feeds.npr.org/510298/podcast.xml"
}
},
"thebay": {
"id": "thebay",
"title": "The Bay",
"tagline": "Local news to keep you rooted",
"info": "Host Devin Katayama walks you through the biggest story of the day with reporters and newsmakers.",
"imageSrc": "https://cdn.kqed.org/wp-content/uploads/2024/04/The-Bay-Podcast-Tile-703x703-1.jpg",
"imageAlt": "KQED The Bay",
"officialWebsiteLink": "/podcasts/thebay",
"meta": {
"site": "radio",
"source": "kqed",
"order": 2
},
"link": "/podcasts/thebay",
"subscribe": {
"apple": "https://podcasts.apple.com/us/podcast/the-bay/id1350043452",
"amazon": "https://music.amazon.com/podcasts/d800ea4c-7a2c-42f2-b861-edaf78a5db0b/the-bay",
"npr": "https://www.npr.org/podcasts/586725995/the-bay",
"stitcher": "https://www.stitcher.com/podcast/kqed/the-bay",
"spotify": "https://open.spotify.com/show/4BIKBKIujizLHlIlBNaAqQ",
"rss": "https://feeds.megaphone.fm/KQINC8259786327"
}
},
"thelatest": {
"id": "thelatest",
"title": "The Latest",
"tagline": "Trusted local news in real time",
"info": "",
"imageSrc": "https://cdn.kqed.org/wp-content/uploads/2025/05/The-Latest-2025-Podcast-Tile-703x703-1.jpg",
"imageAlt": "KQED The Latest",
"officialWebsiteLink": "/thelatest",
"meta": {
"site": "news",
"source": "kqed",
"order": 6
},
"link": "/thelatest",
"subscribe": {
"apple": "https://podcasts.apple.com/us/podcast/the-latest-from-kqed/id1197721799",
"npr": "https://www.npr.org/podcasts/1257949365/the-latest-from-k-q-e-d",
"spotify": "https://open.spotify.com/show/5KIIXMgM9GTi5AepwOYvIZ?si=bd3053fec7244dba",
"rss": "https://feeds.megaphone.fm/KQINC9137121918"
}
},
"theleap": {
"id": "theleap",
"title": "The Leap",
"tagline": "What if you closed your eyes, and jumped?",
"info": "Stories about people making dramatic, risky changes, told by award-winning public radio reporter Judy Campbell.",
"imageSrc": "https://cdn.kqed.org/wp-content/uploads/2024/04/The-Leap-Podcast-Tile-703x703-1.jpg",
"imageAlt": "KQED The Leap",
"officialWebsiteLink": "/podcasts/theleap",
"meta": {
"site": "news",
"source": "kqed",
"order": 17
},
"link": "/podcasts/theleap",
"subscribe": {
"apple": "https://podcasts.apple.com/us/podcast/the-leap/id1046668171",
"npr": "https://www.npr.org/podcasts/447248267/the-leap",
"stitcher": "https://www.stitcher.com/podcast/kqed/the-leap",
"spotify": "https://open.spotify.com/show/3sSlVHHzU0ytLwuGs1SD1U",
"rss": "https://ww2.kqed.org/news/programs/the-leap/feed/podcast"
}
},
"the-moth-radio-hour": {
"id": "the-moth-radio-hour",
"title": "The Moth Radio Hour",
"info": "Since its launch in 1997, The Moth has presented thousands of true stories, told live and without notes, to standing-room-only crowds worldwide. Moth storytellers stand alone, under a spotlight, with only a microphone and a roomful of strangers. The storyteller and the audience embark on a high-wire act of shared experience which is both terrifying and exhilarating. Since 2008, The Moth podcast has featured many of our favorite stories told live on Moth stages around the country. For information on all of our programs and live events, visit themoth.org.",
"airtime": "SAT 8pm-9pm and SUN 11am-12pm",
"imageSrc": "https://ww2.kqed.org/radio/wp-content/uploads/sites/50/2018/04/theMoth.jpg",
"officialWebsiteLink": "https://themoth.org/",
"meta": {
"site": "arts",
"source": "prx"
},
"link": "/radio/program/the-moth-radio-hour",
"subscribe": {
"apple": "https://itunes.apple.com/us/podcast/the-moth-podcast/id275699983?mt=2",
"tuneIn": "https://tunein.com/radio/The-Moth-p273888/",
"rss": "http://feeds.themoth.org/themothpodcast"
}
},
"the-new-yorker-radio-hour": {
"id": "the-new-yorker-radio-hour",
"title": "The New Yorker Radio Hour",
"info": "The New Yorker Radio Hour is a weekly program presented by the magazine's editor, David Remnick, and produced by WNYC Studios and The New Yorker. Each episode features a diverse mix of interviews, profiles, storytelling, and an occasional burst of humor inspired by the magazine, and shaped by its writers, artists, and editors. This isn't a radio version of a magazine, but something all its own, reflecting the rich possibilities of audio storytelling and conversation. Theme music for the show was composed and performed by Merrill Garbus of tUnE-YArDs.",
"airtime": "SAT 10am-11am",
"imageSrc": "https://cdn.kqed.org/wp-content/uploads/2024/04/The-New-Yorker-Podcast-Tile-360x360-1.jpg",
"officialWebsiteLink": "https://www.wnycstudios.org/shows/tnyradiohour",
"meta": {
"site": "arts",
"source": "WNYC"
},
"link": "/radio/program/the-new-yorker-radio-hour",
"subscribe": {
"apple": "https://itunes.apple.com/us/podcast/id1050430296",
"tuneIn": "https://tunein.com/podcasts/WNYC-Podcasts/New-Yorker-Radio-Hour-p803804/",
"rss": "https://feeds.feedburner.com/newyorkerradiohour"
}
},
"the-sam-sanders-show": {
"id": "the-sam-sanders-show",
"title": "The Sam Sanders Show",
"info": "One of public radio's most dynamic voices, Sam Sanders helped launch The NPR Politics Podcast and hosted NPR's hit show It's Been A Minute. Now, the award-winning host returns with something brand new, The Sam Sanders Show. Every week, Sam Sanders and friends dig into the culture that shapes our lives: what's driving the biggest trends, how artists really think, and even the memes you can't stop scrolling past. Sam is beloved for his way of unpacking the world and bringing you up close to fresh currents and engaging conversations. The Sam Sanders Show is smart, funny and always a good time.",
"airtime": "FRI 12-1pm AND SAT 11am-12pm",
"imageSrc": "https://cdn.kqed.org/wp-content/uploads/2025/11/The-Sam-Sanders-Show-Podcast-Tile-400x400-1.jpg",
"officialWebsiteLink": "https://www.kcrw.com/shows/the-sam-sanders-show/latest",
"meta": {
"site": "arts",
"source": "KCRW"
},
"link": "https://www.kcrw.com/shows/the-sam-sanders-show/latest",
"subscribe": {
"rss": "https://feed.cdnstream1.com/zjb/feed/download/ac/28/59/ac28594c-e1d0-4231-8728-61865cdc80e8.xml"
}
},
"the-splendid-table": {
"id": "the-splendid-table",
"title": "The Splendid Table",
"info": "\u003cem>The Splendid Table\u003c/em> hosts our nation's conversations about cooking, sustainability and food culture.",
"imageSrc": "https://cdn.kqed.org/wp-content/uploads/2024/04/The-Splendid-Table-Podcast-Tile-360x360-1.jpg",
"officialWebsiteLink": "https://www.splendidtable.org/",
"airtime": "SUN 10-11 pm",
"meta": {
"site": "radio",
"source": "npr"
},
"link": "/radio/program/the-splendid-table"
},
"this-american-life": {
"id": "this-american-life",
"title": "This American Life",
"info": "This American Life is a weekly public radio show, heard by 2.2 million people on more than 500 stations. Another 2.5 million people download the weekly podcast. It is hosted by Ira Glass, produced in collaboration with Chicago Public Media, delivered to stations by PRX The Public Radio Exchange, and has won all of the major broadcasting awards.",
"airtime": "SAT 12pm-1pm, 7pm-8pm",
"imageSrc": "https://ww2.kqed.org/radio/wp-content/uploads/sites/50/2018/04/thisAmericanLife.png",
"officialWebsiteLink": "https://www.thisamericanlife.org/",
"meta": {
"site": "news",
"source": "wbez"
},
"link": "/radio/program/this-american-life",
"subscribe": {
"apple": "https://itunes.apple.com/WebObjects/MZStore.woa/wa/viewPodcast?s=143441&mt=2&id=201671138&at=11l79Y&ct=nprdirectory",
"rss": "https://www.thisamericanlife.org/podcast/rss.xml"
}
},
"tinydeskradio": {
"id": "tinydeskradio",
"title": "Tiny Desk Radio",
"info": "We're bringing the best of Tiny Desk to the airwaves, only on public radio.",
"airtime": "SUN 8pm and SAT 9pm",
"imageSrc": "https://cdn.kqed.org/wp-content/uploads/2025/04/300x300-For-Member-Station-Logo-Tiny-Desk-Radio-@2x.png",
"officialWebsiteLink": "https://www.npr.org/series/g-s1-52030/tiny-desk-radio",
"meta": {
"site": "news",
"source": "npr"
},
"link": "/radio/program/tinydeskradio",
"subscribe": {
"rss": "https://feeds.npr.org/g-s1-52030/rss.xml"
}
},
"wait-wait-dont-tell-me": {
"id": "wait-wait-dont-tell-me",
"title": "Wait Wait... Don't Tell Me!",
"info": "Peter Sagal and Bill Kurtis host the weekly NPR News quiz show alongside some of the best and brightest news and entertainment personalities.",
"airtime": "SUN 10am-11am, SAT 11am-12pm, SAT 6pm-7pm",
"imageSrc": "https://cdn.kqed.org/wp-content/uploads/2024/04/Wait-Wait-Podcast-Tile-300x300-1.jpg",
"officialWebsiteLink": "https://www.npr.org/programs/wait-wait-dont-tell-me/",
"meta": {
"site": "news",
"source": "npr"
},
"link": "/radio/program/wait-wait-dont-tell-me",
"subscribe": {
"npr": "https://rpb3r.app.goo.gl/Xogv",
"apple": "https://itunes.apple.com/WebObjects/MZStore.woa/wa/viewPodcast?s=143441&mt=2&id=121493804&at=11l79Y&ct=nprdirectory",
"tuneIn": "https://tunein.com/radio/Wait-Wait-Dont-Tell-Me-p46/",
"rss": "https://feeds.npr.org/344098539/podcast.xml"
}
},
"weekend-edition-saturday": {
"id": "weekend-edition-saturday",
"title": "Weekend Edition Saturday",
"info": "Weekend Edition Saturday wraps up the week's news and offers a mix of analysis and features on a wide range of topics, including arts, sports, entertainment, and human interest stories. The two-hour program is hosted by NPR's Peabody Award-winning Scott Simon.",
"airtime": "SAT 5am-10am",
"imageSrc": "https://cdn.kqed.org/wp-content/uploads/2024/04/Weekend-Edition-Podcast-Tile-360x360-1.jpg",
"officialWebsiteLink": "https://www.npr.org/programs/weekend-edition-saturday/",
"meta": {
"site": "news",
"source": "npr"
},
"link": "/radio/program/weekend-edition-saturday"
},
"weekend-edition-sunday": {
"id": "weekend-edition-sunday",
"title": "Weekend Edition Sunday",
"info": "Weekend Edition Sunday features interviews with newsmakers, artists, scientists, politicians, musicians, writers, theologians and historians. The program has covered news events from Nelson Mandela's 1990 release from a South African prison to the capture of Saddam Hussein.",
"airtime": "SUN 5am-10am",
"imageSrc": "https://cdn.kqed.org/wp-content/uploads/2024/04/Weekend-Edition-Podcast-Tile-360x360-1.jpg",
"officialWebsiteLink": "https://www.npr.org/programs/weekend-edition-sunday/",
"meta": {
"site": "news",
"source": "npr"
},
"link": "/radio/program/weekend-edition-sunday"
}
},
"racesReducer": {},
"racesGenElectionReducer": {},
"racesGenElection2026Reducer": {},
"radioSchedulesReducer": {},
"listsReducer": {},
"recallGuideReducer": {
"intros": {},
"policy": {},
"candidates": {}
},
"savedArticleReducer": {
"articles": [],
"status": {}
},
"newslettersReducer": {
"isFetching": false,
"fetchFailed": false,
"hasFetched": false,
"newsletters": {},
"isSubscribing": false,
"isUnsubscribing": false,
"subscribedNewsletters": {}
},
"termsReducer": {
"about": {
"name": "About",
"type": "terms",
"id": "about",
"slug": "about",
"link": "/about",
"taxonomy": "site"
},
"arts": {
"name": "Arts & Culture",
"grouping": [
"arts",
"pop",
"trulyca"
],
"description": "KQED Arts provides daily in-depth coverage of the Bay Area's music, art, film, performing arts, literature and arts news, as well as cultural commentary and criticism.",
"type": "terms",
"id": "arts",
"slug": "arts",
"link": "/arts",
"taxonomy": "site"
},
"artschool": {
"name": "Art School",
"parent": "arts",
"type": "terms",
"id": "artschool",
"slug": "artschool",
"link": "/artschool",
"taxonomy": "site"
},
"bayareabites": {
"name": "KQED food",
"grouping": [
"food",
"bayareabites",
"checkplease"
],
"parent": "food",
"type": "terms",
"id": "bayareabites",
"slug": "bayareabites",
"link": "/food",
"taxonomy": "site"
},
"bayareahiphop": {
"name": "Bay Area Hiphop",
"type": "terms",
"id": "bayareahiphop",
"slug": "bayareahiphop",
"link": "/bayareahiphop",
"taxonomy": "site"
},
"campaign21": {
"name": "Campaign 21",
"type": "terms",
"id": "campaign21",
"slug": "campaign21",
"link": "/campaign21",
"taxonomy": "site"
},
"careers": {
"name": "Careers",
"type": "terms",
"id": "careers",
"slug": "careers",
"link": "/careers",
"taxonomy": "site"
},
"checkplease": {
"name": "KQED food",
"grouping": [
"food",
"bayareabites",
"checkplease"
],
"parent": "food",
"type": "terms",
"id": "checkplease",
"slug": "checkplease",
"link": "/food",
"taxonomy": "site"
},
"education": {
"name": "Education",
"grouping": [
"education"
],
"type": "terms",
"id": "education",
"slug": "education",
"link": "/education",
"taxonomy": "site"
},
"elections": {
"name": "Elections",
"type": "terms",
"id": "elections",
"slug": "elections",
"link": "/elections",
"taxonomy": "site"
},
"events": {
"name": "Events",
"type": "terms",
"id": "events",
"slug": "events",
"link": "/events",
"taxonomy": "site"
},
"event": {
"name": "Event",
"alias": "events",
"type": "terms",
"id": "event",
"slug": "event",
"link": "/event",
"taxonomy": "site"
},
"filmschoolshorts": {
"name": "Film School Shorts",
"type": "terms",
"id": "filmschoolshorts",
"slug": "filmschoolshorts",
"link": "/filmschoolshorts",
"taxonomy": "site"
},
"food": {
"name": "KQED food",
"grouping": [
"food",
"bayareabites",
"checkplease"
],
"type": "terms",
"id": "food",
"slug": "food",
"link": "/food",
"taxonomy": "site"
},
"forum": {
"name": "Forum",
"relatedContentQuery": "posts/forum?",
"parent": "news",
"type": "terms",
"id": "forum",
"slug": "forum",
"link": "/forum",
"taxonomy": "site"
},
"futureofyou": {
"name": "Future of You",
"grouping": [
"science",
"futureofyou"
],
"parent": "science",
"type": "terms",
"id": "futureofyou",
"slug": "futureofyou",
"link": "/futureofyou",
"taxonomy": "site"
},
"jpepinheart": {
"name": "KQED food",
"relatedContentQuery": "posts/food,bayareabites,checkplease",
"parent": "food",
"type": "terms",
"id": "jpepinheart",
"slug": "jpepinheart",
"link": "/food",
"taxonomy": "site"
},
"liveblog": {
"name": "Live Blog",
"type": "terms",
"id": "liveblog",
"slug": "liveblog",
"link": "/liveblog",
"taxonomy": "site"
},
"livetv": {
"name": "Live TV",
"parent": "tv",
"type": "terms",
"id": "livetv",
"slug": "livetv",
"link": "/livetv",
"taxonomy": "site"
},
"lowdown": {
"name": "The Lowdown",
"relatedContentQuery": "posts/lowdown?",
"parent": "news",
"type": "terms",
"id": "lowdown",
"slug": "lowdown",
"link": "/lowdown",
"taxonomy": "site"
},
"mindshift": {
"name": "Mindshift",
"parent": "news",
"description": "MindShift explores the future of education by highlighting the innovative – and sometimes counterintuitive – ways educators and parents are helping all children succeed.",
"type": "terms",
"id": "mindshift",
"slug": "mindshift",
"link": "/mindshift",
"taxonomy": "site"
},
"news": {
"name": "News",
"grouping": [
"news",
"forum"
],
"type": "terms",
"id": "news",
"slug": "news",
"link": "/news",
"taxonomy": "site"
},
"newsletters": {
"name": "newsletters",
"type": "terms",
"id": "newsletters",
"slug": "newsletters",
"link": "/newsletters",
"taxonomy": "site"
},
"perspectives": {
"name": "Perspectives",
"parent": "radio",
"type": "terms",
"id": "perspectives",
"slug": "perspectives",
"link": "/perspectives",
"taxonomy": "site"
},
"podcasts": {
"name": "Podcasts",
"type": "terms",
"id": "podcasts",
"slug": "podcasts",
"link": "/podcasts",
"taxonomy": "site"
},
"pop": {
"name": "Pop",
"parent": "arts",
"type": "terms",
"id": "pop",
"slug": "pop",
"link": "/pop",
"taxonomy": "site"
},
"pressroom": {
"name": "Pressroom",
"type": "terms",
"id": "pressroom",
"slug": "pressroom",
"link": "/pressroom",
"taxonomy": "site"
},
"quest": {
"name": "Quest",
"parent": "science",
"type": "terms",
"id": "quest",
"slug": "quest",
"link": "/quest",
"taxonomy": "site"
},
"radio": {
"name": "Radio",
"grouping": [
"forum",
"perspectives"
],
"description": "Listen to KQED Public Radio – home of Forum and The California Report – on 88.5 FM in San Francisco, 89.3 FM in Sacramento, 88.3 FM in Santa Rosa and 88.1 FM in Martinez.",
"type": "terms",
"id": "radio",
"slug": "radio",
"link": "/radio",
"taxonomy": "site"
},
"root": {
"name": "KQED",
"image": "https://ww2.kqed.org/app/uploads/2020/02/KQED-OG-Image@1x.png",
"imageWidth": 1200,
"imageHeight": 630,
"headData": {
"title": "KQED | News, Radio, Podcasts, TV | Public Media for Northern California",
"description": "KQED provides public radio, television, and independent reporting on issues that matter to the Bay Area. We’re the NPR and PBS member station for Northern California."
},
"type": "terms",
"id": "root",
"slug": "root",
"link": "/root",
"taxonomy": "site"
},
"science": {
"name": "Science",
"grouping": [
"science",
"futureofyou"
],
"description": "KQED Science brings you award-winning science and environment coverage from the Bay Area and beyond.",
"type": "terms",
"id": "science",
"slug": "science",
"link": "/science",
"taxonomy": "site"
},
"stateofhealth": {
"name": "State of Health",
"parent": "science",
"type": "terms",
"id": "stateofhealth",
"slug": "stateofhealth",
"link": "/stateofhealth",
"taxonomy": "site"
},
"support": {
"name": "Support",
"type": "terms",
"id": "support",
"slug": "support",
"link": "/support",
"taxonomy": "site"
},
"thedolist": {
"name": "The Do List",
"parent": "arts",
"type": "terms",
"id": "thedolist",
"slug": "thedolist",
"link": "/thedolist",
"taxonomy": "site"
},
"trulyca": {
"name": "Truly CA",
"grouping": [
"arts",
"pop",
"trulyca"
],
"parent": "arts",
"type": "terms",
"id": "trulyca",
"slug": "trulyca",
"link": "/trulyca",
"taxonomy": "site"
},
"tv": {
"name": "TV",
"type": "terms",
"id": "tv",
"slug": "tv",
"link": "/tv",
"taxonomy": "site"
},
"voterguide": {
"name": "Voter Guide",
"parent": "elections",
"alias": "elections",
"type": "terms",
"id": "voterguide",
"slug": "voterguide",
"link": "/voterguide",
"taxonomy": "site"
},
"guiaelectoral": {
"name": "Guia Electoral",
"parent": "elections",
"alias": "elections",
"type": "terms",
"id": "guiaelectoral",
"slug": "guiaelectoral",
"link": "/guiaelectoral",
"taxonomy": "site"
},
"bayareabites_15012": {
"type": "terms",
"id": "bayareabites_15012",
"meta": {
"index": "terms_1716263798",
"site": "bayareabites",
"id": "15012",
"found": true
},
"relationships": {},
"featImg": null,
"name": "Thanksgiving Recipes",
"description": "\u003cimg src=\"http://ww2.kqed.org/bayareabites/wp-content/uploads/sites/24/2015/11/THANKSGIVING-centerpiece1000-1.jpg\" alt=\"THANKSGIVING-centerpiece1000 (1)\" width=\"1000\" height=\"666\" class=\"aligncenter size-full wp-image-103674\" />\r\n\r\nEntrees, sides, desserts, vegan and gluten-free -- our special collection of autumn-themed recipes will help you create a sumptuous Thanksgiving feast for any of your holiday guests. ",
"taxonomy": "series",
"headData": {
"twImgId": null,
"twTitle": null,
"ogTitle": null,
"ogImgId": null,
"twDescription": null,
"description": "Entrees, sides, desserts, vegan and gluten-free -- our special collection of autumn-themed recipes will help you create a sumptuous Thanksgiving feast for any of your holiday guests.",
"title": "Thanksgiving Recipes Archives | KQED Bay Area Bites",
"ogDescription": null
},
"ttid": 99342,
"slug": "thanksgiving-recipes",
"isLoading": false,
"link": "/bayareabites/series/thanksgiving-recipes"
},
"bayareabites_1516": {
"type": "terms",
"id": "bayareabites_1516",
"meta": {
"index": "terms_1716263798",
"site": "bayareabites",
"id": "1516",
"found": true
},
"relationships": {},
"featImg": null,
"name": "baking and bakeries",
"description": null,
"taxonomy": "category",
"headData": {
"twImgId": null,
"twTitle": null,
"ogTitle": null,
"ogImgId": null,
"twDescription": null,
"description": null,
"title": "baking and bakeries Archives | KQED Bay Area Bites",
"ogDescription": null
},
"ttid": 1253,
"slug": "baking-and-bakeries",
"isLoading": false,
"link": "/bayareabites/category/baking-and-bakeries"
},
"bayareabites_752": {
"type": "terms",
"id": "bayareabites_752",
"meta": {
"index": "terms_1716263798",
"site": "bayareabites",
"id": "752",
"found": true
},
"relationships": {},
"featImg": null,
"name": "Bay Area Bites Food + Drink",
"description": null,
"taxonomy": "category",
"headData": {
"twImgId": null,
"twTitle": null,
"ogTitle": null,
"ogImgId": null,
"twDescription": null,
"description": null,
"title": "Bay Area Bites Food + Drink Archives | KQED Bay Area Bites",
"ogDescription": null
},
"ttid": 1,
"slug": "food-and-drink",
"isLoading": false,
"link": "/bayareabites/category/food-and-drink"
},
"bayareabites_2695": {
"type": "terms",
"id": "bayareabites_2695",
"meta": {
"index": "terms_1716263798",
"site": "bayareabites",
"id": "2695",
"found": true
},
"relationships": {},
"featImg": null,
"name": "cooking techniques and tips",
"description": null,
"taxonomy": "category",
"headData": {
"twImgId": null,
"twTitle": null,
"ogTitle": null,
"ogImgId": null,
"twDescription": null,
"description": null,
"title": "cooking techniques and tips Archives | KQED Bay Area Bites",
"ogDescription": null
},
"ttid": 1905,
"slug": "cooking-techniques-and-tips",
"isLoading": false,
"link": "/bayareabites/category/cooking-techniques-and-tips"
},
"bayareabites_1653": {
"type": "terms",
"id": "bayareabites_1653",
"meta": {
"index": "terms_1716263798",
"site": "bayareabites",
"id": "1653",
"found": true
},
"relationships": {},
"featImg": null,
"name": "dessert and chocolate",
"description": null,
"taxonomy": "category",
"headData": {
"twImgId": null,
"twTitle": null,
"ogTitle": null,
"ogImgId": null,
"twDescription": null,
"description": null,
"title": "dessert and chocolate Archives | KQED Bay Area Bites",
"ogDescription": null
},
"ttid": 12,
"slug": "dessert-and-chocolate",
"isLoading": false,
"link": "/bayareabites/category/dessert-and-chocolate"
},
"bayareabites_1874": {
"type": "terms",
"id": "bayareabites_1874",
"meta": {
"index": "terms_1716263798",
"site": "bayareabites",
"id": "1874",
"found": true
},
"relationships": {},
"featImg": null,
"name": "farmers and farms",
"description": null,
"taxonomy": "category",
"headData": {
"twImgId": null,
"twTitle": null,
"ogTitle": null,
"ogImgId": null,
"twDescription": null,
"description": null,
"title": "farmers and farms Archives | KQED Bay Area Bites",
"ogDescription": null
},
"ttid": 1452,
"slug": "farmers-farmers-markets",
"isLoading": false,
"link": "/bayareabites/category/farmers-farmers-markets"
},
"bayareabites_95": {
"type": "terms",
"id": "bayareabites_95",
"meta": {
"index": "terms_1716263798",
"site": "bayareabites",
"id": "95",
"found": true
},
"relationships": {},
"featImg": null,
"name": "farmers markets",
"description": null,
"taxonomy": "category",
"headData": {
"twImgId": null,
"twTitle": null,
"ogTitle": null,
"ogImgId": null,
"twDescription": null,
"description": null,
"title": "farmers markets Archives | KQED Bay Area Bites",
"ogDescription": null
},
"ttid": 59,
"slug": "farmers-markets",
"isLoading": false,
"link": "/bayareabites/category/farmers-markets"
},
"bayareabites_12550": {
"type": "terms",
"id": "bayareabites_12550",
"meta": {
"index": "terms_1716263798",
"site": "bayareabites",
"id": "12550",
"found": true
},
"relationships": {},
"featImg": null,
"name": "holiday recipes",
"description": null,
"taxonomy": "category",
"headData": {
"twImgId": null,
"twTitle": null,
"ogTitle": null,
"ogImgId": null,
"twDescription": null,
"description": null,
"title": "holiday recipes Archives | KQED Bay Area Bites",
"ogDescription": null
},
"ttid": 7013,
"slug": "holiday-recipes",
"isLoading": false,
"link": "/bayareabites/category/holiday-recipes"
},
"bayareabites_1763": {
"type": "terms",
"id": "bayareabites_1763",
"meta": {
"index": "terms_1716263798",
"site": "bayareabites",
"id": "1763",
"found": true
},
"relationships": {},
"featImg": null,
"name": "holidays and traditions",
"description": null,
"taxonomy": "category",
"headData": {
"twImgId": null,
"twTitle": null,
"ogTitle": null,
"ogImgId": null,
"twDescription": null,
"description": null,
"title": "holidays and traditions Archives | KQED Bay Area Bites",
"ogDescription": null
},
"ttid": 1254,
"slug": "holidays-and-traditions",
"isLoading": false,
"link": "/bayareabites/category/holidays-and-traditions"
},
"bayareabites_8405": {
"type": "terms",
"id": "bayareabites_8405",
"meta": {
"index": "terms_1716263798",
"site": "bayareabites",
"id": "8405",
"found": true
},
"relationships": {},
"featImg": null,
"name": "apple pie",
"description": null,
"taxonomy": "tag",
"headData": {
"twImgId": null,
"twTitle": null,
"ogTitle": null,
"ogImgId": null,
"twDescription": null,
"description": null,
"title": "apple pie Archives | KQED Bay Area Bites",
"ogDescription": null
},
"ttid": 2858,
"slug": "apple-pie",
"isLoading": false,
"link": "/bayareabites/tag/apple-pie"
},
"bayareabites_469": {
"type": "terms",
"id": "bayareabites_469",
"meta": {
"index": "terms_1716263798",
"site": "bayareabites",
"id": "469",
"found": true
},
"relationships": {},
"featImg": null,
"name": "apples",
"description": null,
"taxonomy": "tag",
"headData": {
"twImgId": null,
"twTitle": null,
"ogTitle": null,
"ogImgId": null,
"twDescription": null,
"description": null,
"title": "apples Archives | KQED Bay Area Bites",
"ogDescription": null
},
"ttid": 434,
"slug": "apples",
"isLoading": false,
"link": "/bayareabites/tag/apples"
},
"bayareabites_228": {
"type": "terms",
"id": "bayareabites_228",
"meta": {
"index": "terms_1716263798",
"site": "bayareabites",
"id": "228",
"found": true
},
"relationships": {},
"featImg": null,
"name": "pie",
"description": null,
"taxonomy": "tag",
"headData": {
"twImgId": null,
"twTitle": null,
"ogTitle": null,
"ogImgId": null,
"twDescription": null,
"description": null,
"title": "pie Archives | KQED Bay Area Bites",
"ogDescription": null
},
"ttid": 193,
"slug": "pie",
"isLoading": false,
"link": "/bayareabites/tag/pie"
},
"bayareabites_2594": {
"type": "terms",
"id": "bayareabites_2594",
"meta": {
"index": "terms_1716263798",
"site": "bayareabites",
"id": "2594",
"found": true
},
"relationships": {},
"featImg": null,
"name": "pie crust",
"description": null,
"taxonomy": "tag",
"headData": {
"twImgId": null,
"twTitle": null,
"ogTitle": null,
"ogImgId": null,
"twDescription": null,
"description": null,
"title": "pie crust Archives | KQED Bay Area Bites",
"ogDescription": null
},
"ttid": 1854,
"slug": "pie-crust",
"isLoading": false,
"link": "/bayareabites/tag/pie-crust"
},
"bayareabites_530": {
"type": "terms",
"id": "bayareabites_530",
"meta": {
"index": "terms_1716263798",
"site": "bayareabites",
"id": "530",
"found": true
},
"relationships": {},
"featImg": null,
"name": "thanksgiving",
"description": null,
"taxonomy": "tag",
"headData": {
"twImgId": null,
"twTitle": null,
"ogTitle": null,
"ogImgId": null,
"twDescription": null,
"description": null,
"title": "thanksgiving Archives | KQED Bay Area Bites",
"ogDescription": null
},
"ttid": 495,
"slug": "thanksgiving",
"isLoading": false,
"link": "/bayareabites/tag/thanksgiving"
},
"bayareabites_2962": {
"type": "terms",
"id": "bayareabites_2962",
"meta": {
"index": "terms_1716263798",
"site": "bayareabites",
"id": "2962",
"found": true
},
"relationships": {},
"featImg": null,
"name": "thanksgiving recipes",
"description": null,
"taxonomy": "tag",
"headData": {
"twImgId": null,
"twTitle": null,
"ogTitle": null,
"ogImgId": null,
"twDescription": null,
"description": null,
"title": "thanksgiving recipes Archives | KQED Bay Area Bites",
"ogDescription": null
},
"ttid": 2067,
"slug": "thanksgiving-recipes",
"isLoading": false,
"link": "/bayareabites/tag/thanksgiving-recipes"
}
},
"userPermissionsReducer": {
"wpLoggedIn": false
},
"eventsReducer": {},
"fssReducer": {},
"tvDailyScheduleReducer": {},
"tvWeeklyScheduleReducer": {},
"tvPrimetimeScheduleReducer": {},
"tvMonthlyScheduleReducer": {},
"userAccountReducer": {
"user": {
"email": null,
"emailStatus": "EMAIL_UNVALIDATED",
"loggedStatus": "LOGGED_OUT",
"loggingChecked": false,
"articles": [],
"firstName": null,
"lastName": null,
"phoneNumber": null,
"fetchingMembership": false,
"membershipError": false,
"memberships": [
{
"id": null,
"startDate": null,
"firstName": null,
"lastName": null,
"familyNumber": null,
"memberNumber": null,
"memberSince": null,
"expirationDate": null,
"pfsEligible": false,
"isSustaining": false,
"membershipLevel": "Prospect",
"membershipStatus": "Non Member",
"lastGiftDate": null,
"renewalDate": null,
"lastDonationAmount": null
}
]
},
"authModal": {
"isOpen": false,
"view": "LANDING_VIEW"
},
"error": null
},
"youthMediaReducer": {},
"checkPleaseReducer": {
"filterData": {
"region": {
"key": "Restaurant Region",
"filters": [
"Any Region"
]
},
"cuisine": {
"key": "Restaurant Cuisine",
"filters": [
"Any Cuisine"
]
}
},
"restaurantDataById": {},
"restaurantIdsSorted": [],
"error": null
},
"userAgentReducer": {
"userAgent": "Mozilla/5.0 AppleWebKit/537.36 (KHTML, like Gecko; compatible; ClaudeBot/1.0; +claudebot@anthropic.com)",
"isBot": true
}
}