upper waypoint

Learn to Make the Holy Grail of DIY Fresh Cheese: Mozzarella

Save ArticleSave Article
Failed to save article

Please try again

Homemade fresh mozzarella.
Homemade fresh mozzarella. (Sean Itrich)

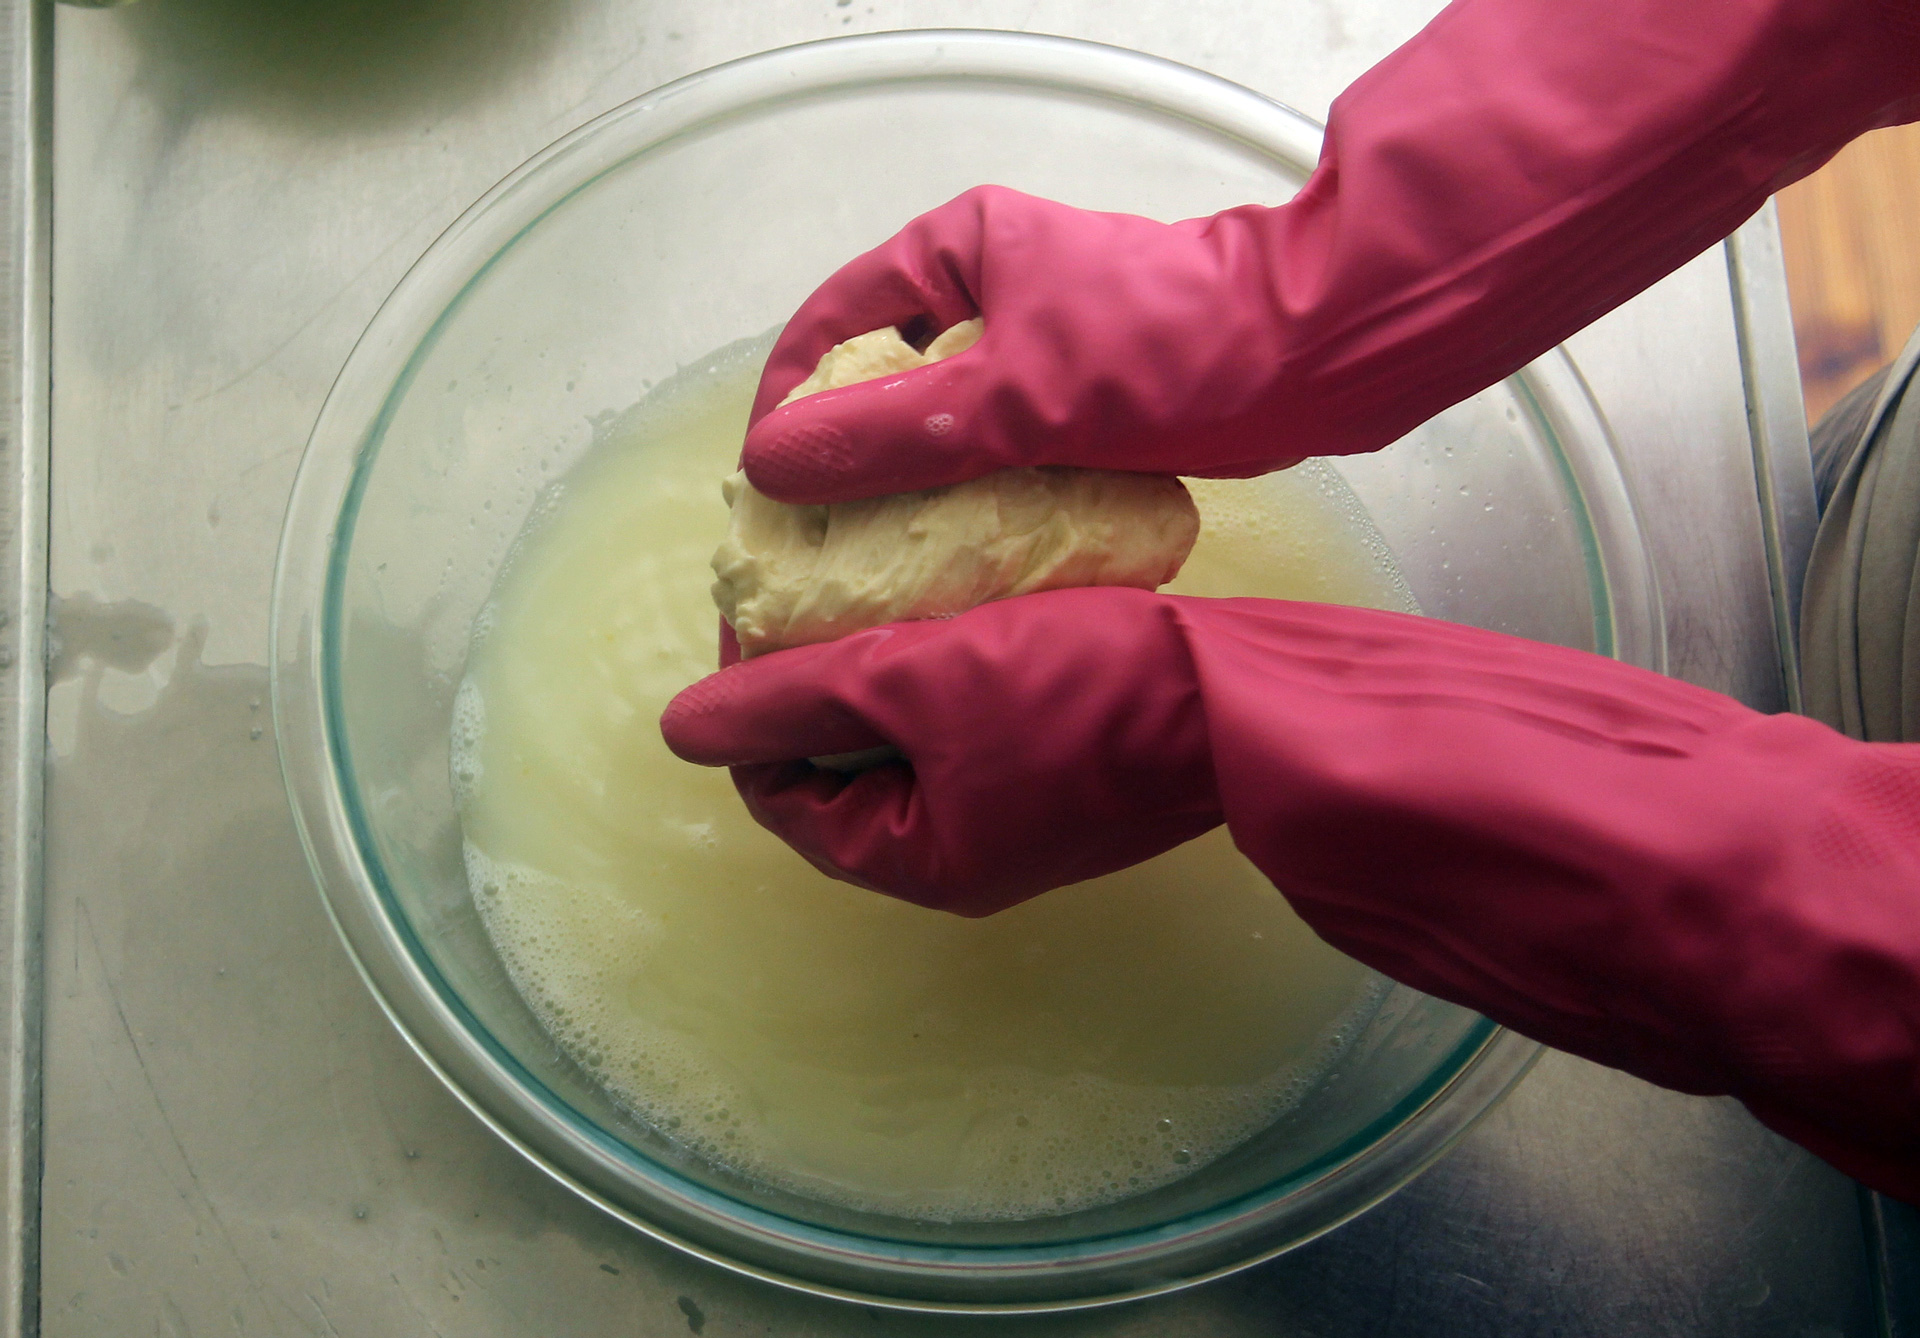
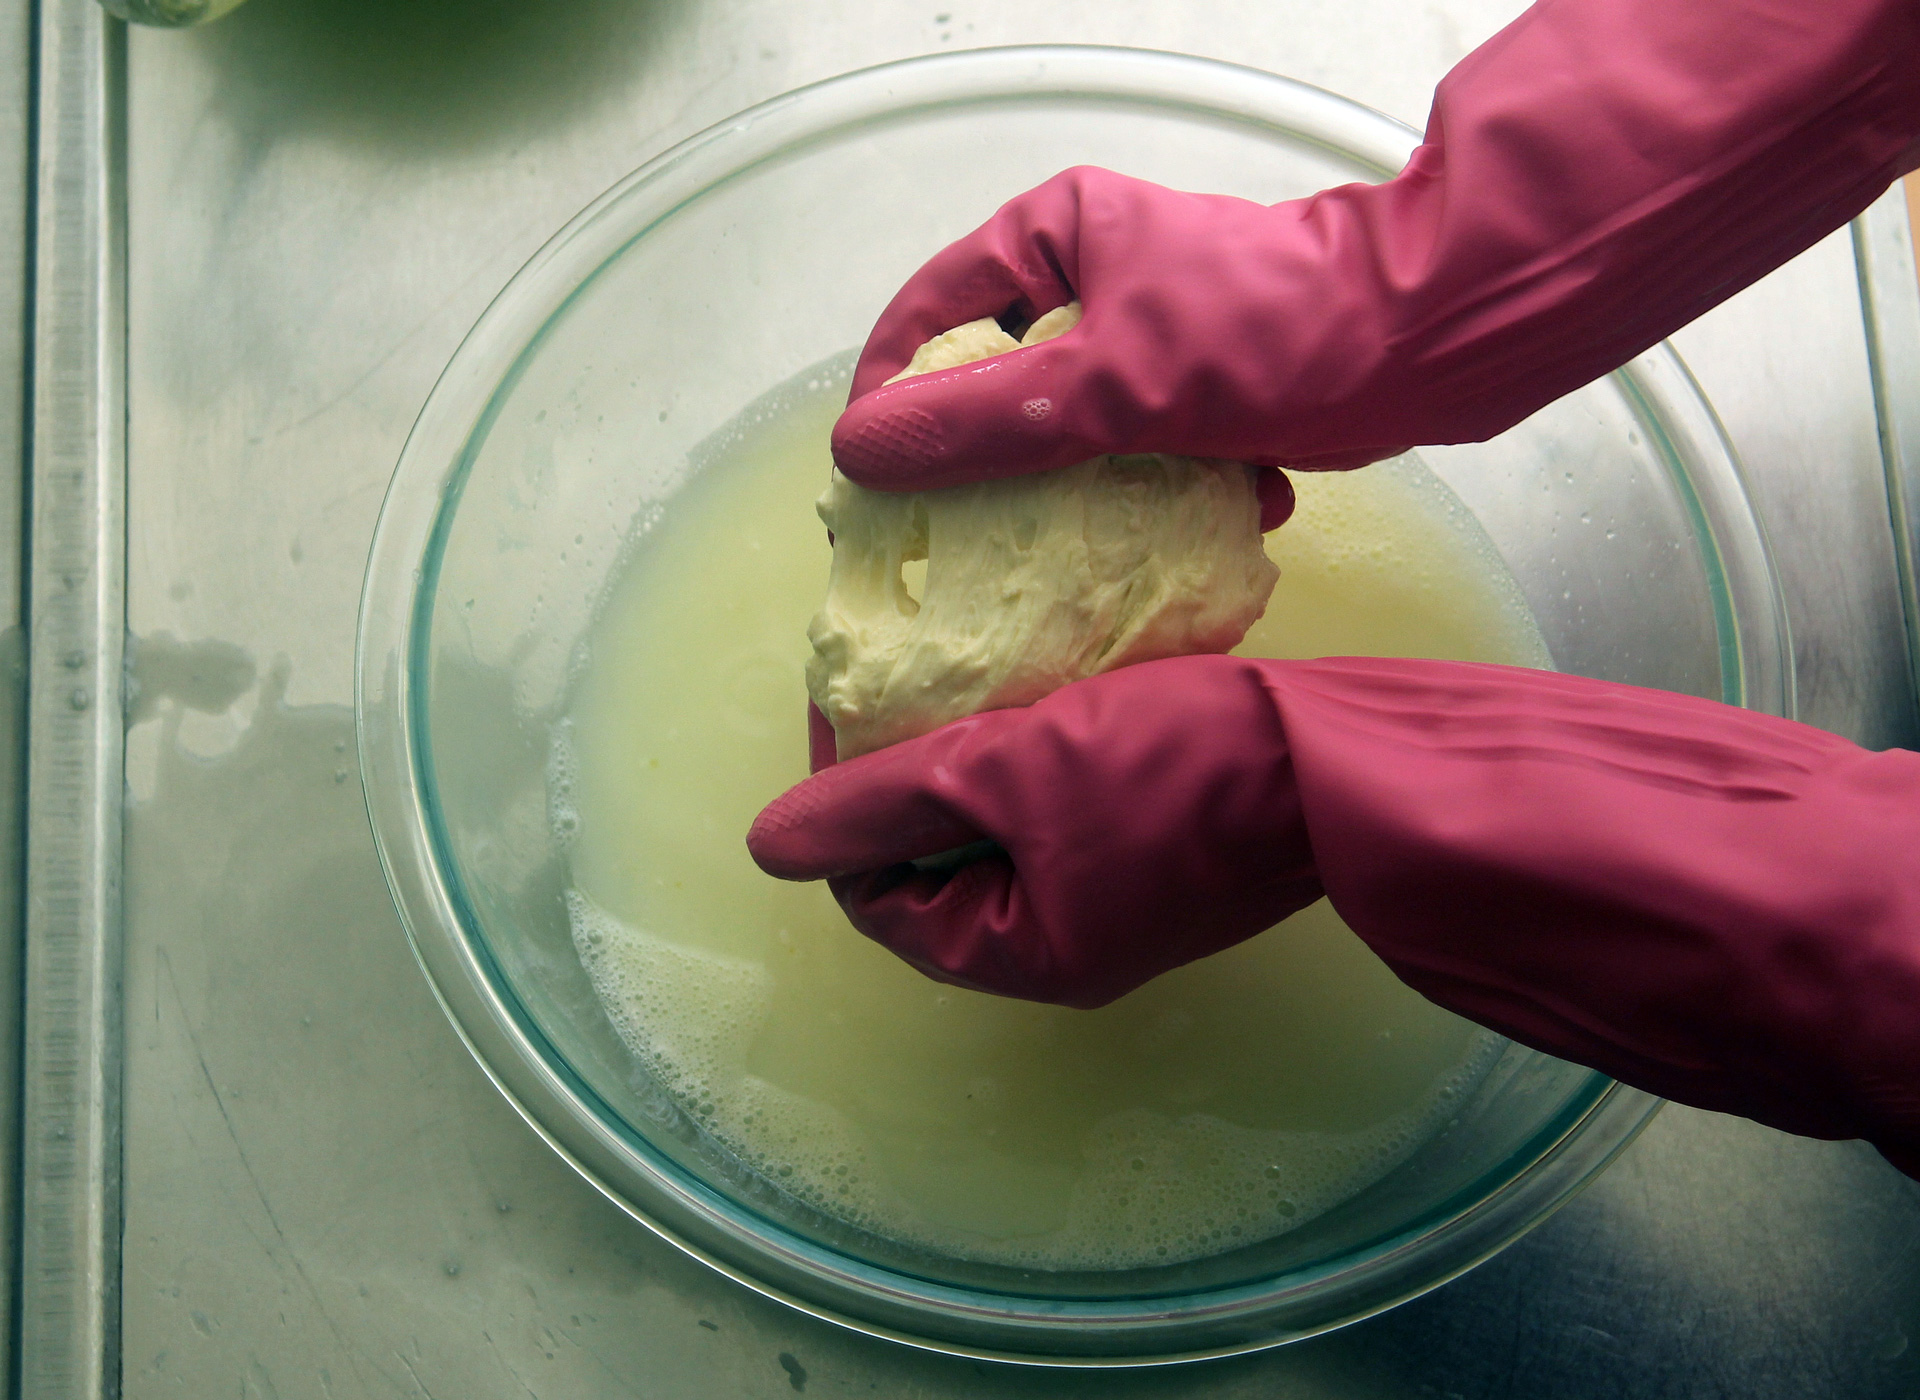
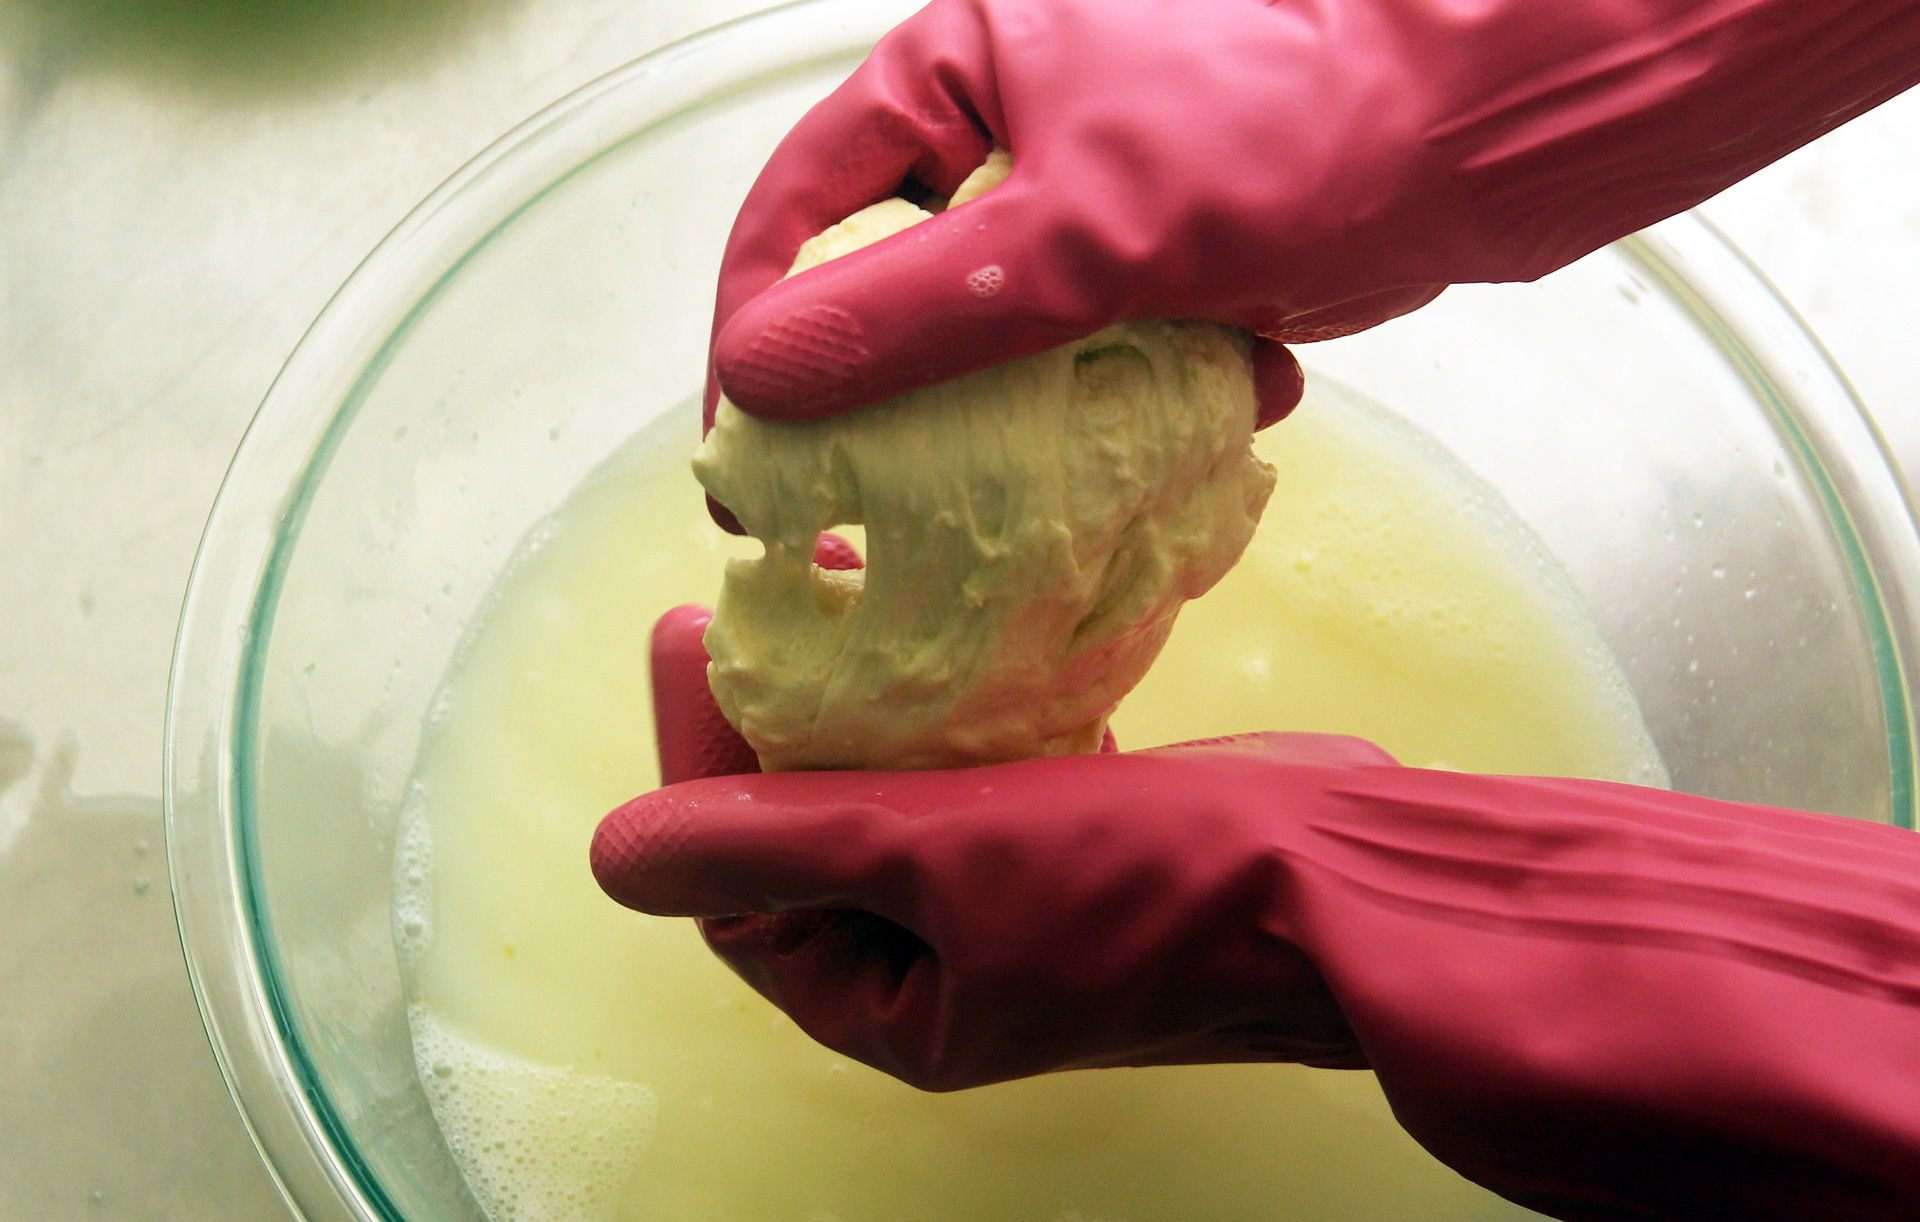
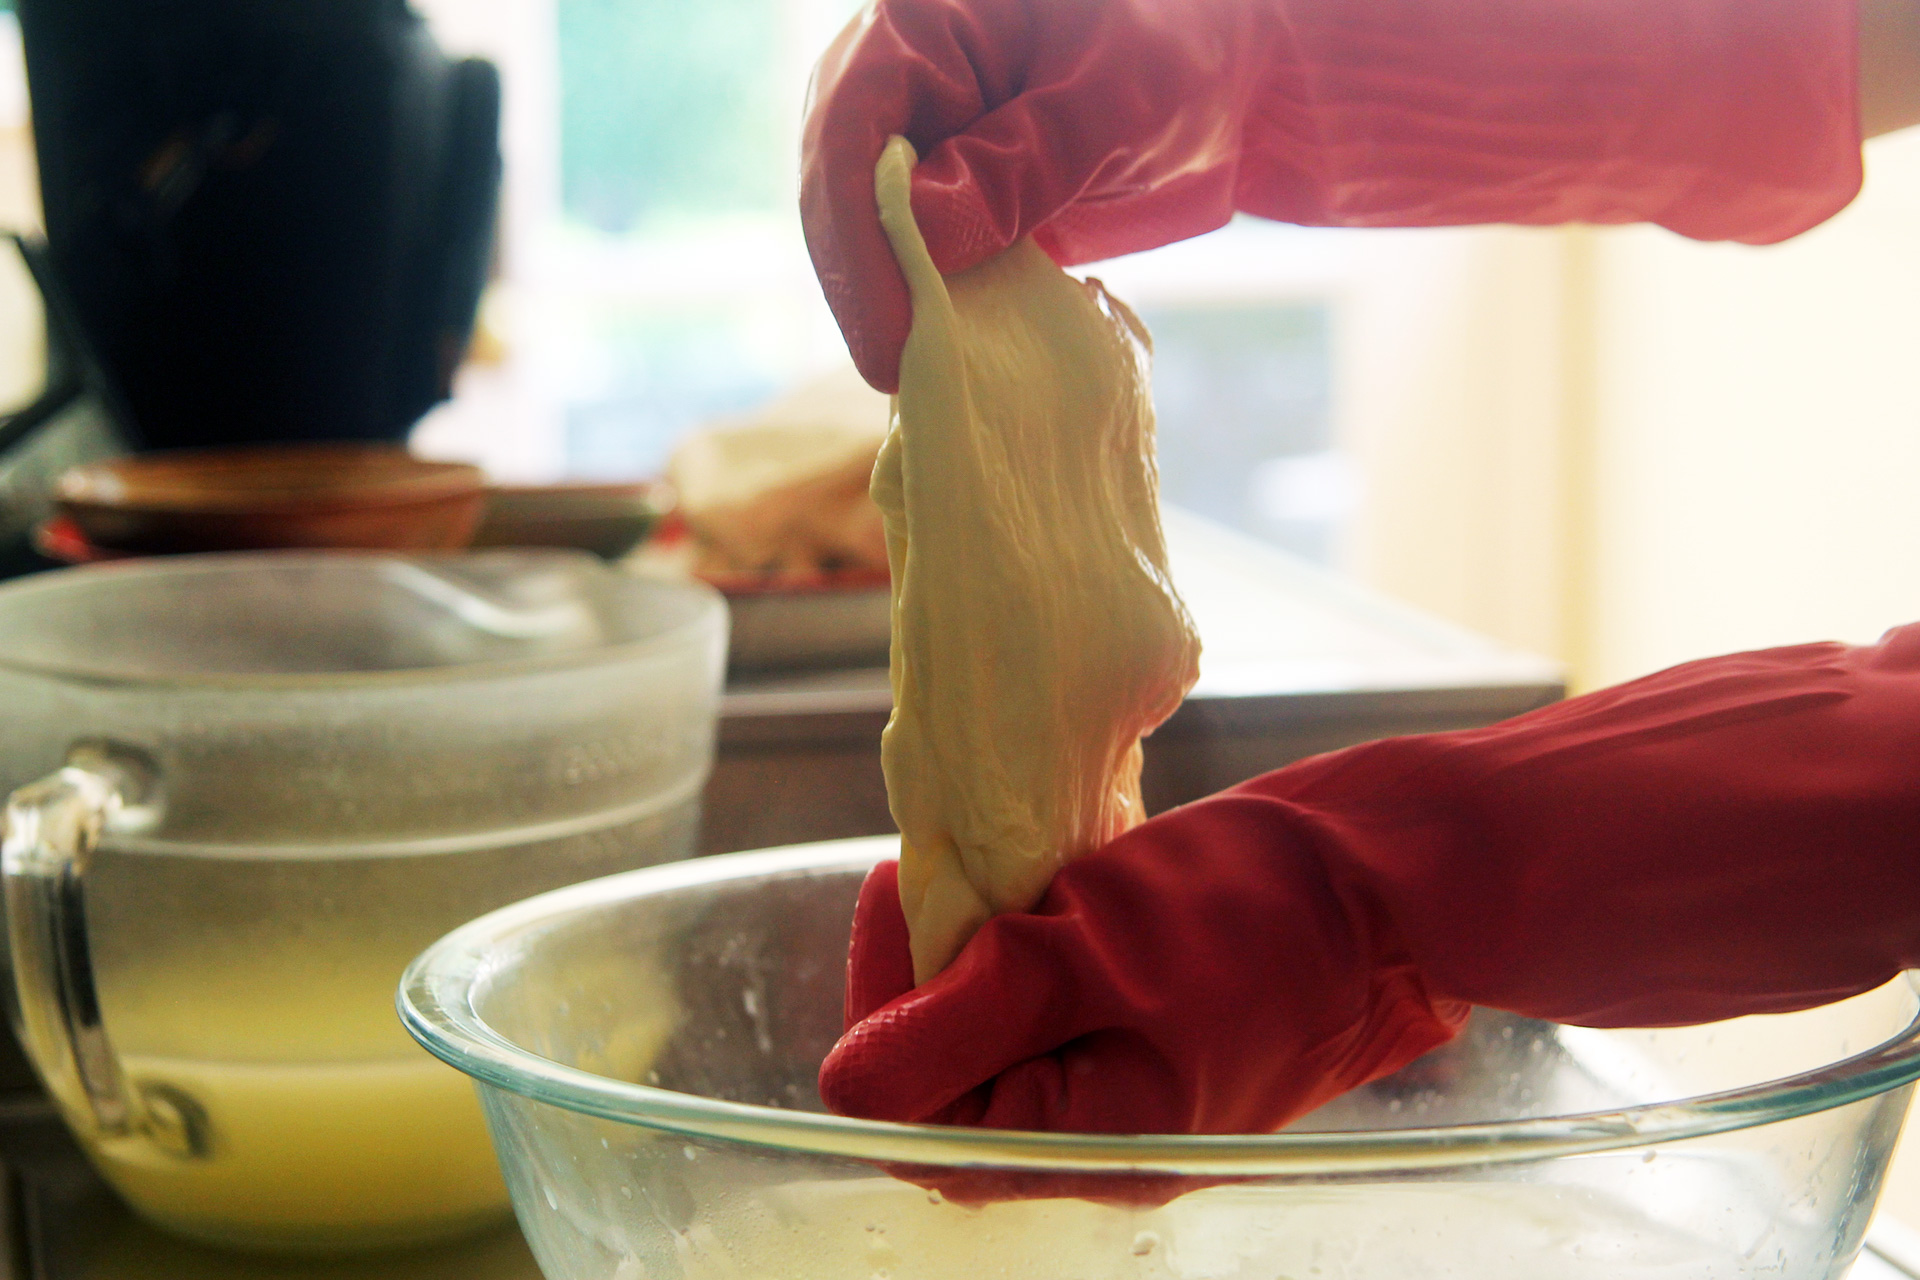
There was a time when I swore off making fresh mozzarella. In a previous job, I worked on developing a recipe for the stuff and things did not go smoothly. It took weeks and weeks of testing, and I was still unable to write a recipe that worked perfectly, each and every time. Other cheeses were easier to manage, but not mozzarella.

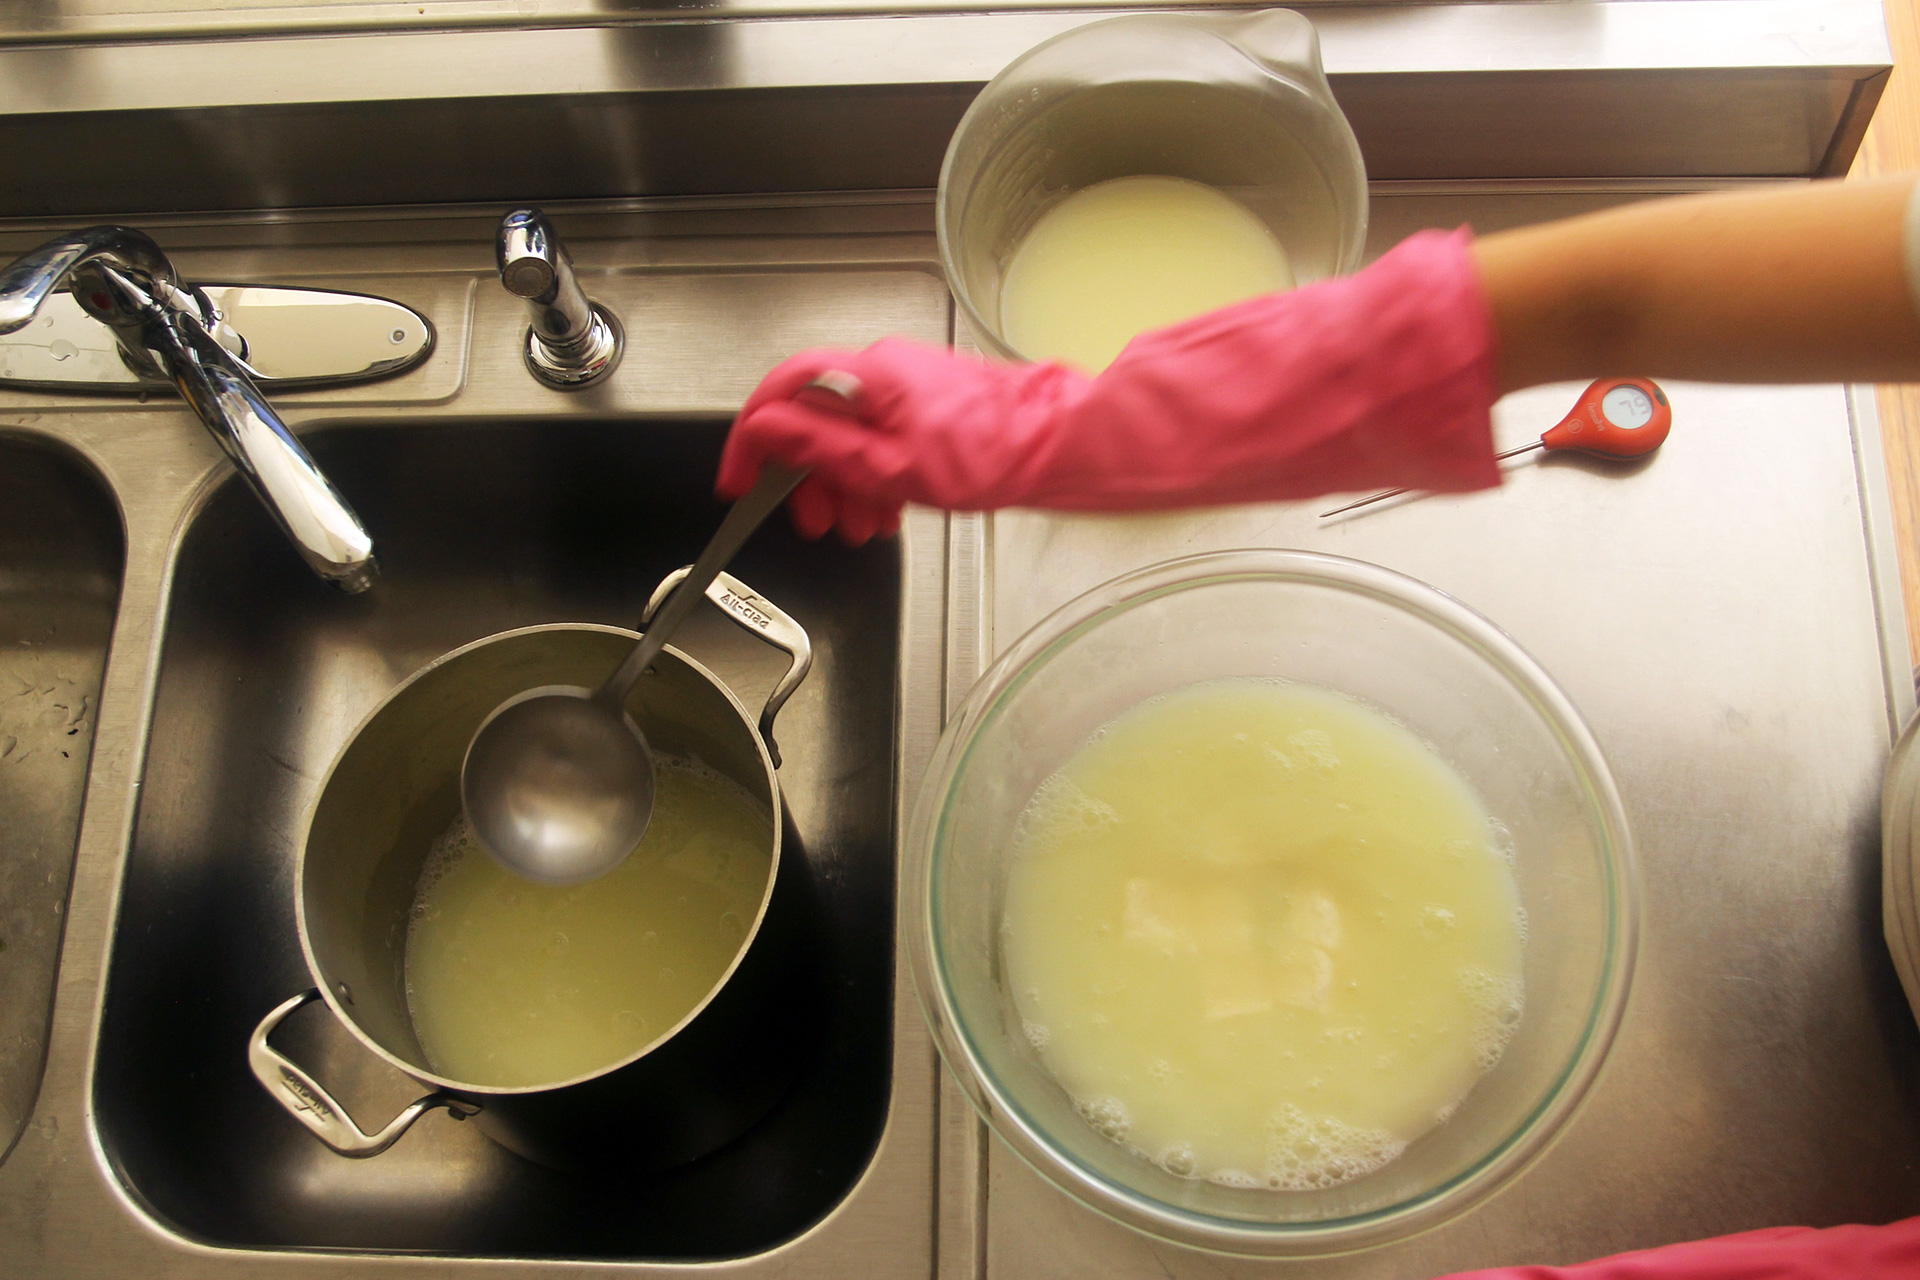
Why? It really comes down to the milk. More than any other fresh cheese, mozzarella is highly dependent on how and when milk was procured, pasteurized, and opened. Fresher milks curdle and stretch differently than those that have been on the shelf longer. Non-homogenized milks behave differently from homogenized. Depending on the temperature at which the milk was pasteurized, it may not form stretchable curds at all. Given all of these factors, plus regular human error, it is basically impossible to write a recipe for the absolute perfect mozzarella that works every time.

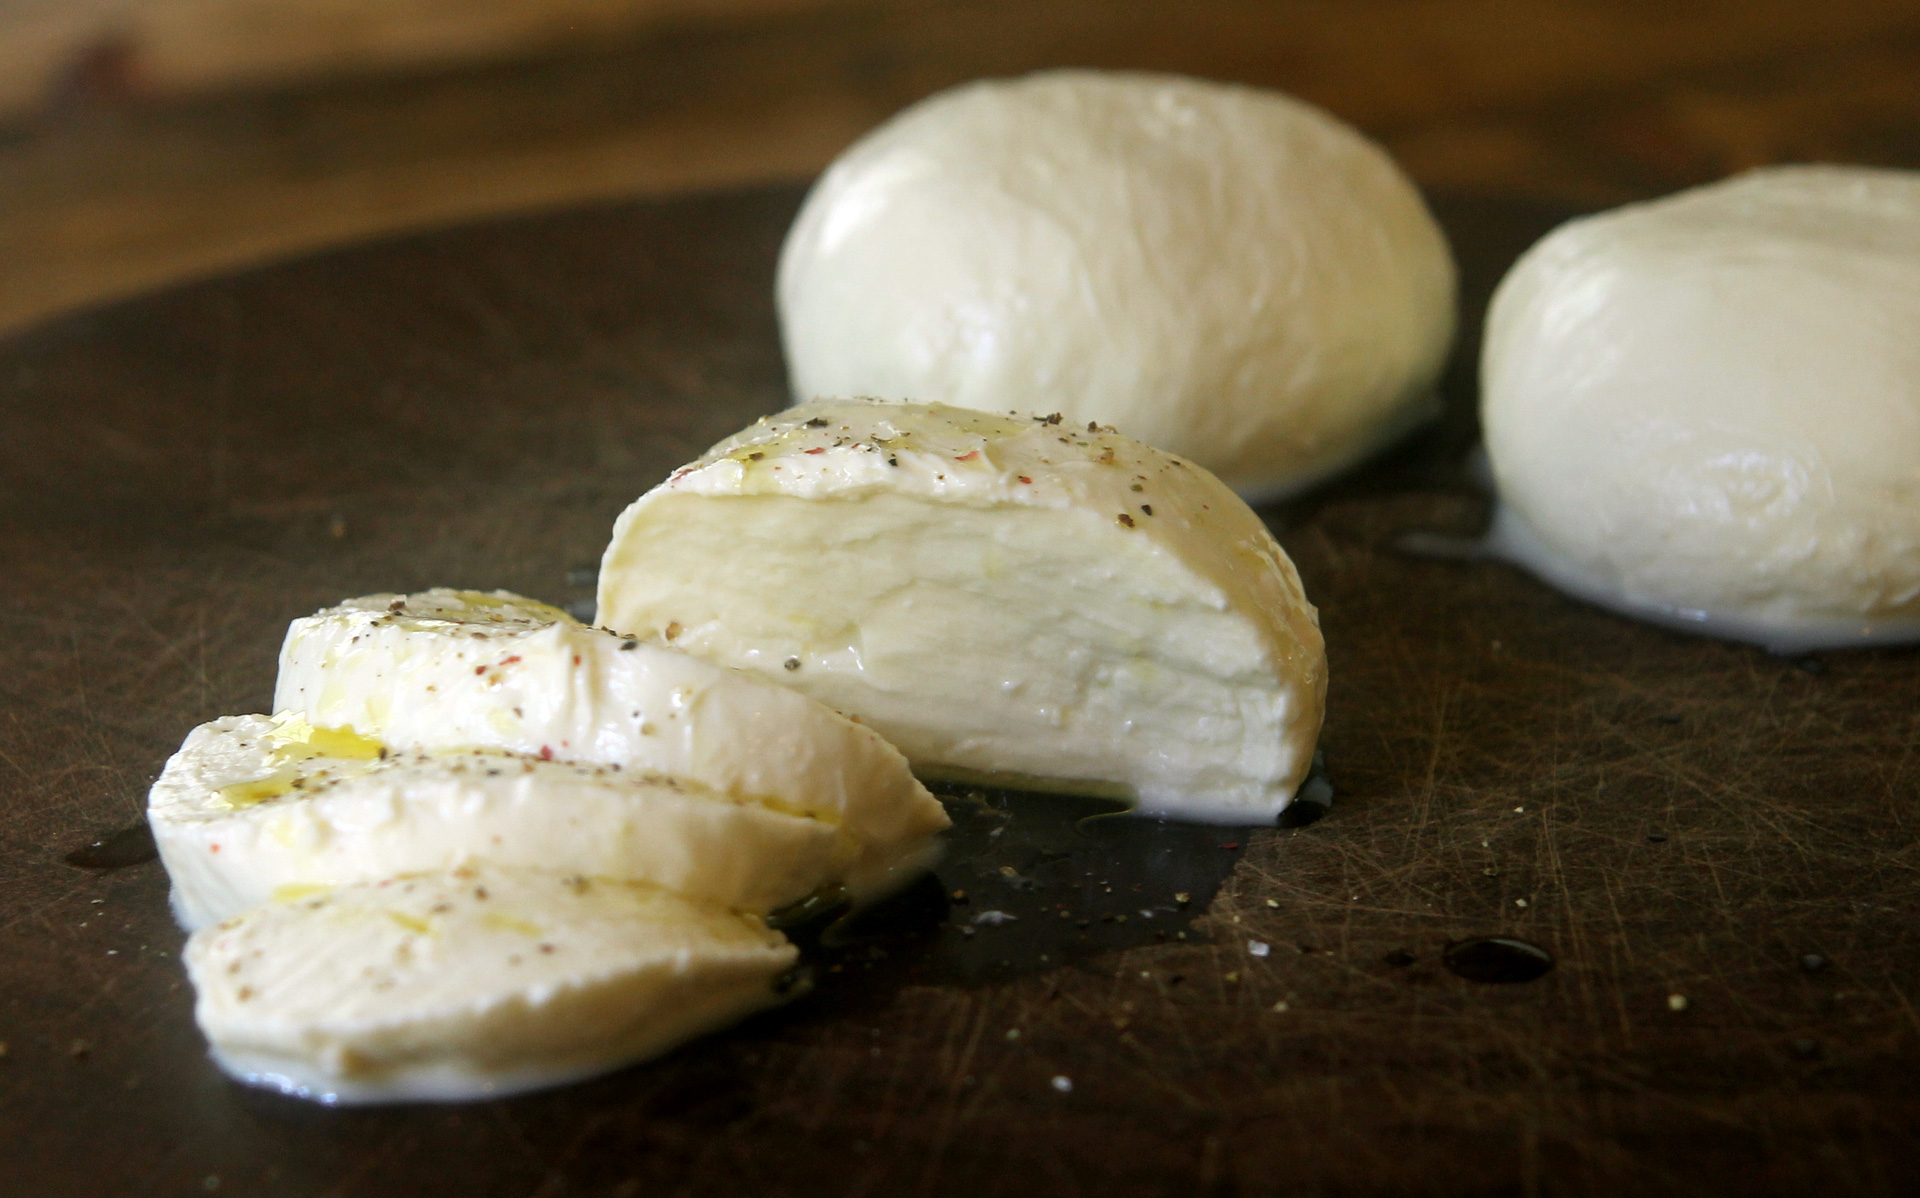
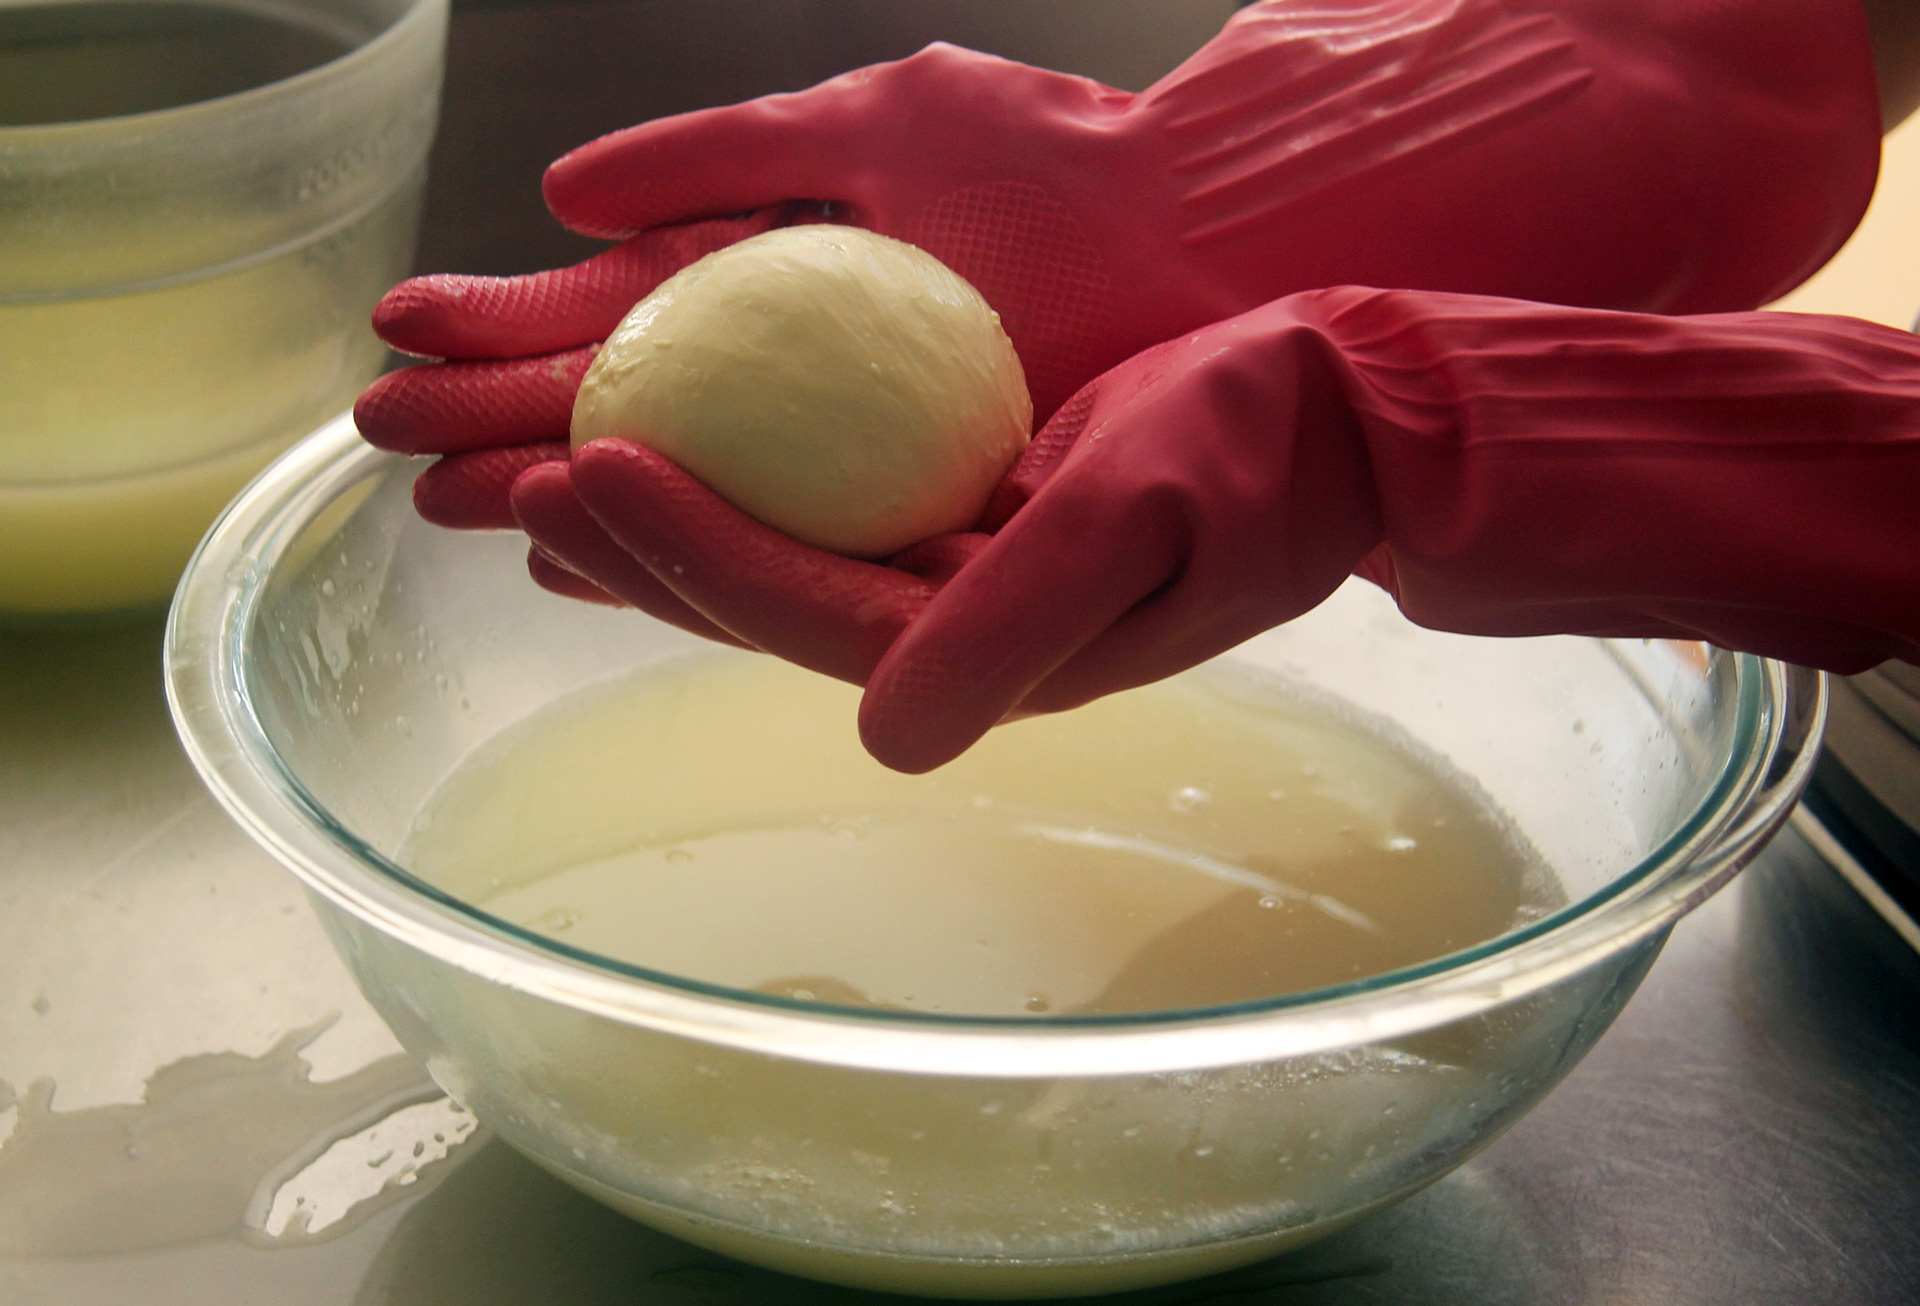
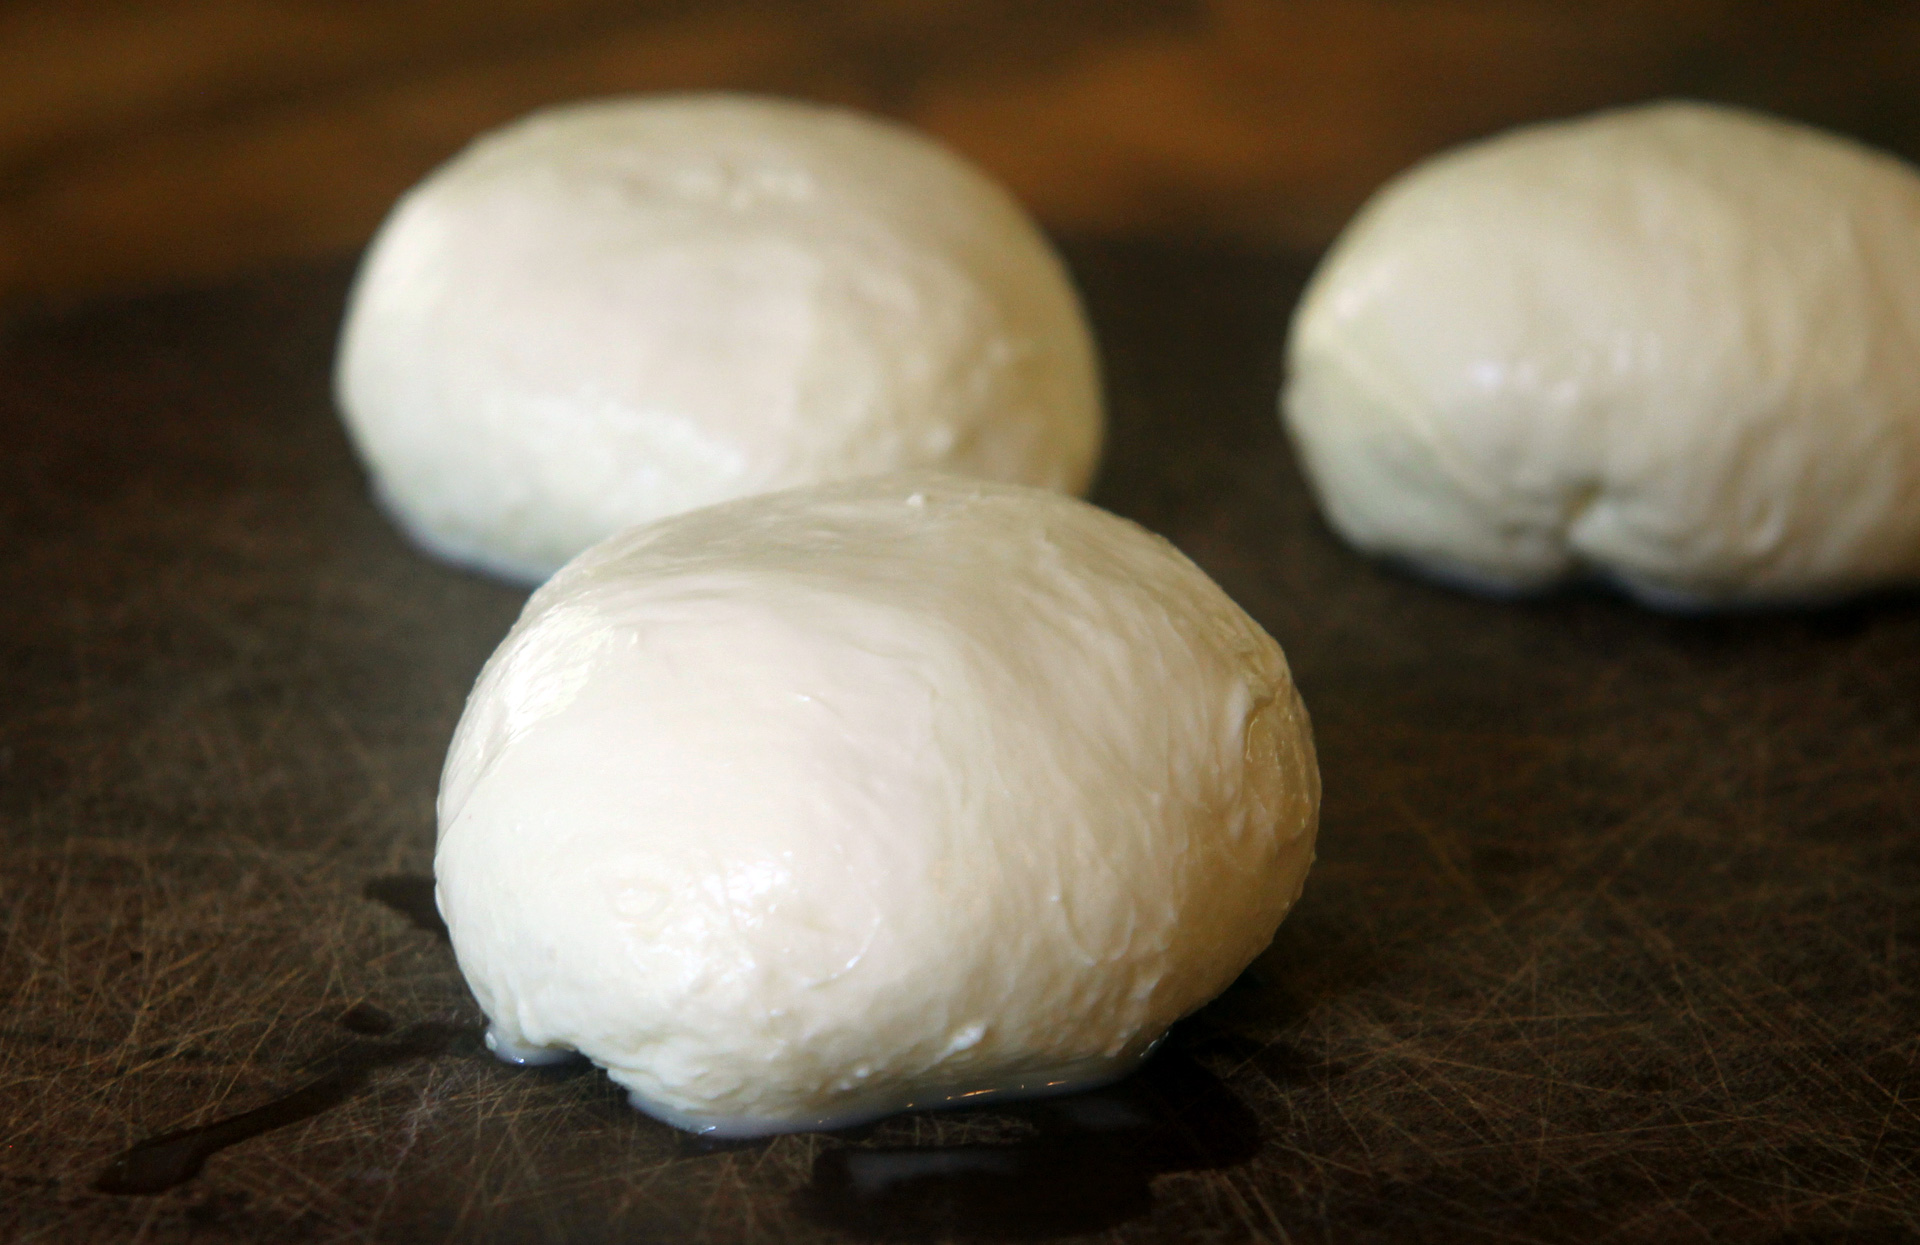
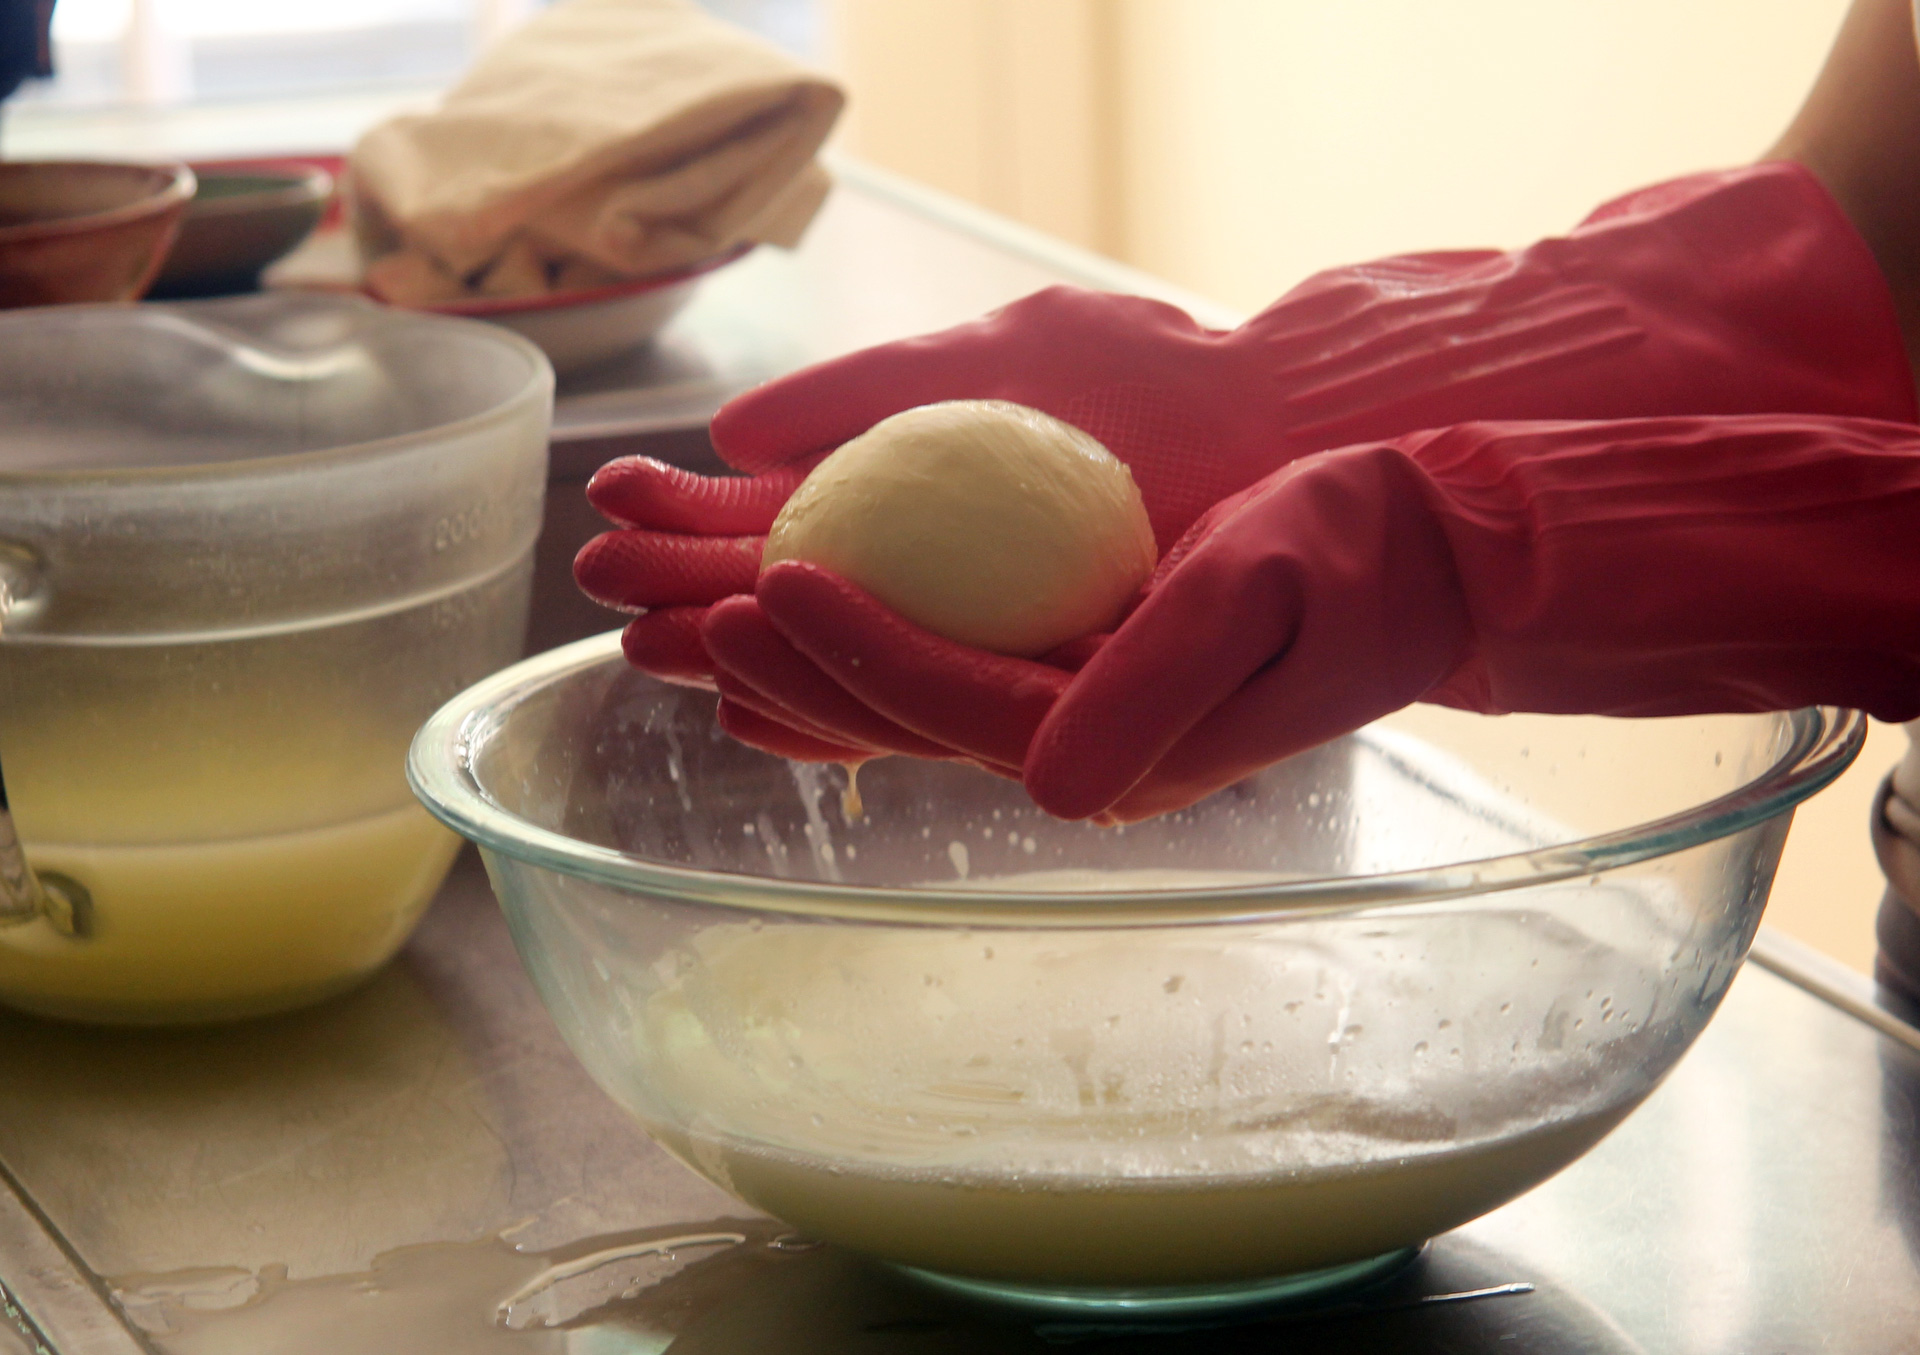
So what is this thing posted at the bottom of the page? It’s written as a recipe, but consider it a guide instead. If you make smart shopping decisions, you will almost certainly end up with mozzarella in the end. It may be the best mozzarella you’ve ever eaten, or it may not. How do you make great cheese? Practice. Try making mozzarella a couple of times a month. Try out different milks and slightly different temperatures. Practice your stretching techniques. You’ll wind up with lots of tasty snacks and, eventually, some of the best cheese ever.

Make sure to purchase milk that hasn’t been pasteurized above 170°F. You will also need rennet (either animal or microbial), citric acid, and salt (not pictured).
Make sure to purchase milk that hasn’t been pasteurized above 170°F. You will also need rennet (either animal or microbial), citric acid, and salt (not pictured). (Kate Williams)

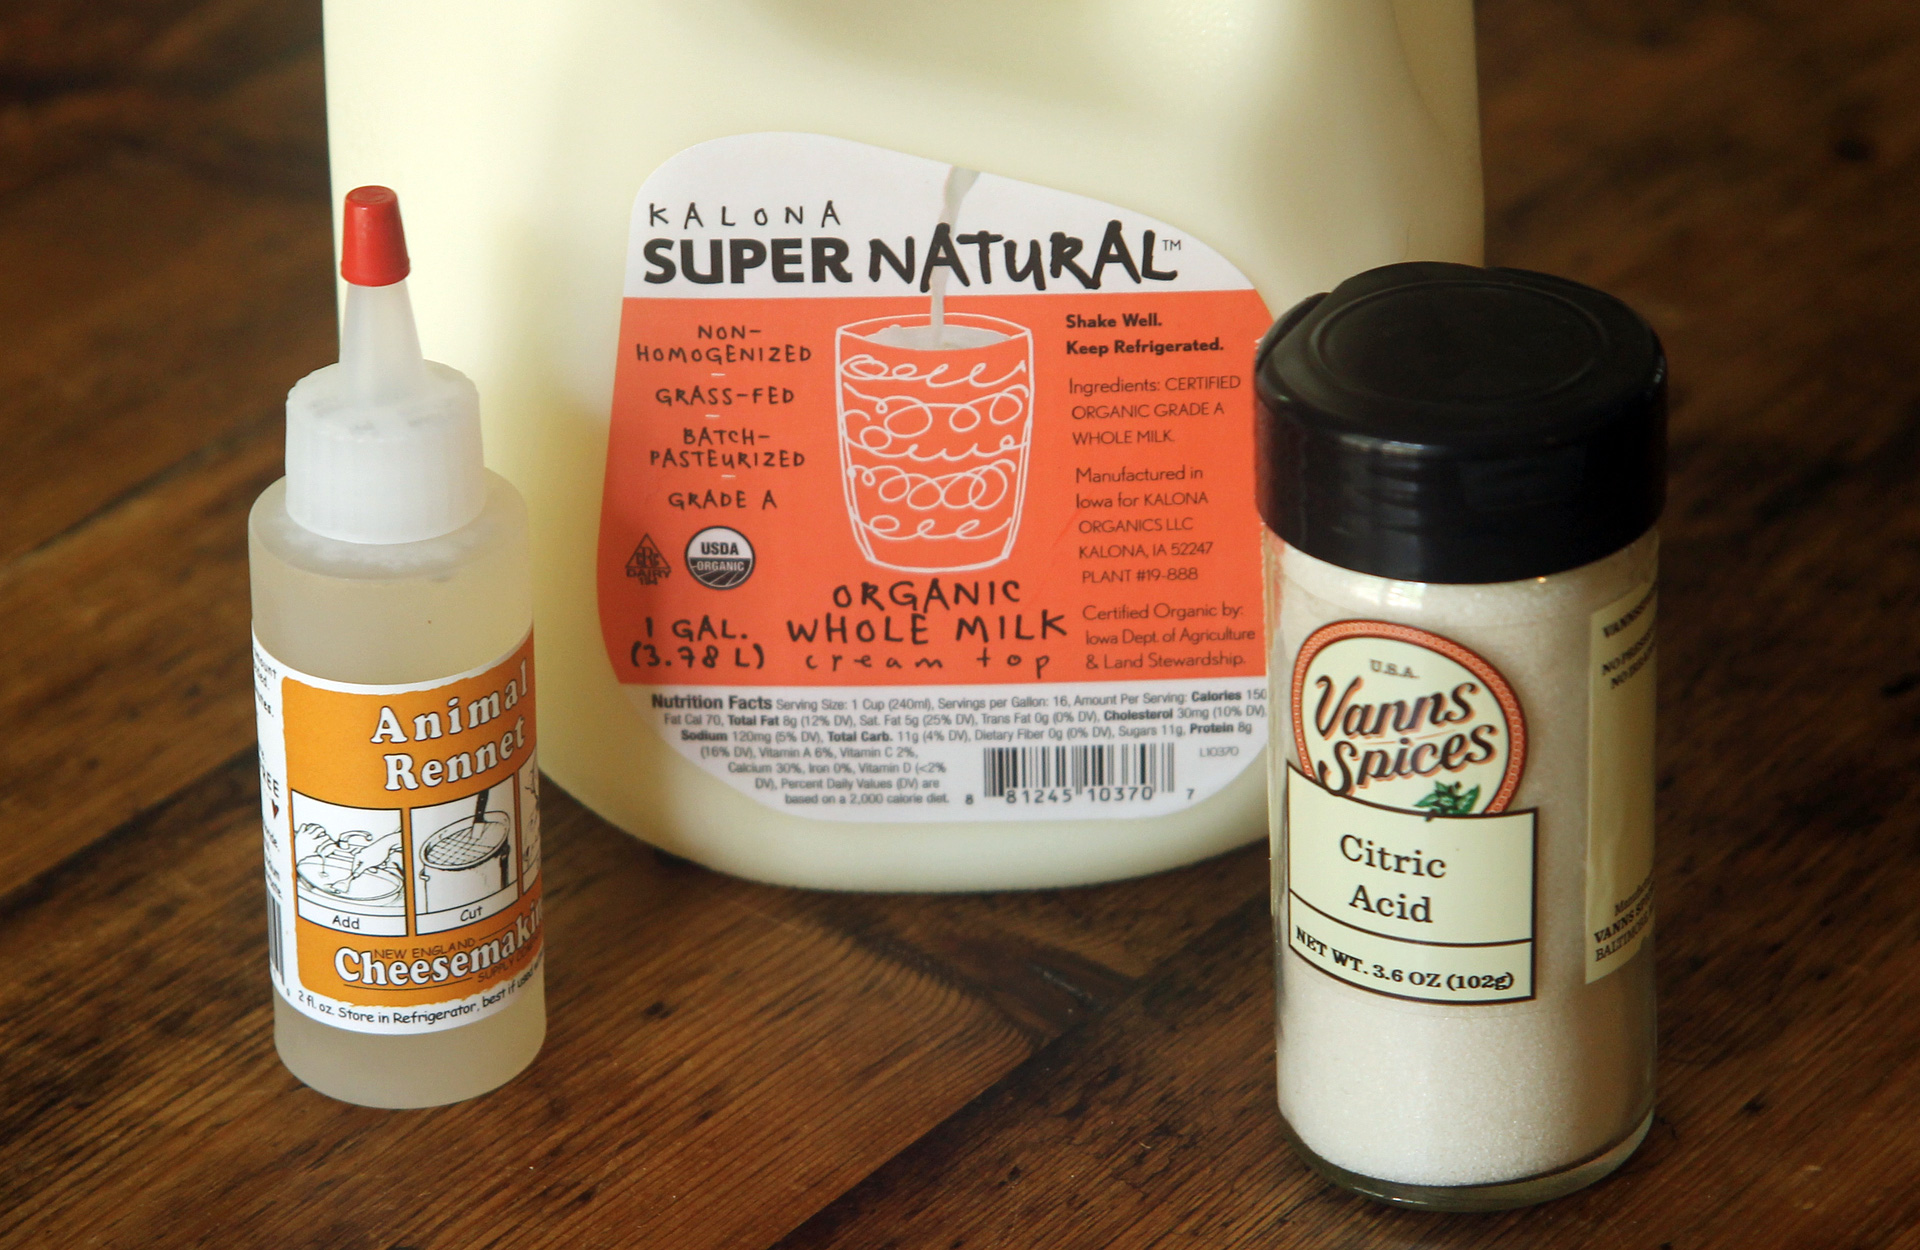
Some tips: It is absolutely critical that you purchase milk that has been pasteurized at temperatures below 170°F. Do not purchase milk that has been ultra-high-temperature pasteurized. Some milks labeled simply “pasteurized” will work, but others may not. Your best bet is to look for milks labeled “batch pasteurized” or “vat pasteurized.” The website New England Cheesemaking has a fairly comprehensive list of milks that should work and the stores where you can find them.

Purchase fresh liquid rennet and store it in the refrigerator. Don’t buy junket rennet. Both animal and vegan microbial rennets will work in this recipe. I’ve developed it using animal rennet, so if you choose to go the microbial route, you may need to fiddle with amounts. Check the label; it should tell you an approximate quantity to use.

Sponsored

When you’re heating the curd, go slow. The higher the temperature the curd reaches, the stiffer the final cheese will be. When it doubt, turn down the heat.

Keep your stretching station organized and wear good, solid rubber gloves. This is what my set-up looks like:

Clockwise, from left: Hot whey, room temperature whey, and mozzarella curds covered in hot whey.
Clockwise, from left: Hot whey, room temperature whey, and mozzarella curds covered in hot whey. (Sean Itrich)

If you’re a normal human, you will likely spill whey all over the counter, so keep towels nearby.

Finally, as you’re stretching and forming the cheese, let gravity do most of the work. Don’t go crazy and knead and pull at the curds. You want to manipulate the curds as little as possible in order to make tender, soft cheese. The curds should basically stretch on its own, with just a little bit of help from your hands.

Now go forth and cheese-make! You can do it!

Homemade fresh mozzarella with olive oil and freshly ground pepper.
Homemade fresh mozzarella with olive oil and freshly ground pepper. (Kate Williams)

Recipe: Homemade Fresh Mozzarella

Makes 3 rounds, each about 6 ounces

Sponsored

Notes: It is crucial that you use high-quality milk in this recipe. Ultra-high-temperature pasteurized milk (labeled UHT) will not work. Your best bet is to use milk that has been batch pasteurized at a low temperature. Non-homogenized milks are even better. Many organic milks are UHT, so you may need to look for a non-organic option. You can use animal or vegan microbial rennet in this recipe; both are available online. You will also need a good digital thermometer and a pair (or two) of rubber kitchen gloves for this recipe.

    Ingredients:
  • 1 gallon whole milk, not UHT pasteurized, and preferably batch pasteurized and non-homogenized (see note)
  • 1 ½ teaspoons citric acid
  • ¼ teaspoon rennet, dissolved in 2 tablespoons water
  • 1 tablespoon kosher salt
    Instructions:
  1. Place a colander in a large bowl.
  2. Pour the milk into a Dutch oven or other large, heavy bottomed pot. Sprinkle the citric acid evenly over the surface of the milk. Stir well to fully dissolve the citric acid. Place the pot over medium-low heat and, stirring occasionally with a wooden spoon, slowly bring the milk to 88°F. It should take 5 to 10 minutes for the milk to heat up; be patient.
  3. Remove the pot from the heat and stir in the rennet-water solution. Keep stirring for 30 seconds and then remove the spoon. Cover the pot and let the mixture sit, off the heat, for 5 minutes.
  4. Remove the lid and check on the curd. It should have formed a solid mass that is the texture of a soft panna cotta. Stick a butter knife into the curd and press it very gently against the curd. If you see a “clean break” between the curds and a clear whey, you’re ready to move on to the next step. If the knife cannot cleanly cut into the curds and/or if you see milky whey instead, re-cover the pot and let it rest for another 2 minutes. Repeat the “clean break” test. If necessary, let the curd rest for another 2 minutes.
  5. Cutting the curds, again.
    Cutting the curds, again. (Kate Williams)
  6. Once you’ve got a clean break, insert a long, thin spatula or knife into the curd, all the way down to the bottom of the pot. Drag the spatula along the bottom of the pot to slice through the curd in a straight line. Repeat these cuts, parallel to the first one, at 1- to 1 ½-inch intervals. Turn the pot 90°F and cut the curd, again at 1- to 1 ½-inch intervals, perpendicular to the first cuts. You should have a grid of 1- to 1 ½-inch cubes.
  7. Slowly heat the curds and the whey until the whey reaches 105°F. Those blobs of fat are okay; this milk is non-homogenized so some separation is natural.
    Slowly heat the curds and the whey until the whey reaches 105°F. Those blobs of fat are okay; this milk is non-homogenized so some separation is natural. (Kate Williams)
  8. Place the pot over medium-low heat and begin to slowly bring the whey to 105°F. For the first minute or so, occasionally stir the curds to break them up into large blocks. After the first minute, stop stirring but occasionally twist the pot to make sure the curds and whey are heating evenly. This process should take 5 to 10 minutes. Be sure to check the temperature of the whey and not the curds, and to take the temperature in more than one place in the pot.
  9. The cooked curds will glob together a bit and will be slightly stretchy.
    The cooked curds will glob together a bit and will be slightly stretchy. (Kate Williams)
  10. Use a slotted spoon to transfer the curds to the prepared colander. They should be slightly stretchy and sticky. Leave all of the whey in the pot.
  11. Gently press on the curds to encourage them to expel whey and form a solid mass.
    Gently press on the curds to encourage them to expel whey and form a solid mass. (Kate Williams)
  12. Press very gently on the curds to form a large mass of curd. Additional whey will continue to come out of the curds. You can encourage this by continuing to press on the curds. Let the curds drain, occasionally pressing on them, until they are no longer dripping whey, 10 to 15 minutes. Transfer the curds to a cutting board and pour all of the collected whey in the bowl back into the Dutch oven.
  13. (If you’d like to wait and stretch your cheese on another day, you can refrigerate (or freeze) the curds and whey (in separate containers) at this point. Bring everything to room temperature before continuing with the recipe below.)
  14. Cut the set curd into a grid of 1- to 1 ½-inch cubes.
    Cut the set curd into a grid of 1- to 1 ½-inch cubes. (Kate Williams)
  15. Slice the curd into 1-inch cubes and then divide the cubes into three portions. Place one third of the curds in a large heatproof bowl.
  16. Stir the salt into the whey until it is fully dissolved. Pour about a third of the seasoned whey into a second large heatproof bowl.
  17. Monitor the temperature of the curds as they heat up.
    Monitor the temperature of the curds as they heat up. (Sean Itrich)
  18. Heat the remaining whey over medium-high heat until it reaches 185 to 190°F. Pour enough of the hot whey to completely cover the curds in the bowl. Let the curds sit in the hot whey, undisturbed, until they reach 135°F in the center. They should be starting to melt into a single mass. Depending on how cold the curds were to begin with, this can take anywhere from 10 seconds to 1 minute.
  19. Beginning to stretch the cheese.
    Beginning to stretch the cheese. (Sean Itrich)
    Gently begin to pull apart your hands.
    Gently begin to pull apart your hands. (Sean Itrich)
    Let gravity do the work.
    Let gravity do the work. (Sean Itrich)
  20. Put on a pair (or two) of rubber kitchen gloves and stick your hands into the hot whey. Grab all of the curds in your hands and pull them out of the whey. Slowly pull your hands apart to gently stretch the curds, but let gravity do most of the work. Plunge the curds back into the hot whey, fold them in half, and repeat the stretching step until the curds are shiny and smooth, about five stretches total.
  21. If you’re having trouble, and the curds are staying dull and/or crumbly, try pouring a little more hot whey on top. Let the curds sit in the hot whey for 30 seconds to heat back up. If they still won’t cooperate, you likely have a milk issue. Crumble the curds and use them like ricotta. Try again next time with a different milk!
  22. As you stretch the cheese, it should begin to turn shiny and smooth.
    As you stretch the cheese, it should begin to turn shiny and smooth. (Sean Itrich)
  23. Now fold the curd over itself until it fits in your palm. Using your dominant hand, form a ring with your thumb and forefinger. Squeeze the curd up through that space to form a taut ball. If necessary, use both hands to continue to stretch the skin tightly around the ball as if you were making a round of bread dough. Place the ball of mozzarella in the bowl of room temperature whey and let it rest and set for 30 minutes.
  24. Shape the curds into a taut round ball and place in the room temperature whey to set.
    Shape the curds into a taut round ball and place in the room temperature whey to set. (Sean Itrich)
  25. Pour the whey from the stretching bowl back into the Dutch oven and bring it back to 185 to 190°F. Repeat the stretching process with the remaining two portions of curd.
  26. Fresh mozzarella.
    Fresh mozzarella. (Kate Williams)
  27. Remove the mozzarella from the whey after 30 minutes; for the best results, don’t let it sit too long in the whey.
  28. Fresh mozzarella is at its best just after it has set. If you’re planning to eat the cheese that day, you can just keep on a plate it at room temperature until you’re ready to eat. If you need to store it, wrap it tightly in plastic and then place in a storage container. Eat within three days.

lower waypoint
next waypoint
Samosas aren’t from India…Wait, what?Springtime Delight: Rhubarb Puff-Tart PocketsFood Labeling: How to Identify Conventional, Organic and GMO ProduceCheck, Please: How to Pay without looking like a fool or making everyone uncomfortable.We Recreated an It's-It Ice Cream Sandwich at Home — With an Oakland Twist.Josey Baker Bread: Baking for Bros, with Gluten-Free Adventure Bread RecipeBored of Apples and Walnuts? Try Adding Date Charoset to Your Passover Table This YearTaste Test: Store-bought Raw Sauerkrauts are Surprisingly DistinctiveDIY Bone Broth - You Really Should be Making It at HomeBread Flapjacks: Jacques Pépin Cooking At Home